


Contents: General information ↧ Inspection ↧
General information
1. The cardan shaft is a section of pipe through which torque is transmitted from the gearbox (or, on all-wheel drive versions, from the transfer case) to the differential. Cardan joints are installed at both ends of the rear propeller shaft. On the front propeller shaft, the joint is located at the front end (see illustration).
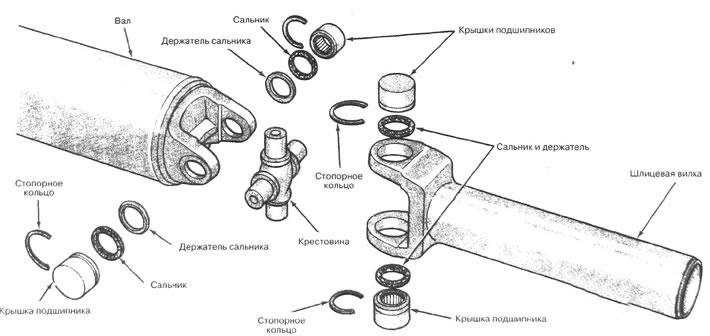
2.1. Details of a typical cardan joint
2. The rear propeller shaft has a splined fork located at the front end. The fork moves horizontally in the extended portion of the gearbox or transfer case housing. The presence of a splined connection allows the cardan shaft to move relative to the gearbox when the vehicle is moving and the suspension elements are moving. The presence of a seal at the fork connection prevents oil leakage and dirt from entering the gearbox. If there are signs of transmission oil leakage at the front of the propeller shaft, it is necessary to replace the oil seal (see chapter 7A).
3. As a rule, the cardan transmission does not require frequent maintenance and repair. The hinges have factory lubrication, which does not need to be replaced during the entire service life. If the technical condition deteriorates, the joint must be replaced. During the procedure for replacing the joints, the propeller shaft must be removed.
4. Since the cardan shaft is a balanced element, it is important to ensure that no dirt build-up occurs on its surface. Whenever the vehicle is lifted for maintenance, clean and inspect the shaft. Also make sure that the balance weights are securely fastened in their locations. To maintain balance, the removed cardan shaft should be installed without disturbing its original position.
5. Malfunctions in the operation of the cardan transmission are manifested by noise and vibration when the vehicle is moving. Determine the source of the fault during a test run. Refer to the "Troubleshooting" subsection at the beginning of this manual. If signs of malfunction of the cardan transmission components are detected, inspect it.
Inspection
6. Raise the rear of the vehicle and support it with stands. Place chocks under the front wheels to prevent the vehicle from rolling off the jack stands.
7. While under the vehicle, inspect the driveshaft. Make sure there are no dents or cracks in the shaft tubes. If the above defects are present, the cardan shaft should be replaced.
8. Check for signs of oil leakage at the front and rear ends of the shaft. Traces of leakage in the area where the shaft connects to the gearbox or transfer case indicate failure of the gearbox/transfer case seal (see chapter 7). Signs of oil leakage in the area where the shaft connects to the differential indicate failure of the main gear shaft seal (see subsection 9).
9. While under the vehicle, have an assistant rotate the rear wheel to cause the drive shafts to rotate. Make sure that the cardan joints do not make clicking or noise, and do not stick when the shaft rotates.
10. The condition of the joints can also be assessed without turning the shaft in the manner described. Grasp the cardan shaft parts on either side of the joint with your hands and try to turn them in opposite directions. Movement in the joint during inspection indicates wear.
The condition of the joints is also assessed by trying to lift the shaft.
11. At the end of the check, make sure that the bolts located at the ends of the cardan transmission are securely tightened.
12. On all-wheel drive models, the front propeller shaft should be inspected using the method described above. Inspect the splined fork and surrounding area for signs of oil leakage. Such signs indicate that the fork is out of order.
13. Check for signs of oil leakage in the area where the driveshafts connect to the transfer case, as well as to the front differential. The presence of such signs indicates wear of the seals.
14. In addition, make sure that there is no excessive play in the constant velocity joints (CV joints) of the front drive shafts. Check for signs of grease leakage in the area adjacent to the drive shafts. To do this, it is necessary to inspect the CV joint boots at both ends of the drive shaft. The presence of signs of leakage in the area of the drive shaft flange indicates failure of its seal. The presence of grease on the outside of the rubber boot indicates that it is torn. The maintenance procedures for these elements are described in the relevant subsections of this chapter.