ChevyMan.ru
Mazda Mitsubishi Toyota Land Rover Honda Kia Nissan
English Русский
Български
Беларускі
Український
Српски
Hrvatski
Română
Polski
Slovenský
Magyar
|
Articles | Sitemap | Contacts |


Home   Aveo   Captiva   Cruze   Lacetti   Lanos   Niva   Tahoe   Others  
Captiva 1 (2006-2018)
  • Home
  • Captiva
  • 1 (2006-2018)
  • Transmission
  • Automatic gearbox - repair
  • B5 Brake and Rear Crankcase Assembly

B5 Brake and Rear Crankcase Assembly (Chevrolet Captiva 1)

            0

Necessary equipment


  • J-23327 Clutch Spring Compressor
  • J-23456 Clutch and Booster Pack Remover
  • J-45184 Differential Bearing Race Installer
  • J-28585 Snap Ring Remover

1. Install the B5 brake piston.
  • Lubricate the new sealing rings with automatic transmission fluid and install them on the piston.
  • Lubricate the inner surface of the rear crankcase with automatic transmission fluid.
  • Press the piston into the rear crankcase. Be careful not to damage the sealing rings.
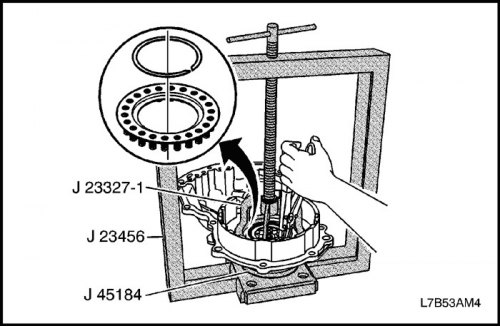
Press the piston into the rear crankcase. Be careful not to damage the sealing rings.


Important: Be careful not to bend the return spring assembly.


2. Install the return spring assembly B5.
  • Install the return spring assembly onto the B5 brake piston.
  • Install J-45184 to center of J-23456.
  • Install the transaxle housing cover with final drive assembly onto J-45184.
  • Using J-23327-1, which is the bridge piece for J-23327, compress the return spring assembly.
  • Use circlip pliers to install the circlip.
  • Remove all tools.

Remove all tools.


3. Install the flange, plate, disc and elastic disc.


  • Install the elastic disc.

Important: Make sure the elastic disc is oriented correctly.

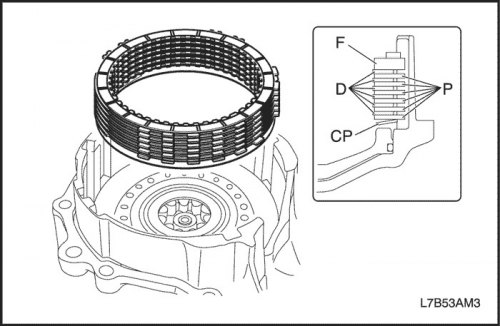
  • Install the flange, plates and discs as shown in the figure.

Important: Make sure that the number and order of installation of plates and disks is correct.

  • Order: F - D - P - D - P - D - P - D - P - D - P - D - P - UD

Clutch and brake
Flange (F)
Plate (P)
Disk (D)
Elastic disk (ED)
Brake B5
1
6
6
1


Remove all tools.

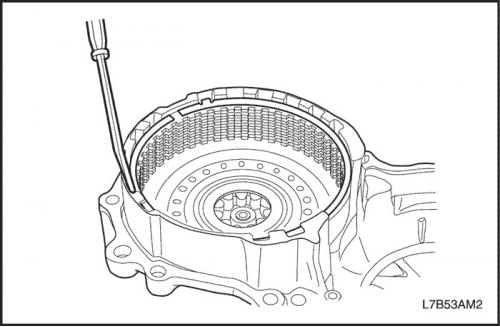
  • Install the retaining ring into the groove using a screwdriver.
Install the retaining ring into the groove using a screwdriver.


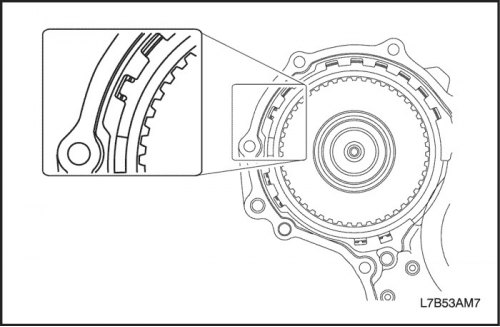
Important: Make sure the snap ring is oriented correctly as shown in the figure.

Important: Make sure the snap ring is oriented correctly as shown in the figure.


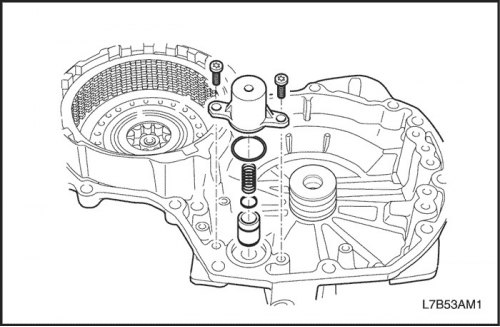
4. Install the forward clutch accumulator (C1).


  • Lubricate the new sealing ring with automatic transmission fluid and install the accumulator piston.
  • Install the piston and battery spring into the battery cover.
  • Lubricate the new sealing ring with automatic transmission fluid and install the battery cover.
  • Install the battery cover onto the rear crankcase and tighten the 2 Torx bolts.

Tighten

Tighten the forward clutch battery mounting bolt (C1) to 10 Nm (89 lbs.in).
Tighten the forward clutch battery mounting bolt (C1) to 10 Nm (89 lbs.in).


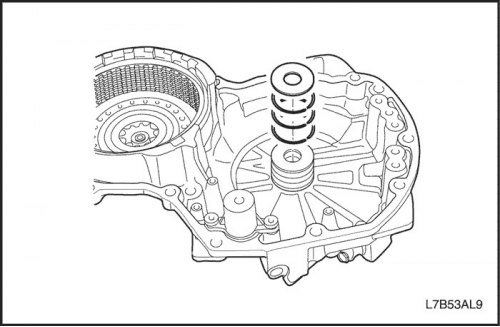
5. Install the sealing ring.
  • Lubricate 3 new sealing rings with automatic transmission fluid and install them in the rear crankcase.
  • Install the thrust bearing race into the rear crankcase.
Install the thrust bearing race into the rear crankcase.


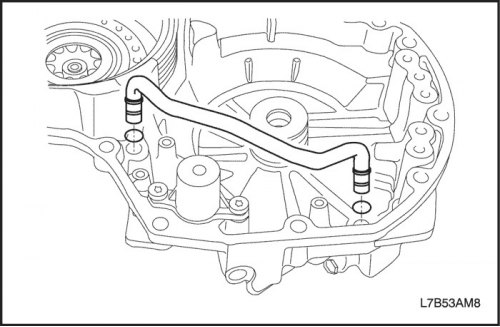
6. Install the feed pipe to the underdrive clutch (C3).
  • Lubricate new sealing rings with automatic transmission fluid and install them in the feed pipe to the downshift clutch (C3).
Lubricate new sealing rings with automatic transmission fluid and install them in the feed pipe to…

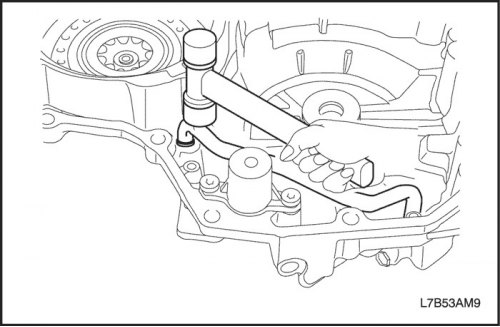
  • Using a plastic hammer, install the C3 supply pipe into the rear crankcase.

Important: Care must be taken not to damage the O-rings and the C3 supply pipe.
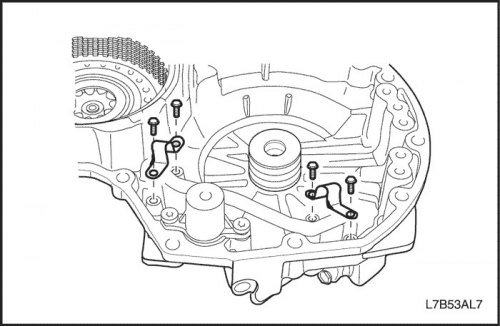


Important: Care must be taken not to damage the O-rings and the C3 supply pipe.

  • Install 2 clamps and tighten 4 bolts.

Tighten

Tighten the underdrive clutch mounting bolt to 7 Nm (62 lbs.in).
Tighten the underdrive clutch mounting bolt to 7 Nm (62 lbs.in).


Caution: When working with compressed air, wear protective glasses to prevent eye injury.


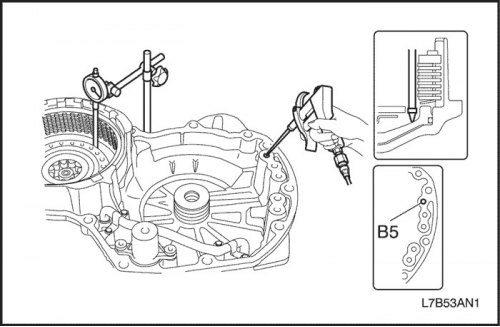
7. Check the stroke of the B5 brake piston.
  • Install the indicator as shown in the figure.
  • By supplying compressed air (4 kg/cm?) to the lubrication channel as shown in the figure, measure the piston stroke and make sure that the piston moves smoothly.
  • Piston: 2.34-2.70 mm (0.092-0.106 inches)

If the piston stroke is not within the norm, select another flange.
  • Flange thickness type: 5.0mm (0.197 inches), 5.1 mm (0.201 inches), 5.2 mm (0.205 inches), 5.3 mm (0.209 inches), 5.5 mm (0.217 inches)

The article was checked: Vladimir Romannikov
This article is available at russian, bulgarian, belarusian, ukrainian, serbian, croatian, romanian, polish, slovak, hungarian

Share information:

Previous articles
Captiva 1: Automatic gearbox - repair
Next articles

Brake Test B5
Disassembling the B5 brake
Disassembling the rear crankcase
Assembling the 2nd gear overrun brake hub (B1), 2nd gear brake hub (B2) and overrunning clutch No. 1 (F1)
Disassembling the 2nd gear inertia brake hub (B1), 2nd gear brake hub (B2) and overrunning clutch No. 1 (F1)
Disassembling the forward clutch (C1) and direct drive (C2)
Checking the forward clutch (C1) and direct clutch (C2)
Assembly of the forward clutch (C1) and direct drive (C2)
Checking the planetary gear assembly
Disassembling the epicyclic gear of the front planetary row


See similar articles on the topic of Chevrolet cars:
Rear Drum Brake Specifications Chevrolet Aveo T250 (2006-2011)
Replacing the brake pads of the rear wheel brake mechanism Chevrolet Cruze 1 (2008-2016)
Replacement of protective covers and sealing rings of pistons of brake cylinders of front and rear wheels Chevrolet Lacetti 1 (2002-2009)
Replacing the brake pads of the rear wheels Chevrolet Lanos T150 (2002-2009)
Rear brake device Chevrolet Niva 1 (2002-2016)
Typical rear brake arrangement Chevrolet Tahoe 1 (1992-2000)
Checking and replacing rear brake pads Chevrolet Lumina 1 (1989-1994)
Link in different formats to this page


Visitor comments

No comments yet


How much will 26 + 27 =


Captiva 1 (2006-2018) 
  • Manual
  • Before leaving
  • Keys, doors and windows
  • Seats, protection systems
  • Instruments and controls
  • Lighting system
  • Information and entertainment
  • Navigation system
  • Climate control
  • Driving a car
  • Car care
  • Maintenance
  • Engine 2.0 l (diesel)
  • Engine device
  • Troubleshooting
  • Engine repair
  • Cooling system
  • Engine electrical equipment
  • Control and power systems
  • Exhaust system
  • Engine FAM II 2.4D
  • Engine device
  • Troubleshooting
  • Engine repair
  • Cooling system
  • Engine electrical equipment
  • Control and power systems
  • Exhaust system
  • Engine HFV6 3.2L
  • Engine device
  • Troubleshooting
  • Engine repair
  • Cooling system
  • Engine electrical equipment
  • Control and power systems
  • Exhaust system
  • Transmission
  • Front drive axle
  • Rear drive axle
  • Automatic gearbox - device
  • Automatic gearbox - service
  • Automatic gearbox - repair
  • Manual gearbox - device
  • Manual gearbox - service and repair
  • Clutch
  • Transfer case
  • Chassis
  • Car suspension
  • Brake system
  • Steering
  • Body
  • Heating and ventilation
  • Air conditioning (manual)
  • Air conditioning (automatic)
  • Seat belts
  • Airbags
  • Car seat
  • Interior (internal elements)
  • Exterior (external elements)
  • Doors and windows
  • Electrical equipment
  • Equipment and devices
  • Lighting and lamps
  • Windshield wipers and washers
  • Electrical circuits


ChevyMan.ru © 2017-2026 · Mobile version · Feedback · Site search · Interesting to read · Sitemap: EN BG BY UA RS HR RO PL SK HU

Aveo 2003-2008 · Aveo 2006-2011 · Aveo 2012-2018 · Captiva 2006-2018 · Cruze 2008-2016 · Lacetti 2002-2009 · Lanos 2002-2009 · Niva 2002-2016 · Tahoe 1992-2000 · Tahoe 2000-2014 · Lumina 1 1989-1994 · Trailblazer 1 2001-2008 · Orlando 1 2010-2018 ·
🛡️ For your security and to improve our service, this site uses cookies. You can disable them in your browser.