ChevyMan.ru
Mazda Mitsubishi Toyota Land Rover Honda Kia Nissan
English Русский
Български
Беларускі
Український
Српски
Hrvatski
Română
Polski
Slovenský
Magyar
|
Articles | Sitemap | Contacts |


Home   Aveo   Captiva   Cruze   Lacetti   Lanos   Niva   Tahoe   Others  
Captiva 1 (2006-2018)
  • Home
  • Captiva
  • 1 (2006-2018)
  • Transmission
  • Manual gearbox - service and repair
  • Disassembling the main unit of the mechanical transmission

Disassembling the main unit of the mechanical transmission (Chevrolet Captiva 1)

            0

Necessary equipment


  • DT-48179 Universal Guide Handle
  • DT-48182 Needle Bearing Puller/Installer
  • DT-48183 Dismantling bridge
  • DT-48189 Differential Bearing Race Puller
  • DT-48225 Primary Shaft Mandrel
  • DT-48226 Puller / tool for installing the main gear box crankcase ball bearing assembly
  • DT-48227 Roller Bearing Puller/Installer
  • DT-48228 Clutch Housing Ball Bearing Remover/Installer
  • DT-48229 Intermediate shaft puller
  • DT-48231 Primary and Secondary Shaft Puller/Pusher
  • DT-48232 Primary shaft synchronizer housing protective device

Disassembly procedure


1. Remove the gearbox from the vehicle. See "Gearbox with final drive assembly" in this section.
1. Remove the gearbox from the vehicle. See «Gearbox with final drive assembly» in this section.


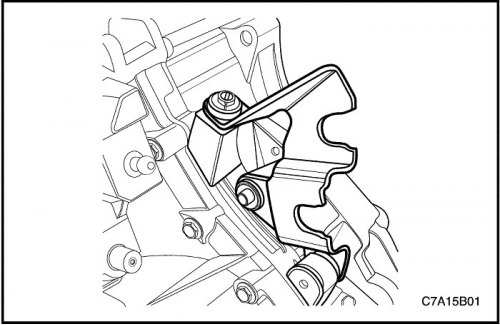
2. Remove the bolts, washer and shift control cable bracket.
2. Remove the bolts, washer and shift control cable bracket.


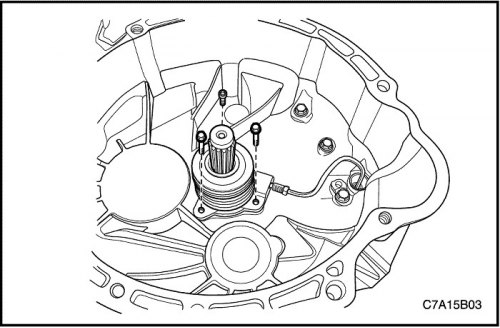
3. Remove the bolts securing the concentric clutch release cylinder.


4. Disconnect the tube from the concentric clutch release cylinder.
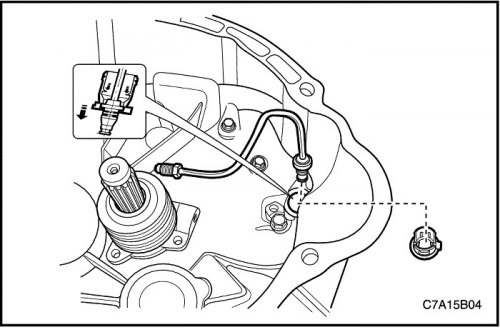
4. Disconnect the tube from the concentric clutch release cylinder.


Important: Do not apply excessive force to the bushing when removing it.


5. Remove the bushing from the concentric working cylinder tube.

6. Remove the concentric clutch release cylinder tube.
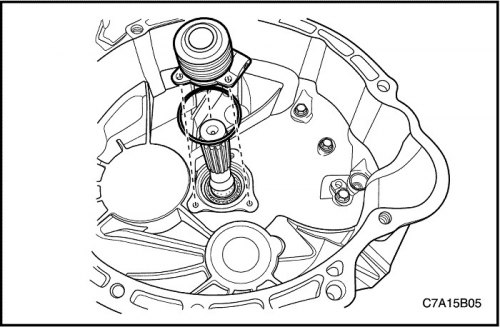
6. Remove the concentric clutch release cylinder tube.


7. Remove the O-ring and concentric clutch release cylinder.
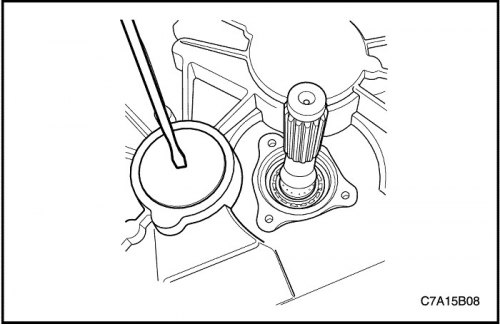
7. Remove the O-ring and concentric clutch release cylinder.


8. Tap the hole in the intermediate shaft sealing plug with a suitable tool.


Important: Puncture the sealing plug in the center to prevent damage to the transaxle assembly.
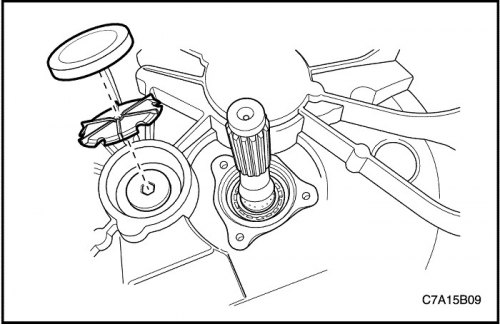

Important: Puncture the sealing plug in the center to prevent damage to the transaxle assembly.


9. Remove the intermediate shaft sealing plug and oil pipe using a suitable tool. Discard the sealing plug and oil pipe.
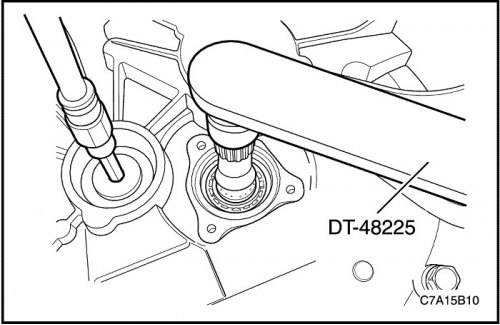
9. Remove the intermediate shaft sealing plug and oil pipe using a suitable tool. Discard the…


10. Hold the input shaft with DT-48225.

11. Remove the locking plug from the intermediate shaft. Discard the locking plug.
  • Shift to any gear.

12. Remove DT-48225.
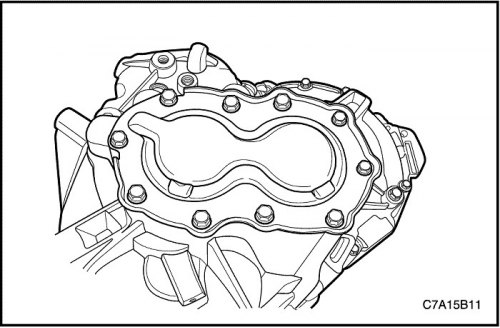
12. Remove DT-48225.


13. Unscrew the bolts securing the rear cover of the gearbox with the final drive assembly.


13. Unscrew the bolts securing the rear cover of the gearbox with the final drive assembly.


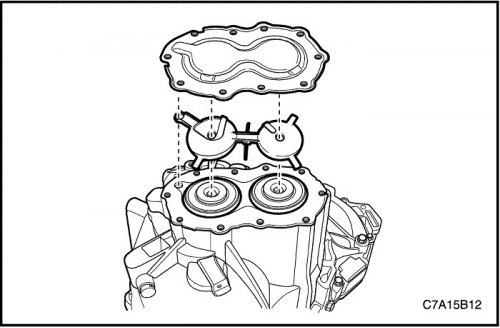
14. Remove the rear cover of the gearbox with the final drive assembly and the oil line.
14. Remove the rear cover of the gearbox with the final drive assembly and the oil line.


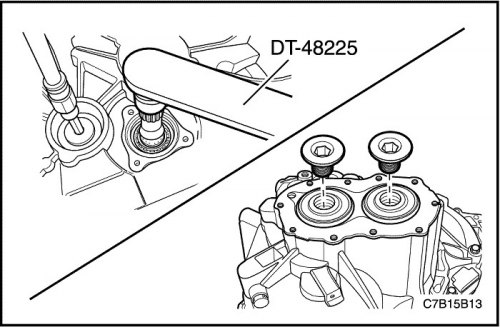
15. Hold the input shaft with DT-48225.

16. Remove the primary shaft retaining plug and secondary shaft retaining plug. Discard the retaining plugs.
  • Shift to any gear.

17. Remove DT-48225.
17. Remove DT-48225.


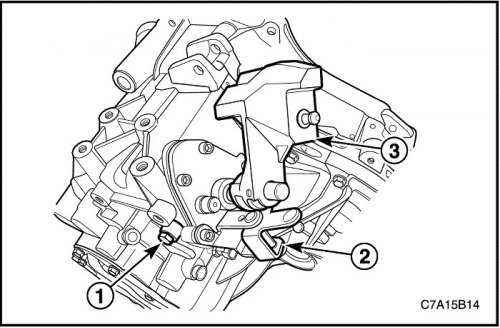
18. Remove the gear shift shaft assembly.


  • Shift into neutral.
  • Remove the gear shift guide bolt (1).
  • Remove the gear shift mounting bolts.
  • Remove the gear selector lever (2).
  • Remove the gear shift shaft assembly (3).
Remove the gear shift shaft assembly (3).


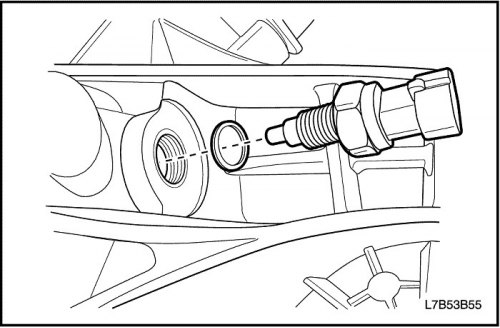
19. Remove the reverse light switch and washer from the gearbox housing with the final drive assembly.
19. Remove the reverse light switch and washer from the gearbox housing with the final drive…


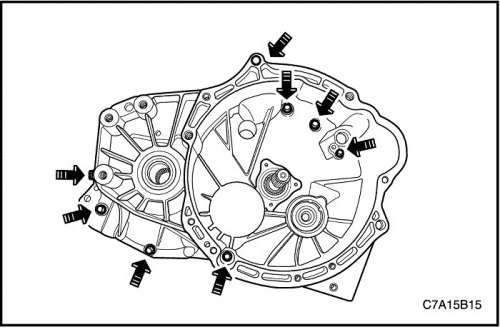
20. Remove the eight bolts from the side of the clutch housing.
20. Remove the eight bolts from the side of the clutch housing.


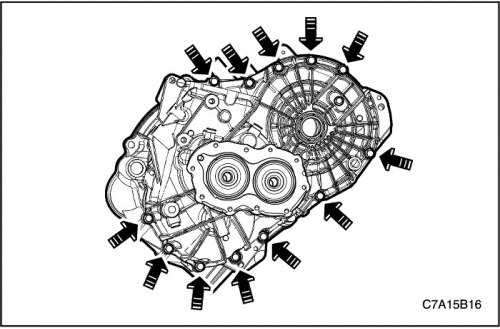
21. Remove the twelve bolts from the gearbox housing side with the final drive assembly.


21. Remove the twelve bolts from the gearbox housing side with the final drive assembly.


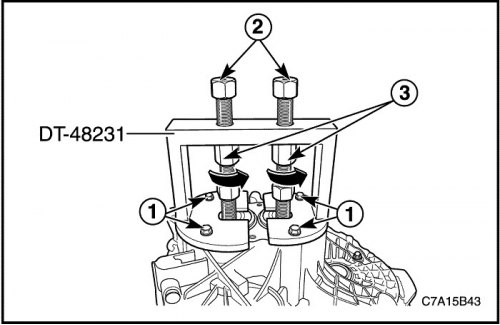
22. Remove the gearbox housing with the final drive assembly from the clutch housing.
  • Install DT-48231 into the gearbox housing with the final drive assembly.
  • Tighten the four bolts (1).
  • Screw the spindles (2) into the primary and secondary shafts.
  • Separate the gearbox housing with the final drive assembly from the clutch housing.
  • Hold the spindles (2) using a suitable tool.
  • Turn the passage nuts (3) in the direction of the arrow.
  • Remove DT-48231 from the gearbox housing with the final drive assembly.
  • Unscrew the spindles (2) from the primary and secondary shafts.
  • Remove four bolts (1).

Remove four bolts (1).


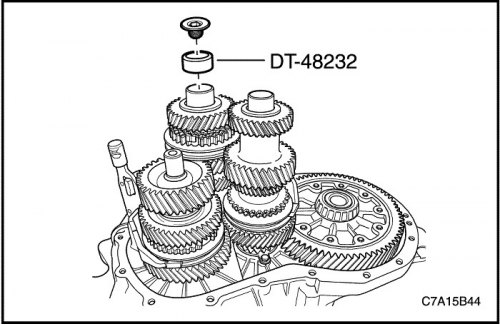
23. Install DT-48232 and retaining plug into the input shaft.

Important: This is necessary to prevent the 3rd/4th gear synchronizer housing assembly from falling apart.
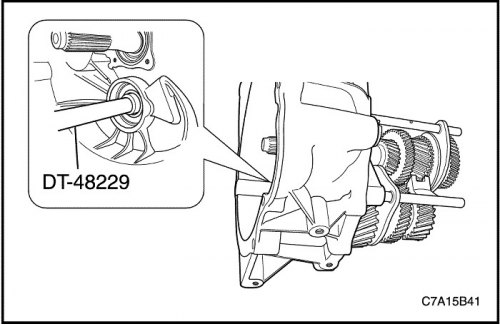

Important: This is necessary to prevent the 3rd/4th gear synchronizer housing assembly from falling…


24. Remove the intermediate, primary and secondary shaft assemblies together with the corresponding gear shift forks from the clutch housing.
  • Knock the intermediate shaft out of the intermediate shaft ball bearing using DT-48229.

Important: Hold the primary and secondary shaft assembly firmly.


25. Remove DT-48232 and retaining plug from input shaft.
25. Remove DT-48232 and retaining plug from input shaft.


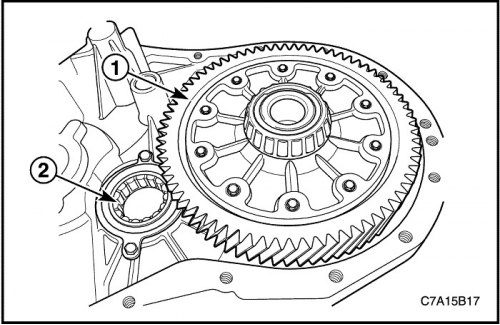
26. Remove the differential (1) and secondary shaft roller bearing (2) from the clutch housing.
26. Remove the differential (1) and secondary shaft roller bearing (2) from the clutch housing.


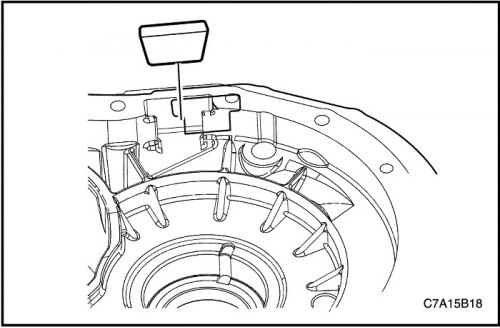
27. Remove the magnet from the gearbox housing with the final drive assembly.
27. Remove the magnet from the gearbox housing with the final drive assembly.


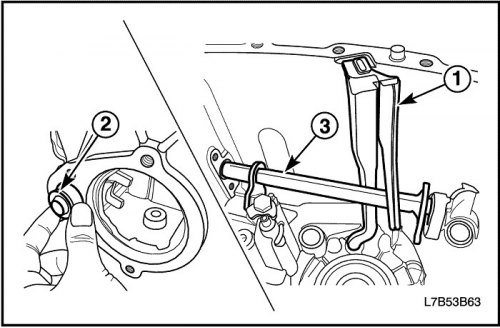
28. Remove the drain channel (1) from the gearbox housing with the final drive assembly.

29. Remove the idle gear shift mechanism rod bushing (2) from the gearbox housing with the final drive assembly.

30. Remove the idle gear shift mechanism rod (3) from the gearbox housing with the final drive assembly.
30. Remove the idle gear shift mechanism rod (3) from the gearbox housing with the final drive…


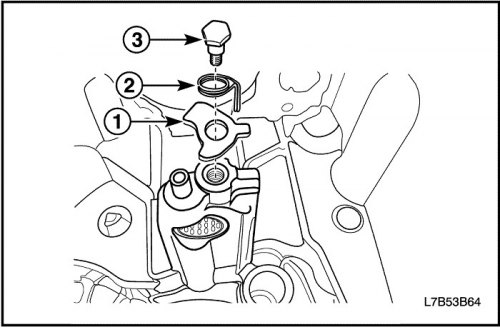
31. Remove the grub screw (3), torsion spring (2) and reverse gear interlock (1) from the gearbox housing with the final drive assembly. Discard the grub screw.
31. Remove the grub screw (3), torsion spring (2) and reverse gear interlock (1) from the gearbox…


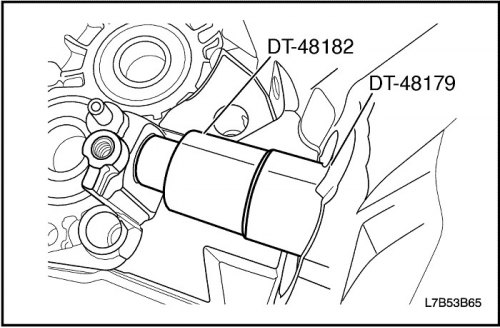
32. Remove the needle bearing from the transaxle housing using DT-48179 and DT-48182.
32. Remove the needle bearing from the transaxle housing using DT-48179 and DT-48182.


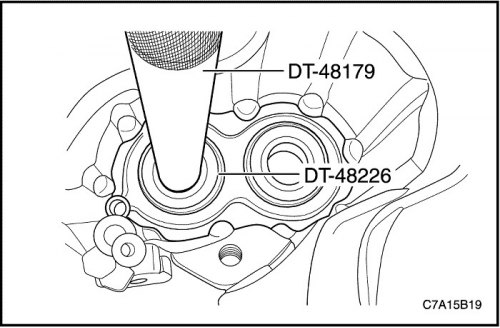
33. Remove the input and output shaft ball bearings from the transaxle housing using DT-48179 and DT-48226.
33. Remove the input and output shaft ball bearings from the transaxle housing using DT-48179 and…


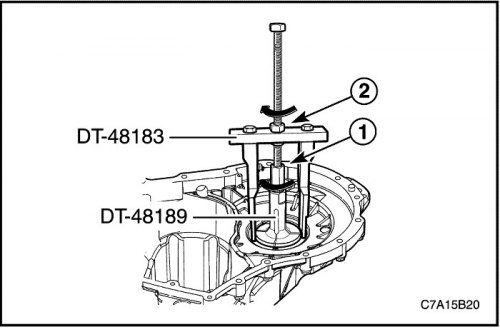
34. Remove the differential bearing race from the gearbox housing with the final drive assembly.
  • Install DT-48189.
  • Turn the nut (1) in the direction of the arrow.
  • Install DT-48183 into DT-48189.
  • Hold the spindle with a suitable tool.
  • Turn the nut (2) in the direction of the arrow.
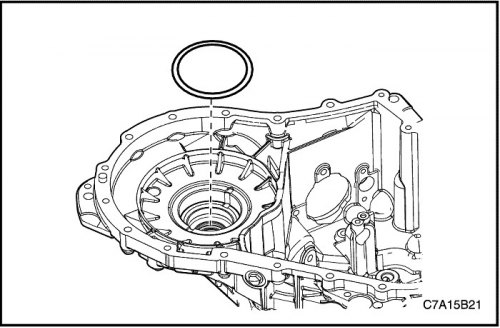
Turn the nut (2) in the direction of the arrow.


35. Remove the adjusting lining from the gearbox housing with the final drive assembly.
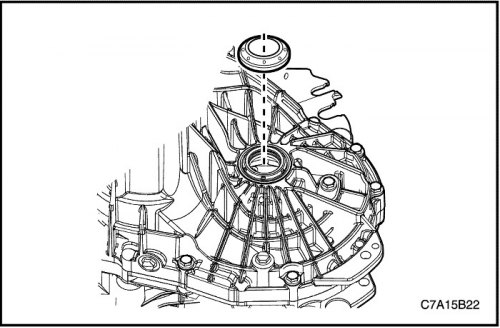
35. Remove the adjusting lining from the gearbox housing with the final drive assembly.


36. Remove the drive axle shaft seal from the gearbox housing with the final drive assembly. Discard the drive axle shaft seal.
36. Remove the drive axle shaft seal from the gearbox housing with the final drive assembly.…


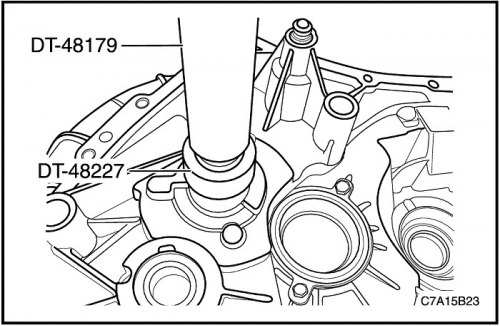
37. Remove the input shaft roller bearing from the clutch housing using DT-48179 and DT-48227.
37. Remove the input shaft roller bearing from the clutch housing using DT-48179 and DT-48227.


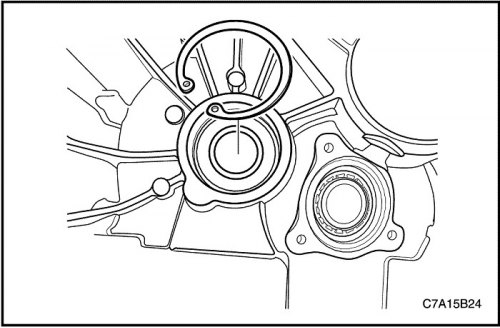
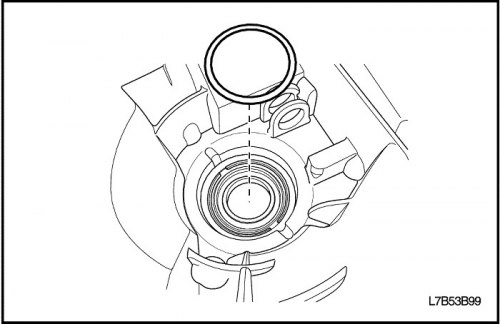
38. Remove the retaining ring from the intermediate shaft ball bearing.
38. Remove the retaining ring from the intermediate shaft ball bearing.


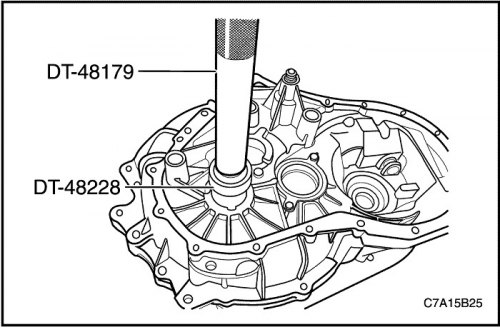
39. Remove the intermediate shaft ball bearing from the clutch housing using DT-48179 and DT-48228.
39. Remove the intermediate shaft ball bearing from the clutch housing using DT-48179 and DT-48228.


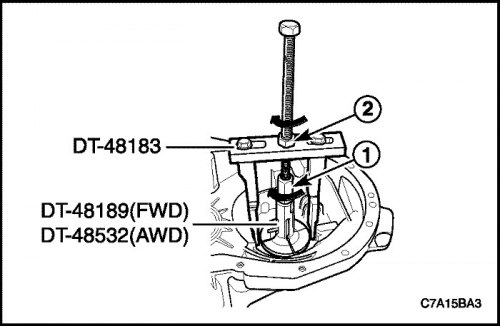
40. Remove the differential bearing race from the clutch housing.
  • For 4WD version install DT-48189; for all-wheel drive version install DT-48532.
  • Turn the nut (1) in the direction of the arrow.
  • Install DT-48183 on DT-48189 (for four-wheel drive version) or DT-48532 (for all-wheel drive version).
  • Hold the spindle with a suitable tool.
  • Turn the nut (2) in the direction of the arrow.
Turn the nut (2) in the direction of the arrow.


41. Remove the adjusting shim from the clutch housing.
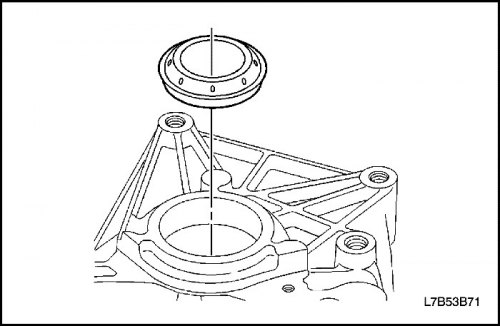
41. Remove the adjusting shim from the clutch housing.


42. Remove the drive axle shaft seal from the clutch housing. Discard the drive axle shaft seal.

The article was checked: Vladimir Romannikov
This article is available at russian, bulgarian, belarusian, ukrainian, serbian, croatian, romanian, polish, slovak, hungarian

Share information:

Previous articles
Captiva 1: Manual gearbox - service and repair
Next articles

Gearbox with final drive assembly
Adjusting the shift control cable
Shift control cable
Gear shift lever housing
Changing the working fluid of the gearbox
Disassembling the gear shift shaft
Disassembling the intermediate shaft
Disassembling the primary shaft
Disassembling the secondary shaft
Cleaning and checking the clutch housing and the gearbox housing with the final drive assembly


See similar articles on the topic of Chevrolet cars:
Transmission control unit Chevrolet Aveo T250 (2006-2011)
Disassembling the engine Chevrolet Cruze 1 (2008-2016)
Location of the main units and assemblies of the car Chevrolet Lacetti 1 (2002-2009)
Heating, ventilation and air conditioning control unit Chevrolet Lanos T150 (2002-2009)
Disassembling the cardan transmission Chevrolet Niva 1 (2002-2016)
Main parameters of automatic transmission Chevrolet Tahoe 2 and 3 (2000-2014)
Transmission — mechanical and automatic Chevrolet Orlando 1 (2010-2018)
Link in different formats to this page


Visitor comments

No comments yet


How much will 24 + 26 =


Captiva 1 (2006-2018) 
  • Manual
  • Before leaving
  • Keys, doors and windows
  • Seats, protection systems
  • Instruments and controls
  • Lighting system
  • Information and entertainment
  • Navigation system
  • Climate control
  • Driving a car
  • Car care
  • Maintenance
  • Engine 2.0 l (diesel)
  • Engine device
  • Troubleshooting
  • Engine repair
  • Cooling system
  • Engine electrical equipment
  • Control and power systems
  • Exhaust system
  • Engine FAM II 2.4D
  • Engine device
  • Troubleshooting
  • Engine repair
  • Cooling system
  • Engine electrical equipment
  • Control and power systems
  • Exhaust system
  • Engine HFV6 3.2L
  • Engine device
  • Troubleshooting
  • Engine repair
  • Cooling system
  • Engine electrical equipment
  • Control and power systems
  • Exhaust system
  • Transmission
  • Front drive axle
  • Rear drive axle
  • Automatic gearbox - device
  • Automatic gearbox - service
  • Automatic gearbox - repair
  • Manual gearbox - device
  • Manual gearbox - service and repair
  • Clutch
  • Transfer case
  • Chassis
  • Car suspension
  • Brake system
  • Steering
  • Body
  • Heating and ventilation
  • Air conditioning (manual)
  • Air conditioning (automatic)
  • Seat belts
  • Airbags
  • Car seat
  • Interior (internal elements)
  • Exterior (external elements)
  • Doors and windows
  • Electrical equipment
  • Equipment and devices
  • Lighting and lamps
  • Windshield wipers and washers
  • Electrical circuits


ChevyMan.ru © 2017-2026 · Mobile version · Feedback · Site search · Interesting to read · Sitemap: EN BG BY UA RS HR RO PL SK HU

Aveo 2003-2008 · Aveo 2006-2011 · Aveo 2012-2018 · Captiva 2006-2018 · Cruze 2008-2016 · Lacetti 2002-2009 · Lanos 2002-2009 · Niva 2002-2016 · Tahoe 1992-2000 · Tahoe 2000-2014 · Lumina 1 1989-1994 · Trailblazer 1 2001-2008 · Orlando 1 2010-2018 ·
🛡️ For your security and to improve our service, this site uses cookies. You can disable them in your browser.