
ChevyMan.ru
Mazda Mitsubishi Toyota Land Rover Honda Kia Nissan
English Русский
Български
Беларускі
Український
Српски
Hrvatski
Română
Polski
Slovenský
Magyar
|
Articles | Sitemap | Contacts |


Home   Aveo   Captiva   Cruze   Lacetti   Lanos   Niva   Tahoe   Others  
Lanos T150 (2002-2009)
  • Home
  • Lanos
  • T150 (2002-2009)
  • Chassis
  • Steering
  • Removal the steering gear

Removal the steering gear (Chevrolet Lanos T150)

            0

We remove the steering mechanism for its repair, replacement or replacement of the protective cover.

We show the removal of the steering mechanism with power steering.

The steering mechanism can be removed with or without the steering rods.

In the first method, we press out the pins of the ball joints of the outer ends from the pivot arms of the shock absorber struts (see Replacing the outer tie rod end).

In the second method, we disconnect the inner ends of the steering rods from the steering rack (see Removal the steering rod).

In the salon…
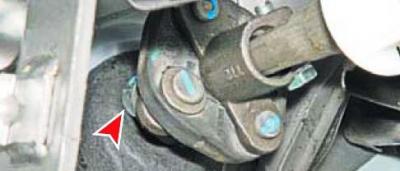
…using a 12 mm socket head, unscrew the bolt of the terminal connection of the elastic coupling…


…using a 12 mm socket head, unscrew the bolt of the terminal connection of the elastic coupling flange with the tail of the steering gear gear and remove the bolt.

We set the front wheels to the straight-ahead position.

After the mechanical connection between the steering gear pinion shaft and the flexible coupling has been disconnected, the steering wheel must not be turned to avoid damaging the spiral cable that connects the driver's airbag and horn switches to the wiring harness.

In the engine compartment, remove the expansion tank of the cooling system from the studs and move it to the side (see Removal the expansion tank).


Before disconnecting the hydraulic lines from the steering gear housing, place a wide container under the housing to collect the fluid.
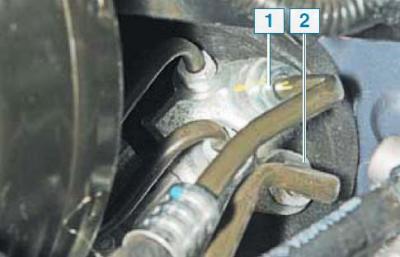
Using a 18 mm spanner, unscrew fitting 1 of the drain line tube and fitting 2 of the discharge line…


Using a 18 mm spanner, unscrew fitting 1 of the drain line tube and fitting 2 of the discharge line tube.

We remove the ends of the tubes of both lines from the holes in the steering gear housing and insert plugs of a suitable diameter into the holes in the tubes and housing.
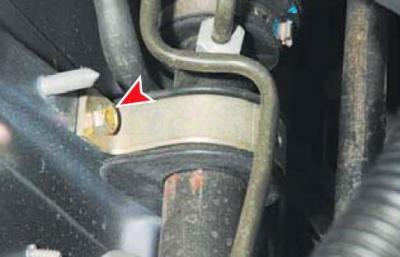
Using a 12 mm socket, unscrew the bolt that secures the upper right bracket of the steering gear to…


Using a 12 mm socket, unscrew the bolt that secures the upper right bracket of the steering gear to the front shield…
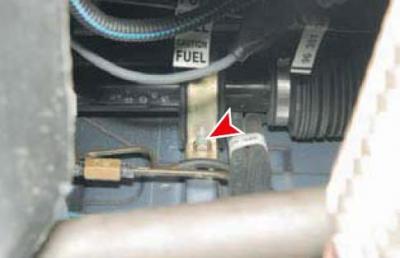
…and the lower mounting nut.
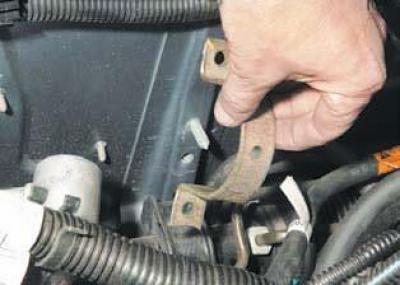

…and the lower mounting nut.


Remove the right steering gear mounting bracket.
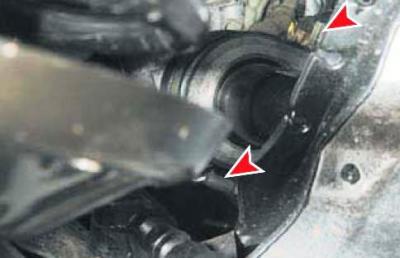

Remove the right steering gear mounting bracket.

Using the same tool, unscrew the bolt of the upper mount of the left steering gear bracket to the…


Using the same tool, unscrew the bolt of the upper mount of the left steering gear bracket to the front shield and the nut of the lower mount... ...and remove the bracket.
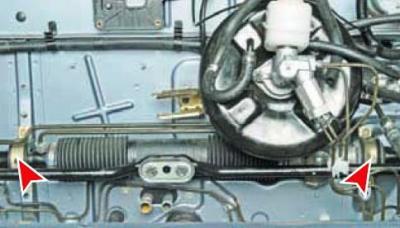
Location of steering gear mounting brackets (for clarity with the engine removed)
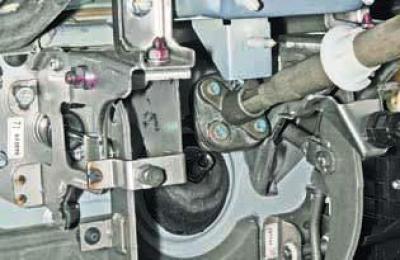

Location of steering gear mounting brackets (for clarity with the engine removed)

We move the steering gear forward until the pinion tail comes out of the elastic coupling flange…


We move the steering gear forward until the pinion tail comes out of the elastic coupling flange (for clarity, the instrument panel has been removed).


We remove the gear shank from the hole in the front body shield..
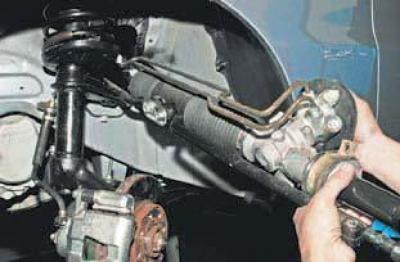
…and we take out the steering mechanism together with the steering rods through the hole in the…


…and we take out the steering mechanism together with the steering rods through the hole in the left mudguard.

With the second method of dismantling, we remove the steering mechanism without the steering rods.

We assemble and install the steering mechanism in the reverse order, making sure to check the middle position of the rack (rectilinear movement of a car).

At the same time, the steering wheel must also maintain the position of straight-line movement of the car.

This is necessary to ensure that the airbag drum coil cable is in the middle position.
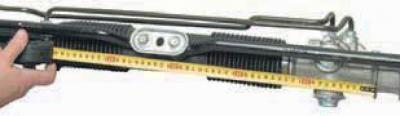
The rack is in the middle position when the distance from the inner end of the seating surface of…


The rack is in the middle position when the distance from the inner end of the seating surface of the steering gear housing under the left rubber cushion to the axis of symmetry of the plate is 325 mm (for clarity, shown with the steering gear removed).


In this case, the clamping bolt of the terminal connection of the elastic coupling flange with the steering column shaft must be located on top of the steering shaft in a horizontal position.

Fill the power steering reservoir with working fluid and remove air from the system (see Bleeding the power steering system).

(Original version of the article on the website: chevyman.ru)

The article was checked: Vladimir Romannikov
This article is available at russian, bulgarian, belarusian, ukrainian, serbian, croatian, romanian, polish, slovak, hungarian

Share information:

Previous articles
Lanos T150: Steering
Next articles

Removal the steering column
Removal the steering wheel
Replacing the outer tie rod end
Steering device
Removal the steering rod
Replacing the steering gear cover
Removal the power steering pump
Bleeding the power steering system


See similar articles on the topic of Chevrolet cars:
Adjusting the clearance of the gear engagement in the steering mechanism Chevrolet Aveo T250 (2006-2011)
Steering Gear Diagnostic Trouble Codes Chevrolet Captiva 1 (2006-2018)
Replacing the steering gear Chevrolet Cruze 1 (2008-2016)
Replacing the steering gear cover Chevrolet Lacetti 1 (2002-2009)
Removal and installation the power steering gear Chevrolet Niva 1 (2002-2016)
Steering gear — removal and installation Chevrolet Tahoe 1 (1992-2000)
Removal and installation the steering gear Chevrolet Lumina 1 (1989-1994)
Link in different formats to this page


Visitor comments

No comments yet


How much will 35 + 34 =


Lanos T150 (2002-2009) 
  • General information
  • User manual
  • Maintenance
  • Troubleshooting
  • Power unit
  • Engine repair
  • Control system
  • Supply system
  • Cooling system
  • Exhaust system
  • Transmission
  • Clutch
  • Car gearbox
  • Front wheel drives
  • Chassis
  • Front suspension
  • Rear suspension
  • Steering
  • Brake system
  • Body
  • Repair of body elements
  • Heating and air conditioning
  • Electrical equipment
  • Engine electrics
  • Lighting and lamps
  • Equipment and devices
  • Electrical circuits


ChevyMan.ru © 2017-2026 · Mobile version · Feedback · Site search · Interesting to read · Sitemap: EN BG BY UA RS HR RO PL SK HU

Aveo 2003-2008 · Aveo 2006-2011 · Aveo 2012-2018 · Captiva 2006-2018 · Cruze 2008-2016 · Lacetti 2002-2009 · Lanos 2002-2009 · Niva 2002-2016 · Tahoe 1992-2000 · Tahoe 2000-2014 · Lumina 1 1989-1994 · Trailblazer 1 2001-2008 · Orlando 1 2010-2018 ·
🛡️ For your security and to improve our service, this site uses cookies. You can disable them in your browser.