
The air passing through the throttle assembly is metered by the position of the throttle valve located in the throttle assembly pipe. The damper has an electric drive.
The throttle valve opening angle is set by the electronic engine control unit (ECU) depending on the engine operating mode (starting, warming up, idling, etc) and from the position of the gas pedal. The gas pedal has no mechanical connection with the throttle valve. The gas pedal travel is monitored by the gas pedal position sensor. Depending on how much the gas pedal has moved when you press it, the electronic control unit calculates the throttle opening angle and the amount of fuel injected (taking into account the current crankshaft rotation frequency, driving speed, etc.) and sends the corresponding control signals to the actuators: the electric throttle actuator and fuel injectors. When the engine is started and idling, the electronic control unit opens the valve to an amount corresponding to the amount of air that should enter the cylinders depending on the ambient air and engine temperature, as well as other parameters.
The throttle position sensor is built into the electric drive unit, which is mounted on the throttle body and connected to the throttle shaft. Based on the sensor signal, the electronic control unit determines the amount of throttle valve opening and sends the corresponding commands to the valve drive electric motor, adjusting its opening angle.
To prevent the internal cavity of the throttle assembly from freezing in cold weather, a channel for coolant is made in the housing, which is supplied and discharged through hoses. When the walls freeze, the flow area of the throttle assembly will change, which can lead to jamming of the throttle valve.
During engine operation, deposits gradually accumulate on the inner walls of the pipe and on the throttle valve, which over time can lead to incorrect operation of the throttle assembly. To clean the internal cavity of the pipe from deposits, the throttle assembly should be removed from the intake manifold. If cleaning fails to resolve the problem, the throttle assembly must be replaced.
A fault in the electrical part of the throttle assembly can be detected during diagnostics of the engine management system.
Removal and replacing the gasket
To complete the job, you will need an engine intake manifold cleaner, a new sealing ring and 1 liter of coolant. We carry out the work in the following order.
1. We prepare the car for maintenance and repair.
2. Disconnect the wire terminal from the negative terminal of the battery.
3. Using a slotted screwdriver or a 7 mm wrench, loosen the clamps securing the air filter housing...
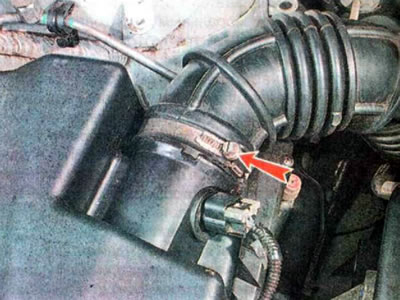
... to the throttle assembly...
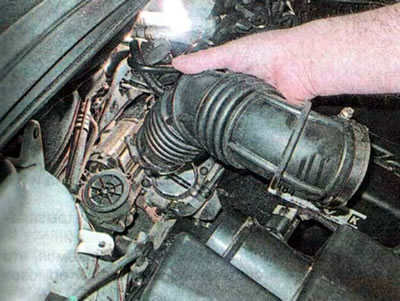
...and remove the air supply pipe.
Note: When disconnecting the throttle body heater hoses, a small amount of coolant may leak out. To collect it, place a suitable container under the throttle assembly.
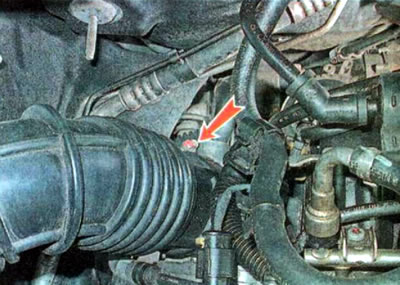
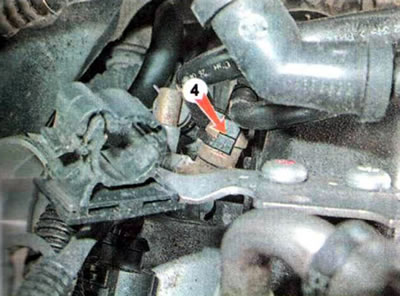
4. Press the lock and disconnect the wiring harness block 1 from the throttle assembly. Disconnect the crankcase ventilation hose 2. Disconnect the supply hoses 3...
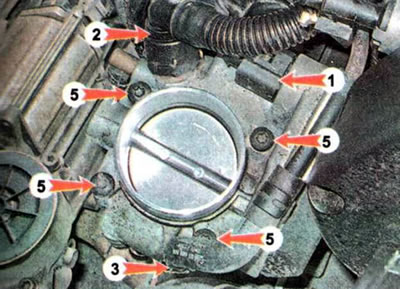
...and coolant drainage 4.
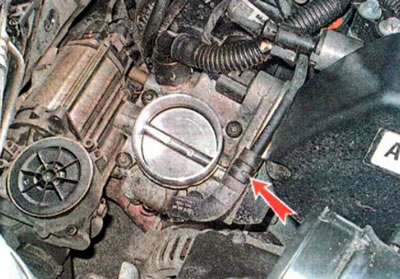
Using a TORX T30 key, unscrew the four mounting bolts 5 and remove the throttle assembly.
5. Inspect the condition of the wiring harness connector terminals. To remove oxides, spray the terminals with a cleaning and protection agent for electrical contacts.
Warning. When performing the following operation, hold the throttle assembly with the electric drive upward so that the cleaning agent cannot flow down the throttle shaft and enter the mechanism. To avoid damage to the throttle assembly, do not attempt to wash off deposits by spraying cleaner, as this will inevitably force dissolved deposits between the bushings and the throttle shaft. It is safer to remove deposits softened by the cleaner with a clean cloth.
6. Spray a small amount of cleaner onto the deposits in the throttle body pipe, both on the inlet and outlet sides. Wipe the throttle assembly with a clean cloth. If necessary, repeat the procedure, and after cleaning is complete, blow it out with compressed air from a compressor or foot pump.
7. Remove the sealing ring.
8. Install the throttle valve assembly in the reverse order, replacing the sealing ring with a new one. Tighten the mounting bolts to a torque of 8 Nm.
9. Check the coolant level and top it up to normal if necessary.
[The article was reprinted from the website «chevyman.ru»]