ChevyMan.ru
Mazda Mitsubishi Toyota Land Rover Honda Kia Nissan
English Русский
Български
Беларускі
Український
Српски
Hrvatski
Română
Polski
Slovenský
Magyar
|
Articles | Sitemap | Contacts |


Home   Aveo   Captiva   Cruze   Lacetti   Lanos   Niva   Tahoe   Others  
Orlando 1 (2010-2018) Trailblazer 1 (2001-2008, petrol) Lumina 1 (1989-1994)
  • Home
  • Chevrolet
  • Trailblazer 1
  • Power unit
  • Engine electrical equipment
  • Battery — Checking and Replacing

Battery — Checking and Replacing (Chevrolet Trailblazer 1)

            0

Contents: Examination ↧ Replacement ↧
Warning: The battery produces hydrogen gas, so keep open flames and lit cigarettes away from the battery. When working with the battery, you must wear protective glasses. Wash away any spilled electrolyte immediately with plenty of water.


Examination


1. Before measuring the battery voltage, it is necessary to remove its static charge. Turn on the high beams for 10 seconds, then turn off the headlights and leave the car for two minutes. Remove the battery (see p. 4 - 10).

2. Check the battery charge level. The charge level can be determined by the color of the indicator located on top of the battery. If the indicator is transparent, the battery needs charging (the procedure is described in chapter 1). After this, check the voltage with a voltmeter (see illustration). Connect the negative electrode of the digital voltmeter to the negative battery terminal and the positive electrode to the positive battery terminal. The voltage should be at least 12.4V. If the voltage obtained is less than the specified one, fully charge the battery before performing the load test.

3.2. To check the open circuit voltage of the battery, it is necessary to connect a voltmeter. When…

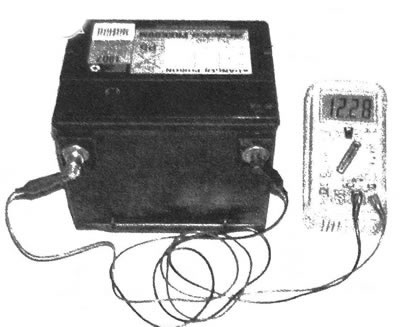
3.2. To check the open circuit voltage of the battery, it is necessary to connect a voltmeter. When the battery is fully charged, the voltage should be at least 12.4V (this value depends on the outside temperature)


3. Perform a load test. A quality check can only be performed using a load fork, which can be purchased at most automotive stores. This test determines the battery's ability to maintain the required voltage when the starter and other energy sources are turned on. Connect the load plug to the battery terminals (see illustration). Perform the test according to the fork's operating instructions. This fork uses a carbon element to increase the load on the battery. Apply a load to the battery and make sure that its voltage does not drop below 9.6V within 15 seconds. A poor battery condition can be easily detected using a load fork.

3.3 Connect the load plug to the battery terminals and perform the test according to the plug's…

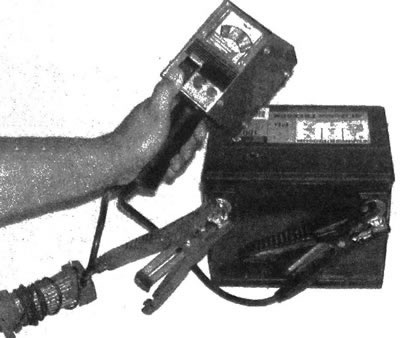
3.3 Connect the load plug to the battery terminals and perform the test according to the plug's instructions for use


Note: When testing in cold conditions, a small allowance is made for the lower voltage limit. This is usually reflected in tables included in the instructions supplied with the load fork. The minimum voltage limit specified for an ambient temperature of 0°C is 9.1V.


Replacement


4. Disconnect the negative cable from the battery.

5. Disconnect the positive battery cable.


6. If the design provides for the presence of engine block heating, then it is necessary to disconnect the heater wire holder located on the battery.

7. Unscrew the bolts of the support beam from the battery casing and disconnect the ventilation tube (see illustration).

3.7. Before removing the battery, unscrew the bolts (A) and remove the support bar, and also…

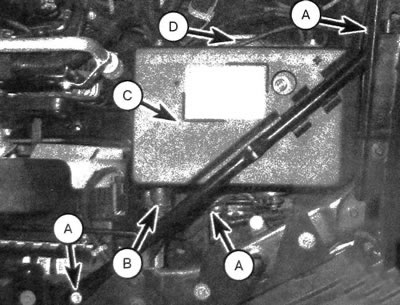
3.7. Before removing the battery, unscrew the bolts (A) and remove the support bar, and also disconnect the ventilation tube (B), remove the battery cover (C), then unscrew the bolt and remove the holder (D)


8. To remove, lift the battery cover straight up.

9. Unscrew the nut and remove the battery holder.

10.To remove, lift the battery vertically upwards.

11. If there is corrosion deposits on the pan, it is necessary to remove it and clean the corroded areas with a solution of baking soda to prevent further spread of rust (see illustration). Paint over the repaired areas with corrosion-resistant paint.

3.11 Inspect the battery tray, holder brackets and associated fasteners for signs of corrosion or…

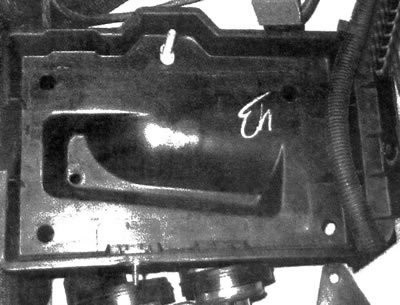
3.11 Inspect the battery tray, holder brackets and associated fasteners for signs of corrosion or other damage. If necessary, unscrew the bolts (which the shelf is attached to the inner panel of the wing) and remove the shelf


12. Clean the battery case and cables and service as described in Chapter 1.

13. When replacing the battery, make sure that the parameters of the new battery meet the technical requirements. Before installation, make sure the new battery is fully charged.

14. Installation is carried out in the reverse order of removal. First you need to connect the positive wire, and then the negative one.

15. After connecting the wires, apply grease or petroleum jelly to the terminals to prevent corrosion.

The article was checked: Vladimir Romannikov
This article is available at russian, bulgarian, belarusian, ukrainian, serbian, croatian, romanian, polish, slovak, hungarian

Share information:

Previous articles
Trailblazer 1: Engine electrical equipment
Next articles

General information and precautions
Engine Electrical Systems — Specifications
Battery Cables — Replacement
Ignition system — general information
Ignition system — checking functionality
Ignition coils — removal and installation
Charging system — general information and precautions


See similar articles on the topic of Chevrolet cars:
Checking the level, topping up and replacing the working fluid Chevrolet Aveo T300 (2012-2018)
Checking the battery under load Chevrolet Captiva 1 (2006-2018)
Checking and replacing engine management system sensors Chevrolet Cruze 1 (2008-2016)
Checking the condition and replacing the timing belt Chevrolet Lacetti 1 (2002-2009)
Checking the condition and replacing the air conditioning compressor drive belt Chevrolet Lanos T150 (2002-2009)
Checking the battery electrolyte level Chevrolet Niva 1 (2002-2016)
Checking and replacing windshield wiper blades Chevrolet Tahoe 1 (1992-2000)
Link in different formats to this page


Visitor comments

No comments yet


How much will 36 + 23 =


Orlando 1 (2010-2018) 
  • General information
  • Introduction to manual
  • User manual
  • Maintenance
  • Troubleshooting
  • Power unit
  • Engine repair
  • Fuel and control system
  • Cooling and lubrication system
  • Ignition system
  • Transmission
  • Clutch
  • Gearbox
  • Drive shafts
  • Chassis
  • Car suspension
  • Steering
  • Brake system
  • Body
  • Exterior (external elements)
  • Doors, locks and windows
  • Electrical equipment
  • Equipment and devices
  • Windscreen wipers
  • Power devices
  • Electrical diagrams


Trailblazer 1 (2001-2008) 
  • General information
  • User manual
  • Troubleshooting
  • Maintenance
  • Power unit
  • Engine in a car
  • Engine overhaul
  • Cooling and heating
  • Fuel and exhaust system
  • Engine electrical equipment
  • Engine control
  • Transmission
  • Automatic gearbox
  • Transfer case
  • Drive shafts and cardan
  • Chassis
  • Brake system
  • Car suspension
  • Steering
  • Body
  • Exterior (external elements)
  • Interior (internal elements)
  • Doors, locks and windows
  • Electrical equipment
  • Equipment and devices
  • Electrical circuits


Lumina 1 (1989-1994) 
  • General information
  • Maintenance
  • Power unit
  • Engine 3.1L V6
  • Engine 3.8L V6
  • Engine overhaul
  • Cooling system
  • Power and exhaust system
  • Fuel injection
  • Engine electrical equipment
  • Reduced exhaust gas toxicity
  • Transmission
  • Automatic gearbox
  • Drive shafts
  • Chassis
  • Brake system
  • Car suspension
  • Steering
  • Body
  • Heating and air conditioning
  • Repair of body elements
  • Doors, covers and windows
  • Interior (internal elements)
  • Electrical equipment
  • Equipment and devices
  • Electrical circuits


ChevyMan.ru © 2017-2026 · Mobile version · Feedback · Site search · Interesting to read · Sitemap: EN BG BY UA RS HR RO PL SK HU

Aveo 2003-2008 · Aveo 2006-2011 · Aveo 2012-2018 · Captiva 2006-2018 · Cruze 2008-2016 · Lacetti 2002-2009 · Lanos 2002-2009 · Niva 2002-2016 · Tahoe 1992-2000 · Tahoe 2000-2014 · Lumina 1 1989-1994 · Trailblazer 1 2001-2008 · Orlando 1 2010-2018 ·
🛡️ For your security and to improve our service, this site uses cookies. You can disable them in your browser.