
ChevyMan.ru
Mazda Mitsubishi Toyota Land Rover Honda Kia Nissan
English Русский
Български
Беларускі
Український
Српски
Hrvatski
Română
Polski
Slovenský
Magyar
|
Articles | Sitemap | Contacts |


Home   Aveo   Captiva   Cruze   Lacetti   Lanos   Niva   Tahoe   Others  
Orlando 1 (2010-2018) Trailblazer 1 (2001-2008, petrol) Lumina 1 (1989-1994)
  • Home
  • Chevrolet
  • Lumina 1
  • Power unit
  • Cooling system
  • Checking and replacing the thermostat

Checking and replacing the thermostat (Chevrolet Lumina 1)

            0

Contents: Examination ↧ Replacement ↧
Caution: Do not remove the radiator cap, drain the coolant, or replace the thermostat until the engine has cooled completely.


Examination


1. Before deciding whether the thermostat is the culprit in your cooling system problems, check the coolant level (see chapter 1, section 4), drive belt tension (see chapter 1, section 21) and the operation of the temperature sensor.

2. If the engine seems to be taking too long to warm up, it means that the thermostat is probably stuck open. Replace the thermostat.

3. If the engine is getting too hot, check the temperature of the upper radiator hose with your hand. If the hose is not hot and the engine is hot, the thermostat is probably stuck closed. Replace the thermostat.

Warning! Do not operate the vehicle without a thermostat. The computer may select the wrong operating mode and this will affect the engine's efficiency, which will lead to emissions of harmful gases into the atmosphere.


4. If the upper radiator hose is hot, it means that coolant is flowing through this hose and the thermostat is open.

Replacement


5. Disconnect the negative battery cable and drain the cooling system (see chapter 1, section 29). If the coolant is relatively fresh or in normal condition, save it and reuse it.

6. On vehicles with a 3.8L engine, remove the air filter to gain access to the thermostat housing (see chapter 4, section 8).

7. To locate the thermostat, follow where the upper radiator hose goes from the engine.


8. Loosen the hose clamp, then separate the hose from the nozzle (see illustration). If the hose is stuck, grasp it near the end with suitable pliers and bend it to break the connection, then remove it. If the hose is old or worn out, cut it off and install a new one.
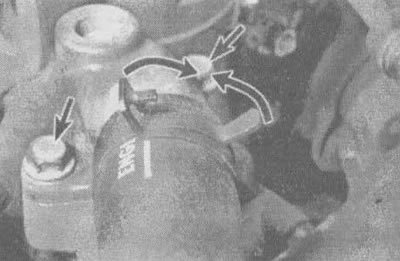
3.8. To remove the thermostat, squeeze the clamps on the hose clamp (indicated by arrows), then…

3.8. To remove the thermostat, squeeze the clamps on the hose clamp (indicated by arrows), then move the clamp to the back of the hose, separate the hose from the thermostat cover and unscrew the bolts (indicated by arrows)


9. If the outer surface of the large pipe is worn out (has traces of destruction, corrosion, etc.), then when removing the hose it can be damaged even more. If this happens, the thermostat cover will need to be replaced.

10. Loosen the bolts and nuts and remove the thermostat cover (see accompanying illustration and illustration 3.8). If the lid is stuck, tap it with a soft-faced hammer. Be prepared for some coolant to spill if the gasket seal fails.
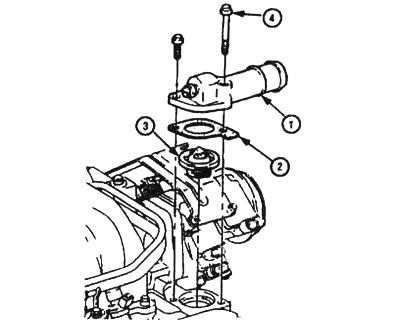
3.10. Thermostat and thermostat housing disassembled (3.8L engine): 1 - thermostat cover, 2 -…

3.10. Thermostat and thermostat housing disassembled (3.8L engine): 1 - thermostat cover, 2 - gasket, 3 - thermostat, 4 - bolts


11. Pay attention to how the thermostat is installed (which side up), take it off (see illustration).
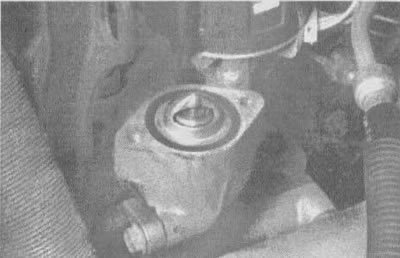
3.11. Before removing the thermostat, remember its position

3.11. Before removing the thermostat, remember its position


12. On vehicles with a 3.8L engine, remove all remaining old gasket and seal material from the housing with a gasket scraper. Clean the mating surfaces with paint thinner or acetone.

13. Replace the thermostat seal (see illustration).
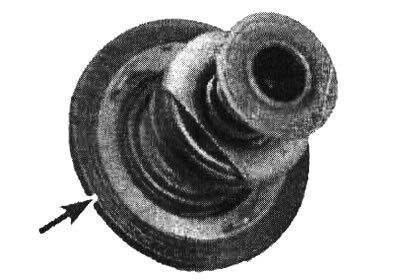
3.13 If you are working with a 3.1L engine, do not forget to replace the thermostat seal (indicated…

3.13 If you are working with a 3.1L engine, do not forget to replace the thermostat seal (indicated by the arrow)


14. Install the new thermostat into the housing. Make sure it is installed with the correct side facing up (the end with the spring is usually directed towards the engine).

15. On vehicles with a 3.8L engine, replace the thermostat gasket. Install the gasket with the thick parts facing upward.


16. Install the cover and tighten the bolts and nuts. Tighten them to the torque specified in the specifications of this chapter.

17. The remaining operations are performed in reverse order.

18. Fill the system with coolant (see chapter 1, section 29).

Note: Do not allow air to enter the system.


19. Start the engine and allow it to warm up to normal operating temperature, then check for leaks and that the thermostat is working properly (see pp. 2-4).

The article was checked: Vladimir Romannikov
This article is available at russian, bulgarian, belarusian, ukrainian, serbian, croatian, romanian, polish, slovak, hungarian

Share information:

Previous articles
Lumina 1: Cooling system
Next articles

Coolant — General Information
General information about the cooling system
Technical data of the engine cooling system
Checking the engine cooling fan motor
Troubleshooting the Cooling Fan Control Circuit
Replacing the engine cooling fan
Replacing the engine cooling fan motor
Removal and installation the radiator


See similar articles on the topic of Chevrolet cars:
Checking the level, topping up and replacing the working fluid Chevrolet Aveo T300 (2012-2018)
Replacing windshield wiper blades Chevrolet Captiva 1 (2006-2018)
Checking and replacing engine management system sensors Chevrolet Cruze 1 (2008-2016)
Checking the condition and replacing the timing belt Chevrolet Lacetti 1 (2002-2009)
Checking the condition and replacing the air conditioning compressor drive belt Chevrolet Lanos T150 (2002-2009)
Replacing fuses Chevrolet Niva 1 (2002-2016)
Thermostat — Checking and Replacing Chevrolet Tahoe 1 (1992-2000)
Link in different formats to this page


Visitor comments

No comments yet


How much will 12 + 16 =


Orlando 1 (2010-2018) 
  • General information
  • Introduction to manual
  • User manual
  • Maintenance
  • Troubleshooting
  • Power unit
  • Engine repair
  • Fuel and control system
  • Cooling and lubrication system
  • Ignition system
  • Transmission
  • Clutch
  • Gearbox
  • Drive shafts
  • Chassis
  • Car suspension
  • Steering
  • Brake system
  • Body
  • Exterior (external elements)
  • Doors, locks and windows
  • Electrical equipment
  • Equipment and devices
  • Windscreen wipers
  • Power devices
  • Electrical diagrams


Trailblazer 1 (2001-2008) 
  • General information
  • User manual
  • Troubleshooting
  • Maintenance
  • Power unit
  • Engine in a car
  • Engine overhaul
  • Cooling and heating
  • Fuel and exhaust system
  • Engine electrical equipment
  • Engine control
  • Transmission
  • Automatic gearbox
  • Transfer case
  • Drive shafts and cardan
  • Chassis
  • Brake system
  • Car suspension
  • Steering
  • Body
  • Exterior (external elements)
  • Interior (internal elements)
  • Doors, locks and windows
  • Electrical equipment
  • Equipment and devices
  • Electrical circuits


Lumina 1 (1989-1994) 
  • General information
  • Maintenance
  • Power unit
  • Engine 3.1L V6
  • Engine 3.8L V6
  • Engine overhaul
  • Cooling system
  • Power and exhaust system
  • Fuel injection
  • Engine electrical equipment
  • Reduced exhaust gas toxicity
  • Transmission
  • Automatic gearbox
  • Drive shafts
  • Chassis
  • Brake system
  • Car suspension
  • Steering
  • Body
  • Heating and air conditioning
  • Repair of body elements
  • Doors, covers and windows
  • Interior (internal elements)
  • Electrical equipment
  • Equipment and devices
  • Electrical circuits


ChevyMan.ru © 2017-2026 · Mobile version · Feedback · Site search · Interesting to read · Sitemap: EN BG BY UA RS HR RO PL SK HU

Aveo 2003-2008 · Aveo 2006-2011 · Aveo 2012-2018 · Captiva 2006-2018 · Cruze 2008-2016 · Lacetti 2002-2009 · Lanos 2002-2009 · Niva 2002-2016 · Tahoe 1992-2000 · Tahoe 2000-2014 · Lumina 1 1989-1994 · Trailblazer 1 2001-2008 · Orlando 1 2010-2018 ·
🛡️ For your security and to improve our service, this site uses cookies. You can disable them in your browser.