
ChevyMan.ru
Mazda Mitsubishi Toyota Land Rover Honda Kia Nissan
English Русский
Български
Беларускі
Український
Српски
Hrvatski
Română
Polski
Slovenský
Magyar
|
Articles | Sitemap | Contacts |


Home   Aveo   Captiva   Cruze   Lacetti   Lanos   Niva   Tahoe   Others  
Orlando 1 (2010-2018) Trailblazer 1 (2001-2008, petrol) Lumina 1 (1989-1994)
  • Home
  • Chevrolet
  • Orlando 1
  • Power unit
  • Cooling and lubrication system
  • Coolant temperature sensor

Coolant temperature sensor (Chevrolet Orlando 1)

            0

The coolant temperature sensor is designed to monitor the engine temperature. The sensor is a thermistor that changes its electrical conductivity depending on the ambient temperature. As the coolant temperature increases, the sensor resistance decreases. The obtained data are used by the electronic control unit (ECU) when calculating most of the control commands intended for the actuators of the engine management system, as well as for turning on the electric fan of the engine cooling system.

The engine is equipped with two coolant temperature sensors. One sensor is located at the rear of the thermostat housing to the left of the cylinder block...
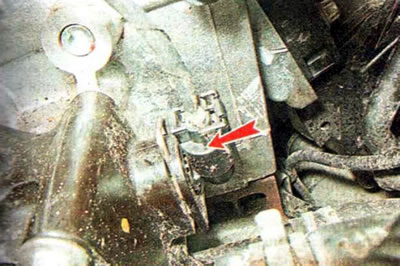
The engine is equipped with two coolant temperature sensors. One sensor is located at the rear of…


...the second sensor is on the right side in the engine cooling system radiator.
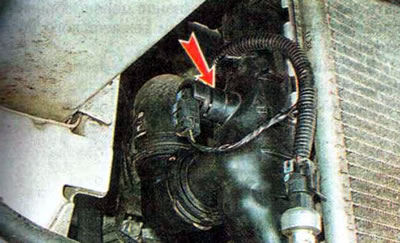
...the second sensor is on the right side in the engine cooling system radiator.


Replacement


The need to perform work is determined during diagnostics of the engine control system. Before replacing the sensor, you should check the condition of its terminals and the condition of the junction block. It is possible that the cause of the malfunction is a contact problem due to oxidized terminals.


Shown is the replacement of the coolant temperature sensor in the radiator; the sensor in the thermostat housing is removed in a similar manner.

New coolant will be required to complete the job.

1. We prepare the car for maintenance and repair.

2. Disconnect the wire terminal from the negative terminal of the battery.

3. Drain the coolant.

4. To access the sensor in the radiator, remove the front bumper trim.

5. Press the lock...
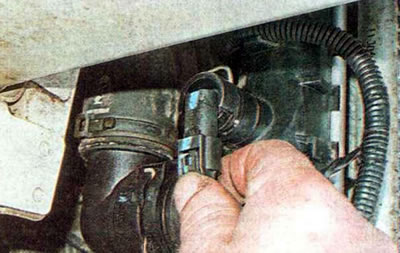
5. Press the lock...


...and disconnect the wiring harness connector from the sensor.
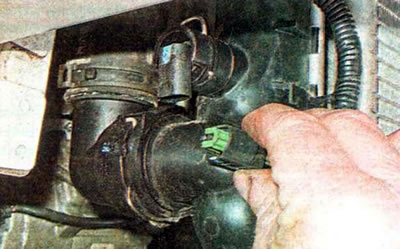
...and disconnect the wiring harness connector from the sensor.


5. Visually check the condition of the sensor terminals and the wiring harness block.

6. To remove oxides, treat them with a cleaning and protection agent for electrical contacts.

7. Using a slotted screwdriver, remove the spring retainer and, pulling, remove the sensor from the hole.
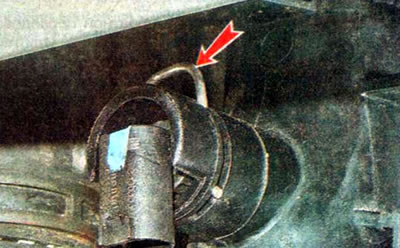


7. Using a slotted screwdriver, remove the spring retainer and, pulling, remove the sensor from the…


The sensor connection is sealed with a rubber ring, which must be replaced.

We replace the sensor in the thermostat housing from the top of the engine compartment.
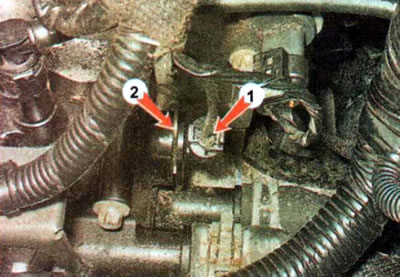
Sensor in the thermostat housing: 1 - wiring harness connector; 2 - spring retainer

Sensor in the thermostat housing: 1 - wiring harness connector; 2 - spring retainer


Note: You can check the sensor by measuring the resistance at its terminals at different temperatures. The resistance values should be approximately the same as those indicated in the table. Otherwise, the sensor is faulty.


Temperature,°CResistance, kOhm
-4093
-2021.50
17.00
202.80
401.20
650.50
850.25
1000.16

Recommendation.
  • You can use hot water to heat the sensor, taking measurements as it cools.
  • To connect the device to the sensor, you can use two pieces of thin PVC tube about 10 mm long. The tubes are put on the sensor terminals and the device probes are inserted into them.


8. Install the sensor in reverse order. Before installation, moisten the sealing ring with coolant.

9. Fill the system with coolant. We start the engine and make sure that there is no coolant leak from under the sensor, otherwise we fix the problem.

[Original version of the article on the website ChevyMan.ru]

The article was checked: Vladimir Romannikov
This article is available at russian, bulgarian, belarusian, ukrainian, serbian, croatian, romanian, polish, slovak, hungarian

Share information:

Previous articles
Orlando 1: Cooling and lubrication system
Next articles

Checking oil pressure
Engine lubrication system pressure
Lubrication system pressure
Cooling system pressure
Oil filter
Motor oil
Classification of motor oil
Requirements for oil quality and replacement periods
Cooling liquid


See similar articles on the topic of Chevrolet cars:
Coolant temperature sensor Chevrolet Aveo T300 (2012-2018)
Coolant Temperature Sensor (ECTS) Chevrolet Captiva 1 (2006-2018)
Scheme 8. Absolute pressure and coolant temperature sensors Chevrolet Cruze 1 (2008-2016)
Removal the coolant temperature sensor Chevrolet Lacetti 1 (2002-2009)
Checking the coolant temperature sensor and its circuits Chevrolet Lanos T150 (2002-2009)
Filling the cooling system with coolant Chevrolet Niva 1 (2002-2016)
Coolant temperature sensor Chevrolet Tahoe 2 and 3 (2000-2014)
Link in different formats to this page


Visitor comments

No comments yet


How much will 34 + 21 =


Orlando 1 (2010-2018) 
  • General information
  • Introduction to manual
  • User manual
  • Maintenance
  • Troubleshooting
  • Power unit
  • Engine repair
  • Fuel and control system
  • Cooling and lubrication system
  • Ignition system
  • Transmission
  • Clutch
  • Gearbox
  • Drive shafts
  • Chassis
  • Car suspension
  • Steering
  • Brake system
  • Body
  • Exterior (external elements)
  • Doors, locks and windows
  • Electrical equipment
  • Equipment and devices
  • Windscreen wipers
  • Power devices
  • Electrical diagrams


Trailblazer 1 (2001-2008) 
  • General information
  • User manual
  • Troubleshooting
  • Maintenance
  • Power unit
  • Engine in a car
  • Engine overhaul
  • Cooling and heating
  • Fuel and exhaust system
  • Engine electrical equipment
  • Engine control
  • Transmission
  • Automatic gearbox
  • Transfer case
  • Drive shafts and cardan
  • Chassis
  • Brake system
  • Car suspension
  • Steering
  • Body
  • Exterior (external elements)
  • Interior (internal elements)
  • Doors, locks and windows
  • Electrical equipment
  • Equipment and devices
  • Electrical circuits


Lumina 1 (1989-1994) 
  • General information
  • Maintenance
  • Power unit
  • Engine 3.1L V6
  • Engine 3.8L V6
  • Engine overhaul
  • Cooling system
  • Power and exhaust system
  • Fuel injection
  • Engine electrical equipment
  • Reduced exhaust gas toxicity
  • Transmission
  • Automatic gearbox
  • Drive shafts
  • Chassis
  • Brake system
  • Car suspension
  • Steering
  • Body
  • Heating and air conditioning
  • Repair of body elements
  • Doors, covers and windows
  • Interior (internal elements)
  • Electrical equipment
  • Equipment and devices
  • Electrical circuits


ChevyMan.ru © 2017-2026 · Mobile version · Feedback · Site search · Interesting to read · Sitemap: EN BG BY UA RS HR RO PL SK HU

Aveo 2003-2008 · Aveo 2006-2011 · Aveo 2012-2018 · Captiva 2006-2018 · Cruze 2008-2016 · Lacetti 2002-2009 · Lanos 2002-2009 · Niva 2002-2016 · Tahoe 1992-2000 · Tahoe 2000-2014 · Lumina 1 1989-1994 · Trailblazer 1 2001-2008 · Orlando 1 2010-2018 ·
🛡️ For your security and to improve our service, this site uses cookies. You can disable them in your browser.