
ChevyMan.ru
Mazda Mitsubishi Toyota Land Rover Honda Kia Nissan
English Русский
Български
Беларускі
Український
Српски
Hrvatski
Română
Polski
Slovenský
Magyar
|
Articles | Sitemap | Contacts |


Home   Aveo   Captiva   Cruze   Lacetti   Lanos   Niva   Tahoe   Others  
Orlando 1 (2010-2018) Trailblazer 1 (2001-2008, petrol) Lumina 1 (1989-1994)
  • Home
  • Chevrolet
  • Orlando 1
  • Power unit
  • Cooling and lubrication system
  • Thermostat — Checking and Replacing

Thermostat — Checking and Replacing (Chevrolet Orlando 1)

            0

The thermostat is designed to maintain the optimal temperature of the engine and accelerate its warm-up. Depending on the operating mode, more or less heat needs to be removed from the engine, and under different road and weather conditions (ambient temperature, vehicle speed, etc.) the radiator cools the coolant passing through it better or worse. The task of the thermostat is to automatically maintain its temperature within the specified limits, regardless of constantly changing conditions.

When the engine is not warmed up, the main thermostat valve 1 blocks the flow of coolant through the radiator, due to which the engine warms up much faster. Once the coolant temperature reaches a certain value, the main thermostat valve begins to gradually open and the liquid from the radiator flows into the engine. At the same time, additional valve 2 gradually closes the flow of liquid moving in a small circle around the radiator.
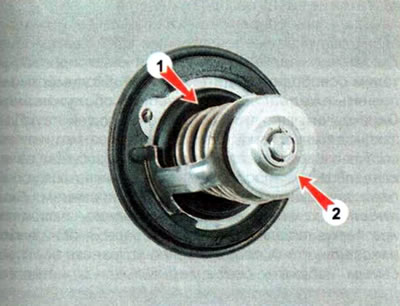
When the engine is not warmed up, the main thermostat valve 1 blocks the flow of coolant through…


The liquid cooled in the radiator is returned to the engine, thereby reducing its temperature. As the engine warms up, the main valve opens wider and wider, and finally the passage from the radiator opens completely and the small circle closes.


The thermostat is equipped with electric heating. In partial load mode, when it is advisable to increase the engine temperature to improve its efficiency, the electric heating is turned off - the thermostat begins to open at 98°C, and opens completely when the coolant reaches a temperature of 102-105°C.

Under heavy engine loads, it is necessary to lower the coolant temperature for normal engine operation. To do this, the ECU turns on the electric heater, and thereby reduces the thermostat opening temperature to the required value, up to 90°C.

If the electric heater fails, the thermostat will ensure engine operation in all modes at elevated temperatures. To eliminate this malfunction, it is necessary to replace the thermostat assembly. Failure of the thermostat itself leads to either engine overheating (if the main thermostat valve does not allow hot coolant to flow into the radiator), or to incomplete/long warming up of the engine to operating temperature (if the main thermostat valve is constantly open).
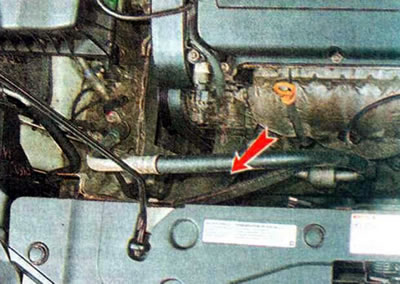
If the electric heater fails, the thermostat will ensure engine operation in all modes at elevated…


You can determine that the thermostat is faulty by checking the temperature of the lower radiator hose by touch. When the thermostat is stuck closed, this hose will remain barely warm when the engine is fully warm.


If the thermostat is stuck open, the lower hose will get warmer as the engine warms up, the engine will not warm up in cold weather, and barely warm air will come out of the heater. But there are cases when the thermostat gets stuck in some middle position or it does not open completely.

If there is any doubt about the correct operation of the thermostat, it is necessary to check it. But since this car's thermostat operates at high temperatures, above the boiling point of water, it is too difficult to check it at home. Therefore, it is easier to make sure that it is working properly by replacing it with a new one or one that is known to be working, or by contacting a specialized service station.

The thermostat is installed in a separate housing located on the left side of the cylinder head.
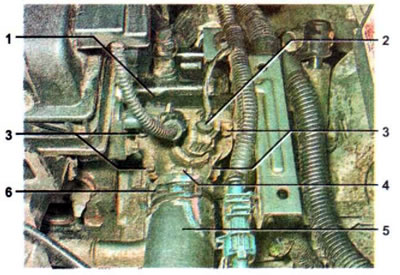
Thermostat: 1 — body; 2 - electric heater; 3 - thermostat cover mounting bolts; 4 - thermostat…

Thermostat: 1 — body; 2 - electric heater; 3 - thermostat cover mounting bolts; 4 - thermostat cover; 5 — hose; 6 — clamp


The thermostat is not repaired. If the test shows that it is faulty, it must be replaced.

Replacing the thermostat


1. We prepare the vehicle for maintenance and repair and install it on an inspection pit or overpass.


2. Drain the coolant

3. By pressing the lock, disconnect the wiring harness block from the thermostat electric heating 2 (see above).

4. Move spring clamp 6 along hose 5 and remove the hose.

5. Using an E10 mm wrench, unscrew the four bolts 3 securing the thermostat cover 4 and remove the cover.

6. Remove the gasket.

7. Remove the thermostat.

8. Clean the mating surfaces.

9. Install a new gasket.

10. Install the parts in the reverse order, tighten the thermostat cover mounting bolts to a torque of 8 Nm.

11. Fill with coolant

12. Start the engine and make sure there are no leaks. If a leak is detected, we eliminate the problem.

The article was checked: Vladimir Romannikov
This article is available at russian, bulgarian, belarusian, ukrainian, serbian, croatian, romanian, polish, slovak, hungarian

Share information:

Previous articles
Orlando 1: Cooling and lubrication system
Next articles

Cooling system — description and testing
Cooling liquid
Requirements for oil quality and replacement periods
Classification of motor oil
Motor oil


See similar articles on the topic of Chevrolet cars:
Checking the level, topping up and replacing the working fluid Chevrolet Aveo T300 (2012-2018)
Replacing windshield wiper blades Chevrolet Captiva 1 (2006-2018)
Checking and replacing engine management system sensors Chevrolet Cruze 1 (2008-2016)
Checking the condition and replacing the timing belt Chevrolet Lacetti 1 (2002-2009)
Checking the condition and replacing the air conditioning compressor drive belt Chevrolet Lanos T150 (2002-2009)
Replacing fuses Chevrolet Niva 1 (2002-2016)
Thermostat — Checking and Replacing Chevrolet Tahoe 1 (1992-2000)
Link in different formats to this page


Visitor comments

No comments yet


How much will 35 + 14 =


Orlando 1 (2010-2018) 
  • General information
  • Introduction to manual
  • User manual
  • Maintenance
  • Troubleshooting
  • Power unit
  • Engine repair
  • Fuel and control system
  • Cooling and lubrication system
  • Ignition system
  • Transmission
  • Clutch
  • Gearbox
  • Drive shafts
  • Chassis
  • Car suspension
  • Steering
  • Brake system
  • Body
  • Exterior (external elements)
  • Doors, locks and windows
  • Electrical equipment
  • Equipment and devices
  • Windscreen wipers
  • Power devices
  • Electrical diagrams


Trailblazer 1 (2001-2008) 
  • General information
  • User manual
  • Troubleshooting
  • Maintenance
  • Power unit
  • Engine in a car
  • Engine overhaul
  • Cooling and heating
  • Fuel and exhaust system
  • Engine electrical equipment
  • Engine control
  • Transmission
  • Automatic gearbox
  • Transfer case
  • Drive shafts and cardan
  • Chassis
  • Brake system
  • Car suspension
  • Steering
  • Body
  • Exterior (external elements)
  • Interior (internal elements)
  • Doors, locks and windows
  • Electrical equipment
  • Equipment and devices
  • Electrical circuits


Lumina 1 (1989-1994) 
  • General information
  • Maintenance
  • Power unit
  • Engine 3.1L V6
  • Engine 3.8L V6
  • Engine overhaul
  • Cooling system
  • Power and exhaust system
  • Fuel injection
  • Engine electrical equipment
  • Reduced exhaust gas toxicity
  • Transmission
  • Automatic gearbox
  • Drive shafts
  • Chassis
  • Brake system
  • Car suspension
  • Steering
  • Body
  • Heating and air conditioning
  • Repair of body elements
  • Doors, covers and windows
  • Interior (internal elements)
  • Electrical equipment
  • Equipment and devices
  • Electrical circuits


ChevyMan.ru © 2017-2026 · Mobile version · Feedback · Site search · Interesting to read · Sitemap: EN BG BY UA RS HR RO PL SK HU

Aveo 2003-2008 · Aveo 2006-2011 · Aveo 2012-2018 · Captiva 2006-2018 · Cruze 2008-2016 · Lacetti 2002-2009 · Lanos 2002-2009 · Niva 2002-2016 · Tahoe 1992-2000 · Tahoe 2000-2014 · Lumina 1 1989-1994 · Trailblazer 1 2001-2008 · Orlando 1 2010-2018 ·
🛡️ For your security and to improve our service, this site uses cookies. You can disable them in your browser.