
ChevyMan.ru
Mazda Mitsubishi Toyota Land Rover Honda Kia Nissan
English Русский
Български
Беларускі
Український
Српски
Hrvatski
Română
Polski
Slovenský
Magyar
|
Articles | Sitemap | Contacts |


Home   Aveo   Captiva   Cruze   Lacetti   Lanos   Niva   Tahoe   Others  
Tahoe 2 and 3 (2000-2014) Tahoe 1 (1992-2000)
  • Home
  • Tahoe
  • 1 (1992-2000)
  • Chassis
  • Brake system
  • Drum brake shoes (models with dual-shoe self-braking brakes) — replacement

Drum brake shoes (models with dual-shoe self-braking brakes) — replacement (Chevrolet Tahoe 1)

            0

Attention! 1. Brake pads are changed only as a set for one axle.


2. Each time the drum brake shoes are replaced, the return and pressure springs of the shoes are also replaced. Due to the continuous heating/cooling that the springs are subjected to, they lose elasticity and over time the shoes touch the drums, causing them to wear out more.


1. Loosen the wheel nuts and raise the rear of the car.

2. Remove the rear wheels.

3. Remove the drum (or the hub if the vehicle is equipped with a fully unloaded axle shaft). On a car with semi-unloaded axle shafts, the drum may not be removable. In this case, pour penetrating liquid between the axle shaft flange studs and the drum holes and tap the drum from the inside along the contour.

4. If the pads interfere with removal (a groove has formed on the drum due to wear), then remove the plug from the brake shield (preventing it from falling inside the drum) and bring the pads together. To do this, move the regulator lock away from the toothed wheel and rotate the toothed wheel of the regulator counterclockwise with a screwdriver (see photo).
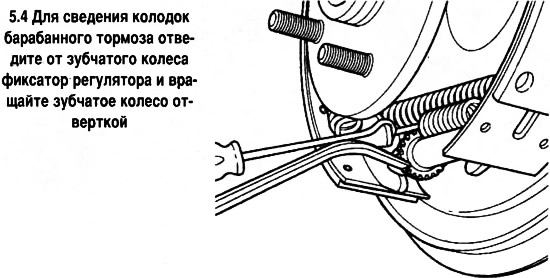
4. If the pads interfere with removal (a groove has formed on the drum due to wear), then remove…


5. Further procedures for replacing the pads are illustrated in the photo.
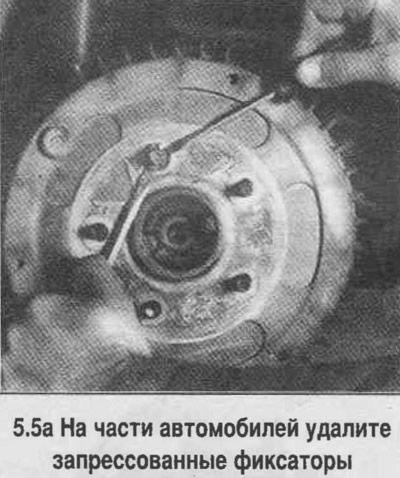


5. Further procedures for replacing the pads are illustrated in the photo.
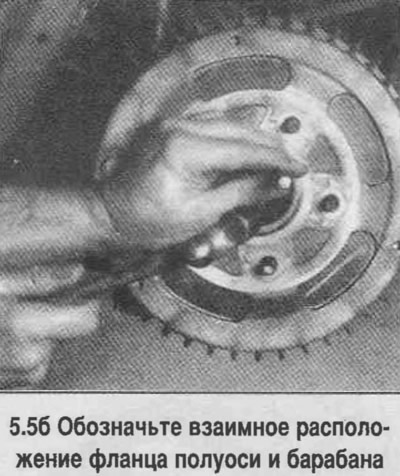

5. Further procedures for replacing the pads are illustrated in the photo.
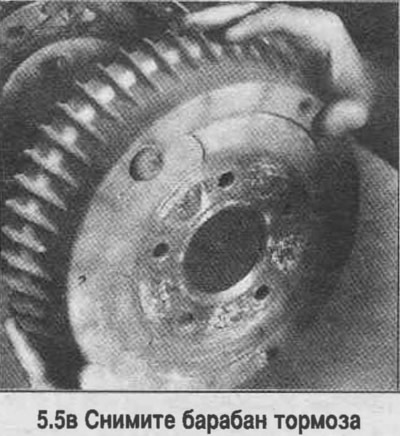

5. Further procedures for replacing the pads are illustrated in the photo.
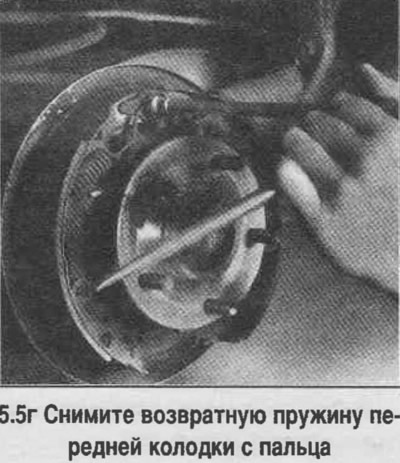

5. Further procedures for replacing the pads are illustrated in the photo.
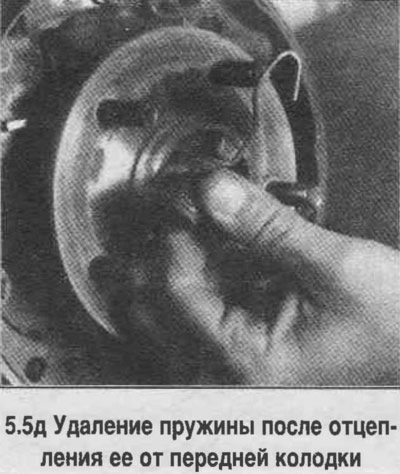

5. Further procedures for replacing the pads are illustrated in the photo.
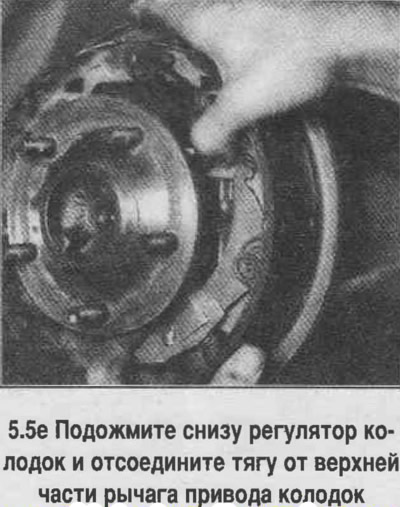

5. Further procedures for replacing the pads are illustrated in the photo.
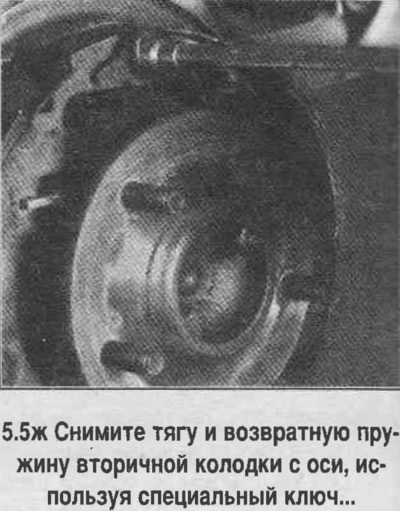

5. Further procedures for replacing the pads are illustrated in the photo.
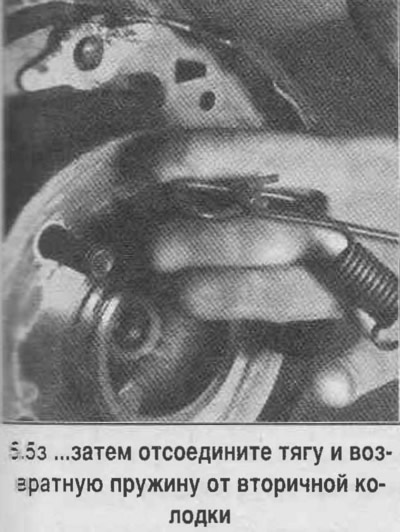

5. Further procedures for replacing the pads are illustrated in the photo.
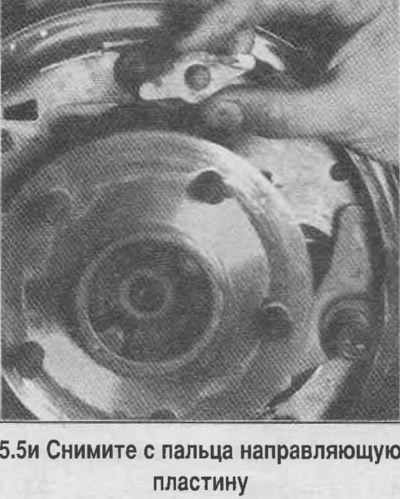

5. Further procedures for replacing the pads are illustrated in the photo.
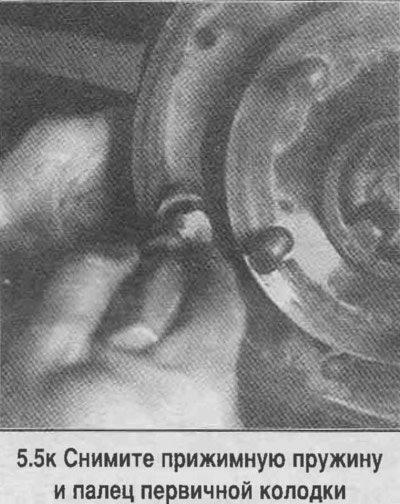

5. Further procedures for replacing the pads are illustrated in the photo.
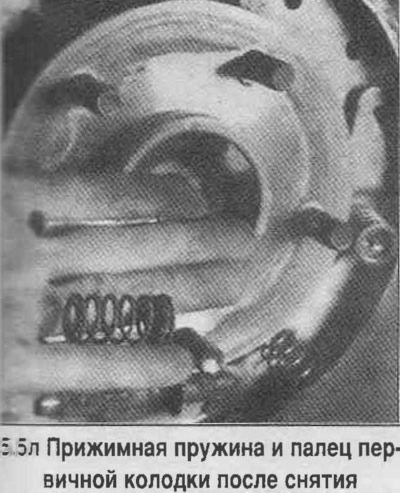

5. Further procedures for replacing the pads are illustrated in the photo.
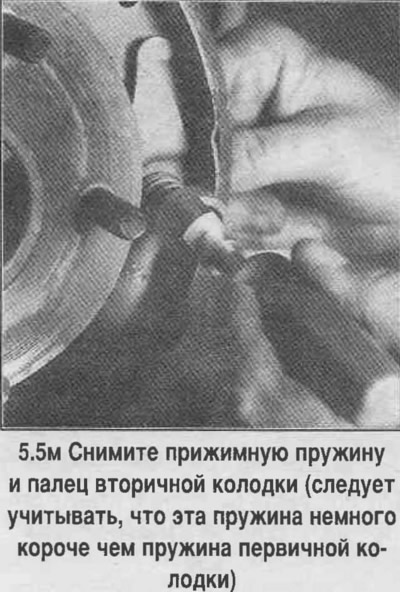

5. Further procedures for replacing the pads are illustrated in the photo.
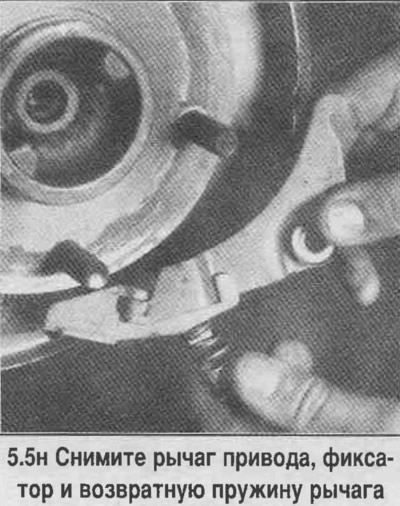

5. Further procedures for replacing the pads are illustrated in the photo.
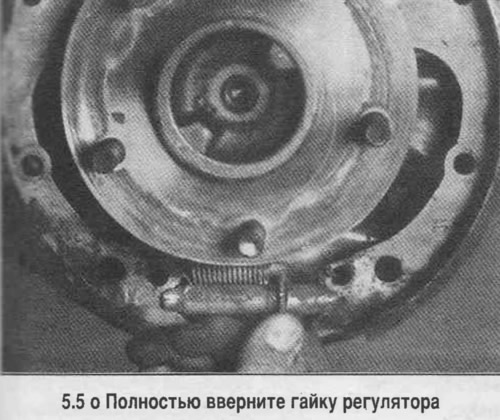

5. Further procedures for replacing the pads are illustrated in the photo.
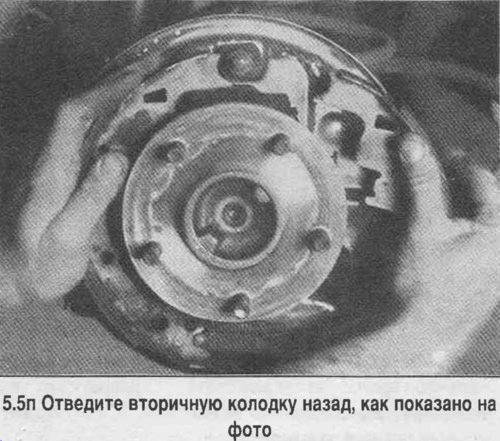

5. Further procedures for replacing the pads are illustrated in the photo.
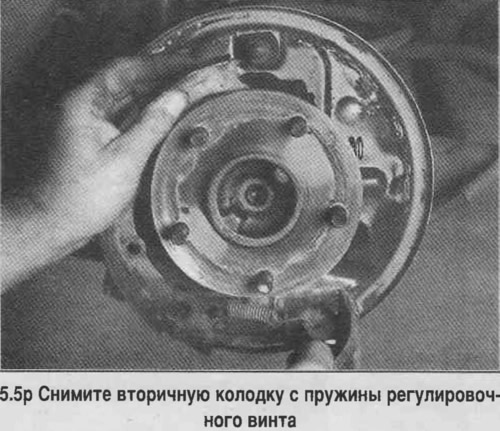

5. Further procedures for replacing the pads are illustrated in the photo.
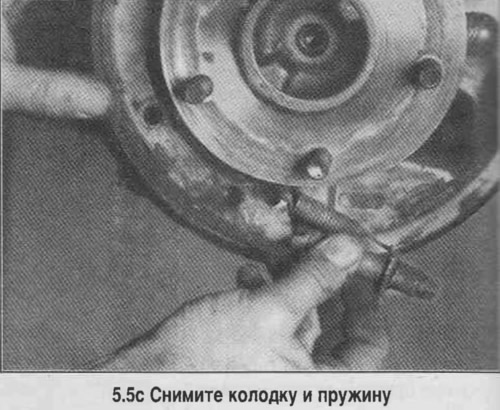

5. Further procedures for replacing the pads are illustrated in the photo.
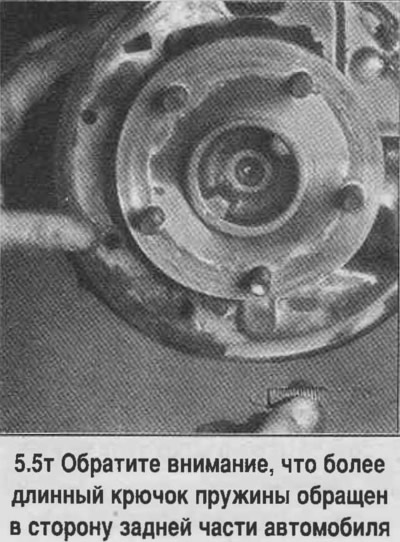

5. Further procedures for replacing the pads are illustrated in the photo.
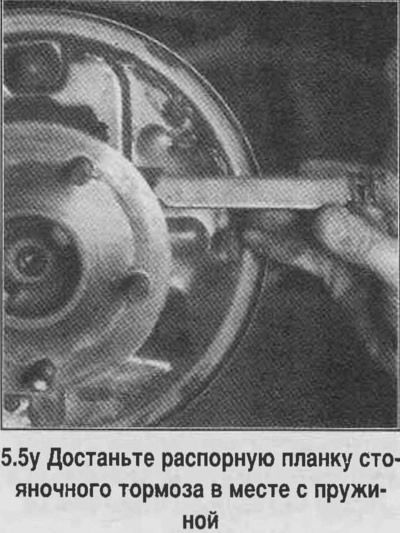

5. Further procedures for replacing the pads are illustrated in the photo.
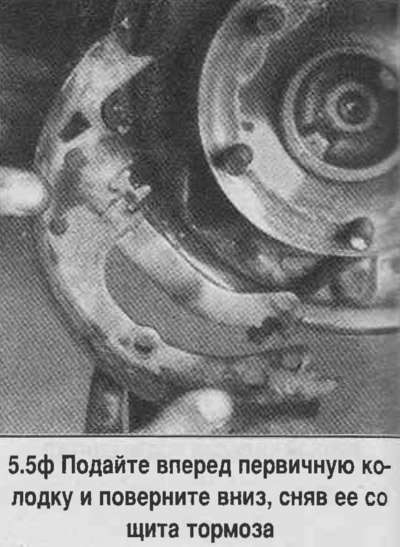

5. Further procedures for replacing the pads are illustrated in the photo.
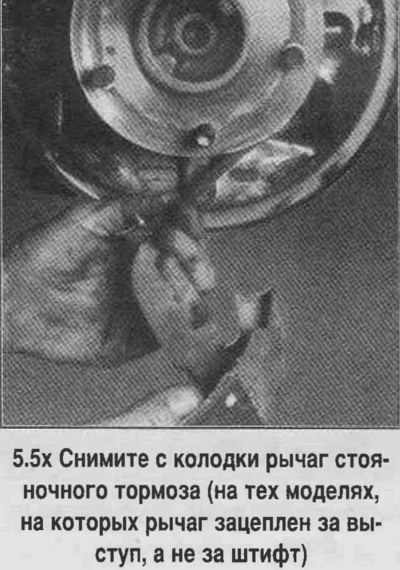

5. Further procedures for replacing the pads are illustrated in the photo.
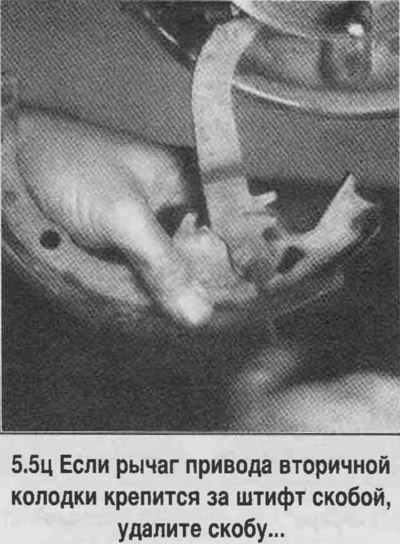

5. Further procedures for replacing the pads are illustrated in the photo.
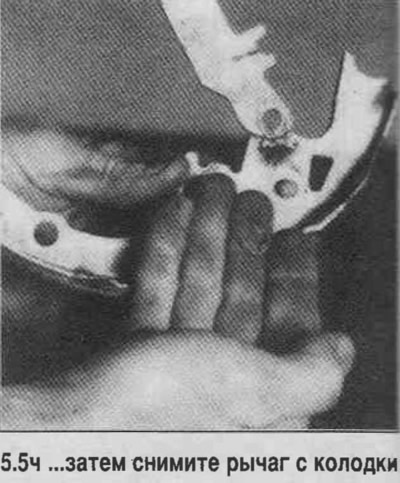

5. Further procedures for replacing the pads are illustrated in the photo.
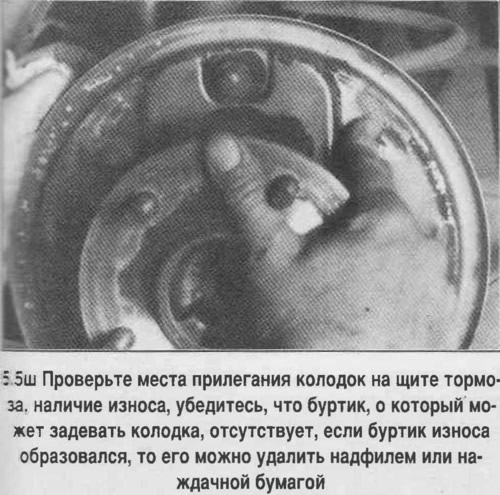

5. Further procedures for replacing the pads are illustrated in the photo.
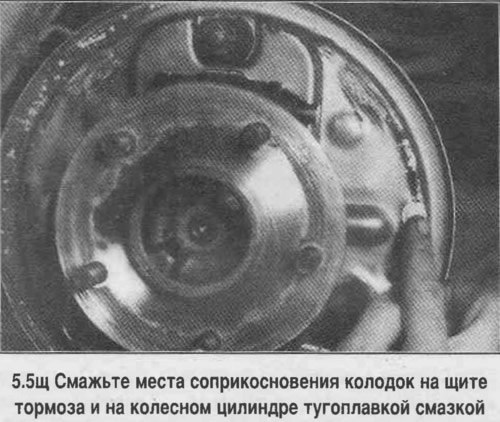

5. Further procedures for replacing the pads are illustrated in the photo.
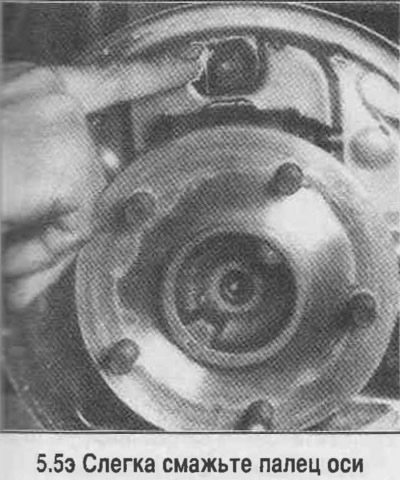

5. Further procedures for replacing the pads are illustrated in the photo.
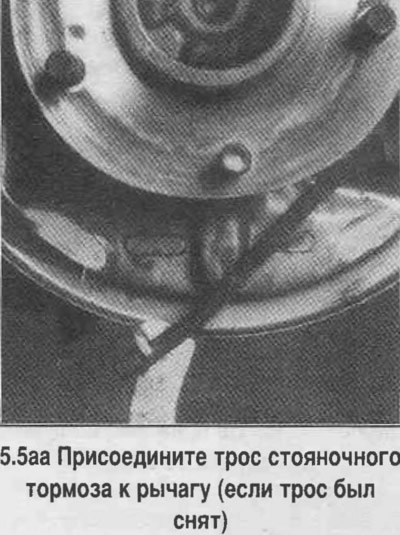

5. Further procedures for replacing the pads are illustrated in the photo.
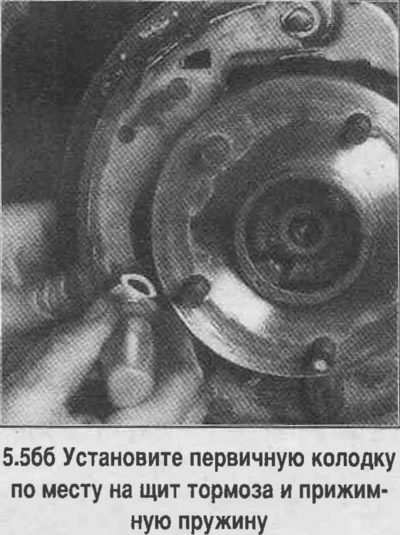

5. Further procedures for replacing the pads are illustrated in the photo.
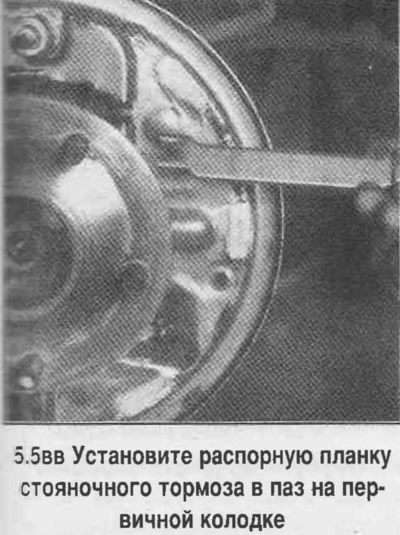

5. Further procedures for replacing the pads are illustrated in the photo.
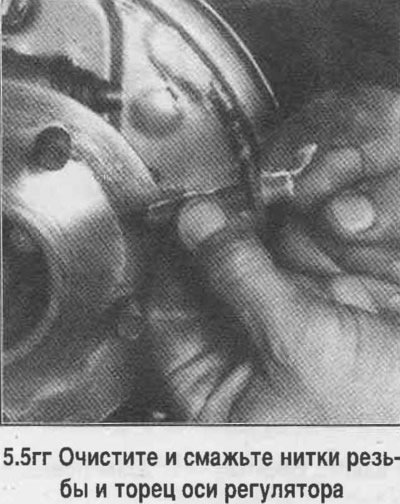

5. Further procedures for replacing the pads are illustrated in the photo.
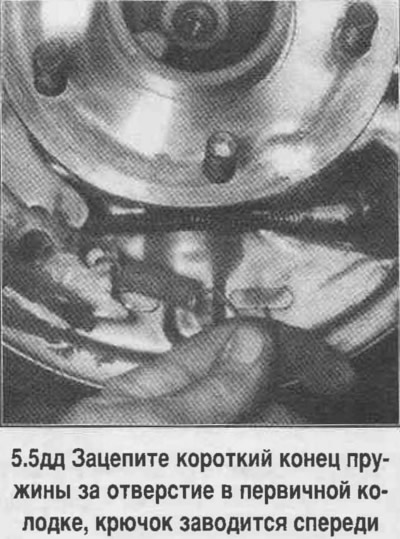

5. Further procedures for replacing the pads are illustrated in the photo.
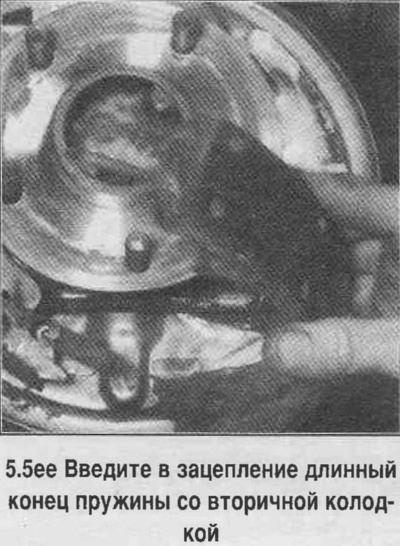

5. Further procedures for replacing the pads are illustrated in the photo.
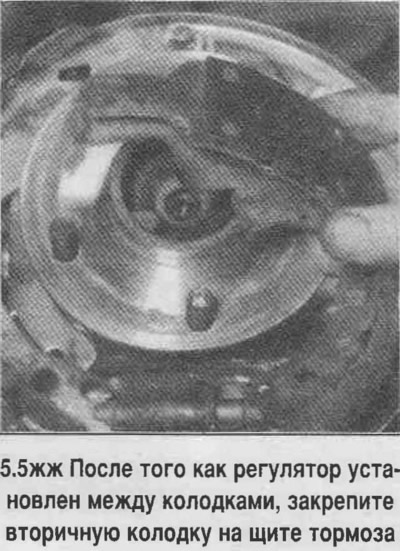

5. Further procedures for replacing the pads are illustrated in the photo.
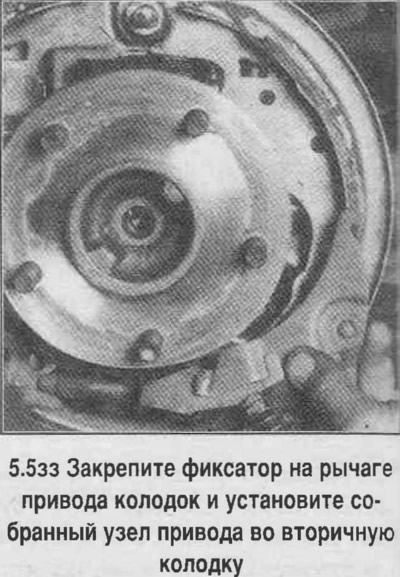

5. Further procedures for replacing the pads are illustrated in the photo.
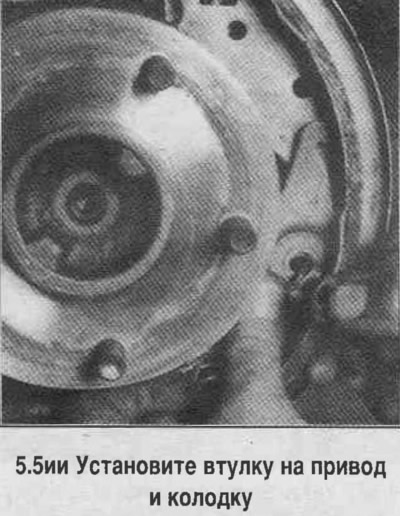

5. Further procedures for replacing the pads are illustrated in the photo.
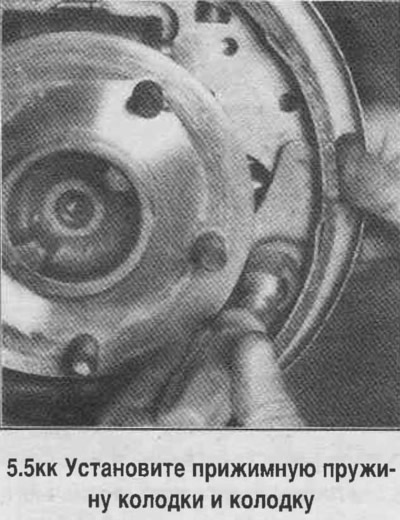

5. Further procedures for replacing the pads are illustrated in the photo.
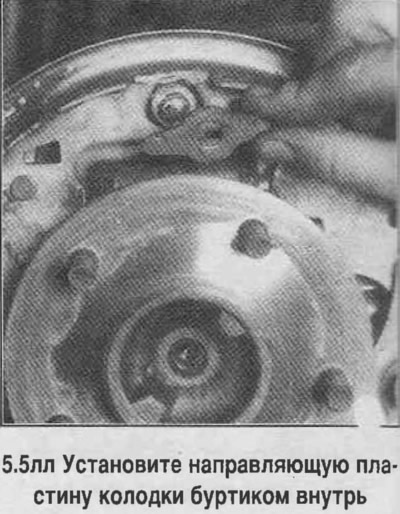

5. Further procedures for replacing the pads are illustrated in the photo.
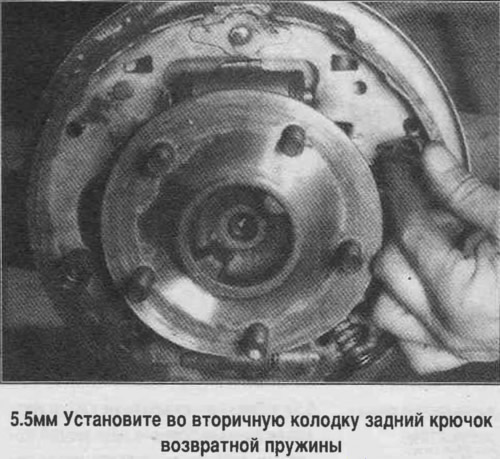

5. Further procedures for replacing the pads are illustrated in the photo.
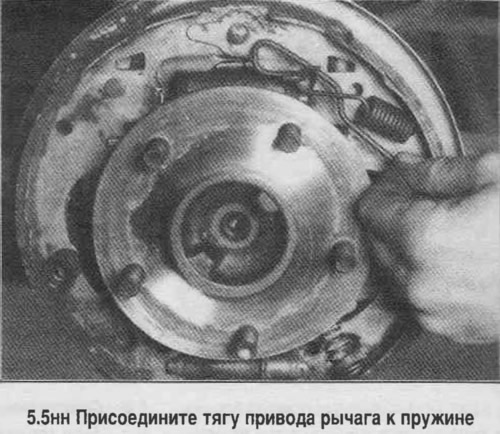

5. Further procedures for replacing the pads are illustrated in the photo.
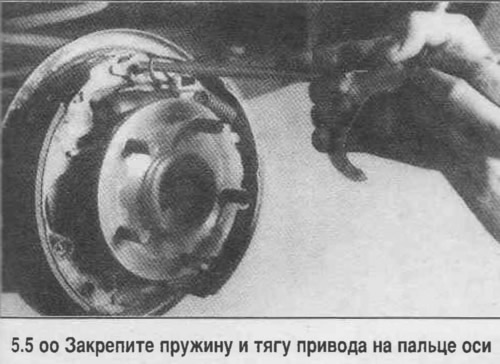

5. Further procedures for replacing the pads are illustrated in the photo.
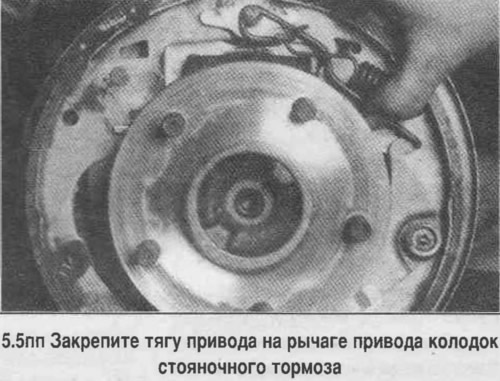

5. Further procedures for replacing the pads are illustrated in the photo.
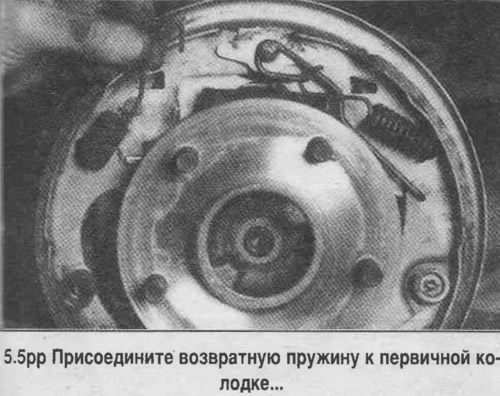

5. Further procedures for replacing the pads are illustrated in the photo.
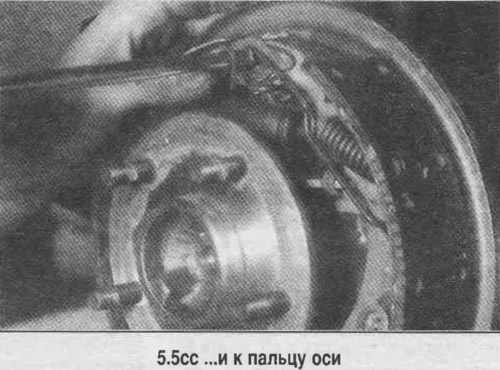

5. Further procedures for replacing the pads are illustrated in the photo.
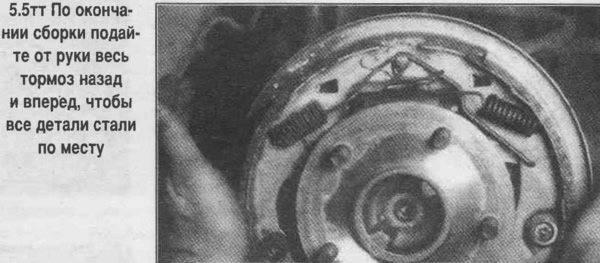

5. Further procedures for replacing the pads are illustrated in the photo.


6. Clean the drum and check the surface condition. Check the ovality of the drum, if there is severe damage, regrind the drum. If after regrinding the diameter is greater than the maximum, replace the drum (see photo),
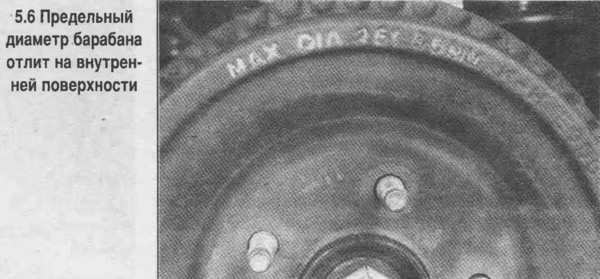


6. Clean the drum and check the surface condition. Check the ovality of the drum, if there is…


7. If traces of brake fluid leakage are detected from the wheel cylinder, replace the cylinder as an assembly, or disassemble and replace worn or damaged parts.

8. Check the brake shield mounting bolts for tightness. Clean the brake shield from dirt and corrosion.

9. Install the drum. Adjust the initial clearance between the shoes and the drum. To do this, spread the shoes until they touch the drum by turning the toothed nut through the opening in the brake shield. When finished, replace the opening plug in the brake shield.

10. Install the wheel, tighten the nuts and lower the car. Check the brake pedal travel. If the brake pedal approaches the floor of the body at the end of the travel, the brakes need to be re-adjusted. After finishing, check the operation of the brakes before driving off.

(The original material is located on the website «chevyman.ru»)

The article was checked: Vladimir Romannikov
This article is available at russian, bulgarian, belarusian, ukrainian, serbian, croatian, romanian, polish, slovak, hungarian

Share information:

Previous articles
Tahoe 1: Brake system
Next articles

Brake Caliper — Removal and Installation
Brake disc — inspection, removal and installation
Disc brake pads — replacement
General information about brakes
Typical rear brake arrangement
Drum Brake Shoes (Models with Conventional Drum Brake) — Replacement
Rear Brake Wheel Cylinder — Removal, Disassembly and Installation
Brake Master Cylinder — Removal, Disassembly and Installation
Parking brake — adjustment
Parking brake cable — removal and installation


See similar articles on the topic of Chevrolet cars:
Checking the brake shoes of the rear drum brakes Chevrolet Aveo T200 (2003-2008)
Rear hub and parking brake shoe/shield Chevrolet Captiva 1 (2006-2018)
Brake problems Chevrolet Cruze 1 (2008-2016)
Checking the fluid level in the brake and clutch hydraulic reservoir Chevrolet Lacetti 1 (2002-2009)
Replacing fluid in hydraulic brake and clutch drives Chevrolet Lanos T150 (2002-2009)
Braking and parking Chevrolet Niva 1 (2002-2016)
Parking brake shoes — replacement Chevrolet Trailblazer 1 (2001-2008, petrol)
Link in different formats to this page


Visitor comments

No comments yet


How much will 10 + 50 =


Tahoe 2 and 3 (2000-2014) 
  • General information
  • Vehicle characteristics
  • Vehicle device
  • Manual
  • Maintenance
  • Power unit
  • Engine repair
  • Engine overhaul
  • Cooling system
  • Injection and control system
  • Exhaust system
  • Engine electrical equipment
  • Transmission
  • Automatic gearbox 4L60, 4L65, 4L70
  • Automatic gearbox 6L50, 6L80, 6L90
  • Transfer case
  • Drive shafts and cardan
  • Front drive axle
  • Rear drive axle
  • Chassis
  • Car suspension
  • Steering
  • Brake system
  • Body (until 2007)
  • Exterior (external elements)
  • Interior (internal elements)
  • Doors, locks and windows
  • Heating and air conditioning
  • Security System (SRS)
  • Body (since 2007)
  • Exterior (external elements)
  • Doors, locks and windows
  • Interior (internal elements)
  • Electrical equipment
  • Electrical appliances (until 2007)
  • Lighting and lamps (until 2007)
  • Audio system (until 2007)
  • Electrical appliances (since 2007)
  • Lighting and lamps (since 2007)
  • Audio system (since 2007)
  • Wiring diagrams (2000-2005)
  • Wiring diagrams (2005-2007)
  • Wiring diagrams (since 2007)


Tahoe 1 (1992-2000) 
  • General information
  • User manual
  • Maintenance
  • Power unit
  • Engine in a car
  • Engine removed
  • Cooling system
  • Heating and air conditioning
  • Fuel and exhaust systems
  • Decreased toxicity
  • Transmission
  • Manual gearbox
  • Automatic gearbox
  • Transfer case
  • Clutch and drive shafts
  • Chassis
  • Brake system
  • Car suspension
  • Steering
  • Body
  • Repair of body elements
  • Electrical equipment
  • Engine electrics
  • Equipment and devices
  • Electrical circuits


ChevyMan.ru © 2017-2026 · Mobile version · Feedback · Site search · Interesting to read · Sitemap: EN BG BY UA RS HR RO PL SK HU

Aveo 2003-2008 · Aveo 2006-2011 · Aveo 2012-2018 · Captiva 2006-2018 · Cruze 2008-2016 · Lacetti 2002-2009 · Lanos 2002-2009 · Niva 2002-2016 · Tahoe 1992-2000 · Tahoe 2000-2014 · Lumina 1 1989-1994 · Trailblazer 1 2001-2008 · Orlando 1 2010-2018 ·
🛡️ For your security and to improve our service, this site uses cookies. You can disable them in your browser.