ChevyMan.ru
Mazda Mitsubishi Toyota Land Rover Honda Kia Nissan
English Русский
Български
Беларускі
Український
Српски
Hrvatski
Română
Polski
Slovenský
Magyar
|
Articles | Sitemap | Contacts |


Home   Aveo   Captiva   Cruze   Lacetti   Lanos   Niva   Tahoe   Others  
Tahoe 2 and 3 (2000-2014) Tahoe 1 (1992-2000)
  • Home
  • Tahoe
  • 1 (1992-2000)
  • Chassis
  • Brake system
  • Brake Master Cylinder — Removal, Disassembly and Installation

Brake Master Cylinder — Removal, Disassembly and Installation (Chevrolet Tahoe 1)

            0

1. Cover the areas under the cylinder tube fittings with a rag.

2. Loosen the nuts of the brake hydraulic lines on the master cylinder (see photo).
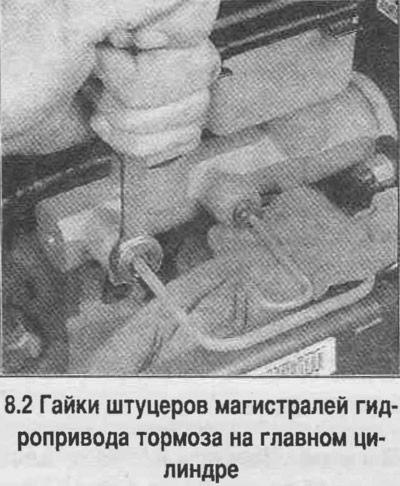
2. Loosen the nuts of the brake hydraulic lines on the master cylinder (see photo).


3. Loosen the bolts securing the shut-off valve/drain cock, remove the bracket. Disconnect the brake lines from the master cylinder and plug the holes to prevent dirt from entering.

4. Unscrew the two nuts securing the master cylinder, move aside the bracket with the shut-off valve and drain cock (see photo). Remove the master cylinder.
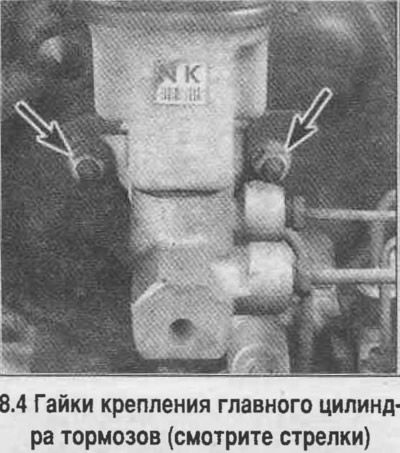
4. Unscrew the two nuts securing the master cylinder, move aside the bracket with the shut-off…


5. Remove the tank cap and diaphragm, drain the remaining liquid.

6. Place the master cylinder in a vice.

7. Remove the primary chamber piston retaining ring by pushing the piston back and prying the ring off with a screwdriver (see photo).
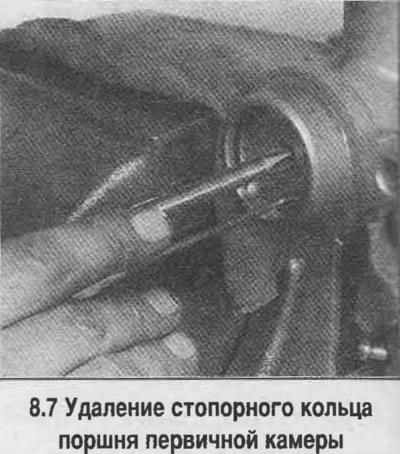


7. Remove the primary chamber piston retaining ring by pushing the piston back and prying the ring…


8. Remove the primary chamber piston with spring from the cylinder (see photo).
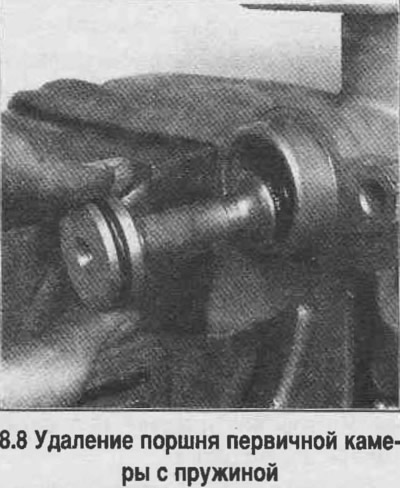
8. Remove the primary chamber piston with spring from the cylinder (see photo).


9. Remove the secondary chamber piston from the cylinder. If necessary, turn the cylinder over and tap the piston against a wooden block to remove it (see photo).
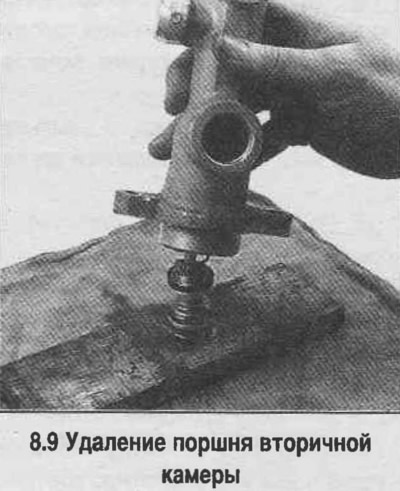
9. Remove the secondary chamber piston from the cylinder. If necessary, turn the cylinder over and…


10. Pry and remove the tank from the cylinder body (see photo). Remove the seals.
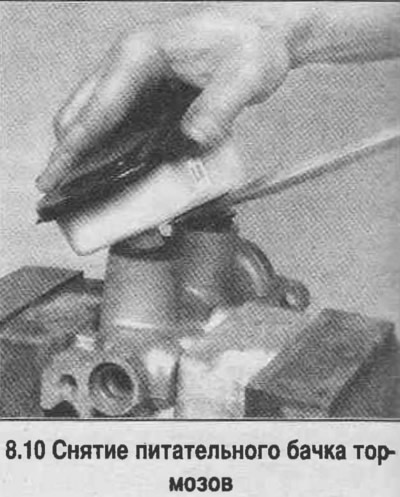


10. Pry and remove the tank from the cylinder body (see photo). Remove the seals.


11. It is not permitted to remove the bypass valve from the cylinder body, since this device is non-disassemblable and cannot be serviced.

12. Check the condition of the cylinder. If any damage is found, replace the master cylinder. Grinding the inner surface is not allowed.

13. Lubricate the new reservoir seals with brake fluid and press them into the cylinder body. Make sure the seals are in place.

14. Place the reservoir on a hard surface and press it into the master cylinder body (see photo).
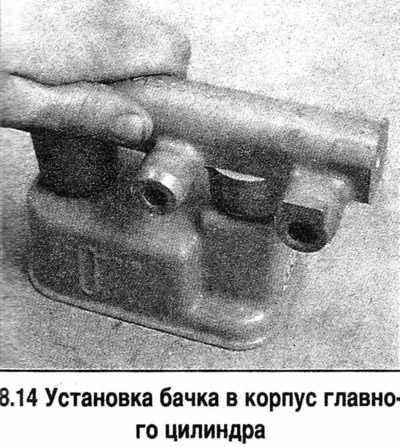
14. Place the reservoir on a hard surface and press it into the master cylinder body (see photo).


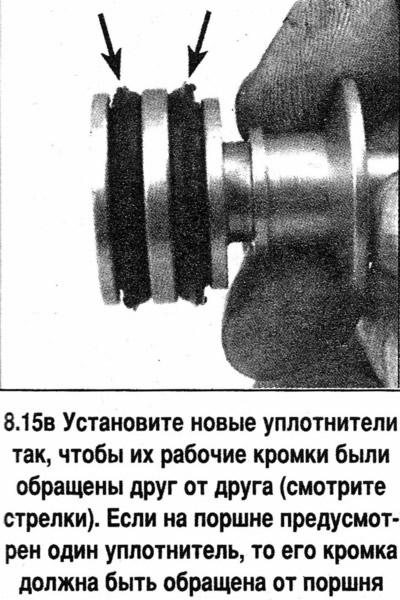
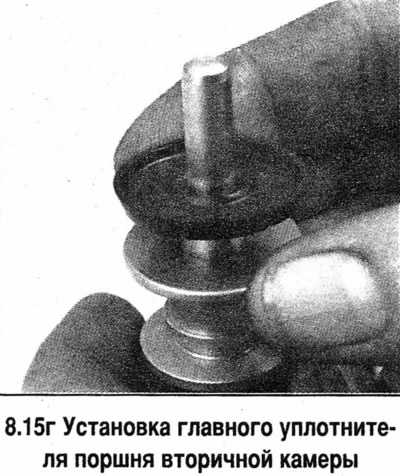
15. Remove the old secondary chamber piston seals and install new seals with the lips facing away from each other (see photo). The secondary piston main seal must be oriented as shown in the photo.
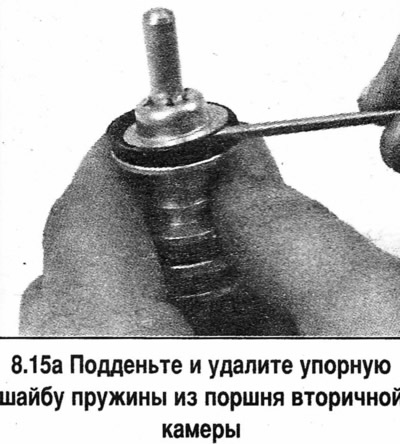
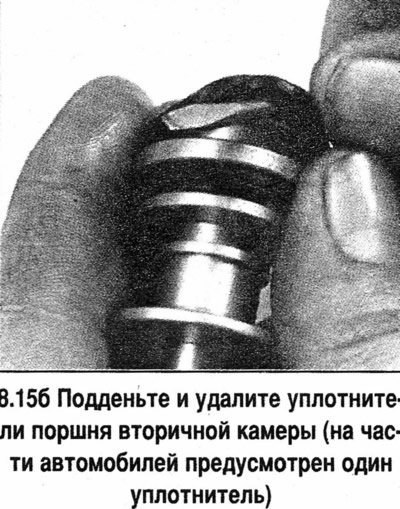
15. Remove the old secondary chamber piston seals and install new seals with the lips facing away…


15. Remove the old secondary chamber piston seals and install new seals with the lips facing away…


15. Remove the old secondary chamber piston seals and install new seals with the lips facing away…


15. Remove the old secondary chamber piston seals and install new seals with the lips facing away…


16. Install a new spring thrust washer onto the secondary chamber piston (see photo).
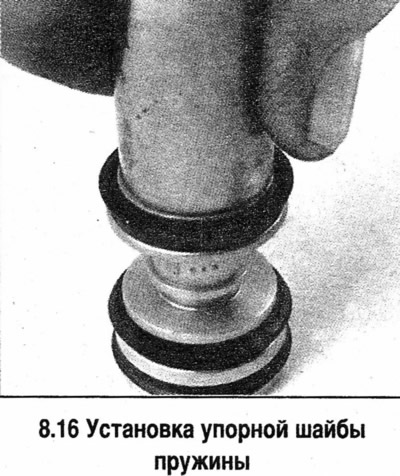


16. Install a new spring thrust washer onto the secondary chamber piston (see photo).


17. Lubricate the cylinder with clean brake fluid and install the spring and piston of the secondary chamber with seals (see photo).
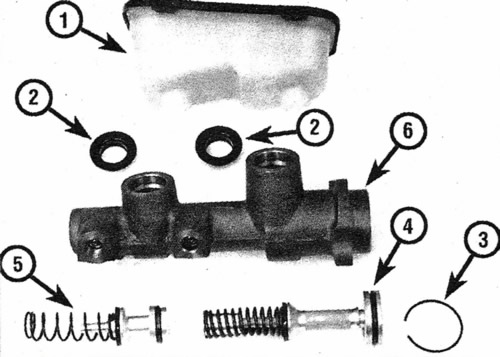
8.17. Brake master cylinder parts.

8.17. Brake master cylinder parts.

1. Feed tank with lid, diaphragm
2. Seals
3. Retaining ring
4. Primary chamber piston with spring
5. Secondary chamber piston with spring
6. Body


18. Install the primary chamber piston with the spring into the cylinder, press the piston back and insert the retaining ring.

19. Check the tank cap and diaphragm. If cracks or deformations are found, replace the tank. Secure the diaphragm to the tank cap.

20. Before installing on the vehicle, remove air from the cylinder, which will speed up bleeding of the brakes and save fluid.

21. Clamp the cylinder in a vice, fill the reservoir with fluid, tighten the plugs and press the primary chamber piston with a large Phillips screwdriver. Unscrew the plug to release air. Screw the plug back on and release the piston. Repeat these steps until fluid begins to flow out of the hole under the fitting. Maintain the fluid level in the reservoir at all times. Repeat the air removal steps for the other hole.


22. Instead of a plug, you can close the hole with your finger. Release your finger after pressing the pistons, after the liquid flows out, close the hole with your finger and release the pistons. After a few seconds, press the piston again and remove your finger. Repeat the procedure and do the same on the other hole. After only liquid begins to flow out of the holes, tighten the plugs.

24. Install the cylinder in the reverse order. First, tighten both nuts by hand. Screw in the fittings without distortions, manipulating the cylinder. Tighten the nuts and fittings.

25. When finished, remove air from the brake hydraulic system.

The article was checked: Vladimir Romannikov
This article is available at russian, bulgarian, belarusian, ukrainian, serbian, croatian, romanian, polish, slovak, hungarian

Share information:

Previous articles
Tahoe 1: Brake system
Next articles

Rear Brake Wheel Cylinder — Removal, Disassembly and Installation
Drum Brake Shoes (Models with Conventional Drum Brake) — Replacement
Drum brake shoes (models with dual-shoe self-braking brakes) — replacement
Brake Caliper — Removal and Installation
Brake disc — inspection, removal and installation
Parking brake — adjustment
Parking brake cable — removal and installation
Brake light switch — removal, installation and adjustment
Vacuum brake booster — removal and installation
Brake booster — removal and installation


See similar articles on the topic of Chevrolet cars:
Replacing the brake master cylinder reservoir Chevrolet Aveo T300 (2012-2018)
General description and operation of the brake master cylinder Chevrolet Captiva 1 (2006-2018)
Checking the level and adding fluid to the brake master cylinder reservoir Chevrolet Cruze 1 (2008-2016)
Removal the master brake cylinder Chevrolet Lacetti 1 (2002-2009)
Removal the master brake cylinder Chevrolet Lanos T150 (2002-2009)
Brake master cylinder Chevrolet Niva 1 (2002-2016)
Removal, overhaul and installation of the master brake cylinder Chevrolet Lumina 1 (1989-1994)
Link in different formats to this page


Visitor comments

No comments yet


How much will 15 + 13 =


Tahoe 2 and 3 (2000-2014) 
  • General information
  • Vehicle characteristics
  • Vehicle device
  • Manual
  • Maintenance
  • Power unit
  • Engine repair
  • Engine overhaul
  • Cooling system
  • Injection and control system
  • Exhaust system
  • Engine electrical equipment
  • Transmission
  • Automatic gearbox 4L60, 4L65, 4L70
  • Automatic gearbox 6L50, 6L80, 6L90
  • Transfer case
  • Drive shafts and cardan
  • Front drive axle
  • Rear drive axle
  • Chassis
  • Car suspension
  • Steering
  • Brake system
  • Body (until 2007)
  • Exterior (external elements)
  • Interior (internal elements)
  • Doors, locks and windows
  • Heating and air conditioning
  • Security System (SRS)
  • Body (since 2007)
  • Exterior (external elements)
  • Doors, locks and windows
  • Interior (internal elements)
  • Electrical equipment
  • Electrical appliances (until 2007)
  • Lighting and lamps (until 2007)
  • Audio system (until 2007)
  • Electrical appliances (since 2007)
  • Lighting and lamps (since 2007)
  • Audio system (since 2007)
  • Wiring diagrams (2000-2005)
  • Wiring diagrams (2005-2007)
  • Wiring diagrams (since 2007)


Tahoe 1 (1992-2000) 
  • General information
  • User manual
  • Maintenance
  • Power unit
  • Engine in a car
  • Engine removed
  • Cooling system
  • Heating and air conditioning
  • Fuel and exhaust systems
  • Decreased toxicity
  • Transmission
  • Manual gearbox
  • Automatic gearbox
  • Transfer case
  • Clutch and drive shafts
  • Chassis
  • Brake system
  • Car suspension
  • Steering
  • Body
  • Repair of body elements
  • Electrical equipment
  • Engine electrics
  • Equipment and devices
  • Electrical circuits


ChevyMan.ru © 2017-2026 · Mobile version · Feedback · Site search · Interesting to read · Sitemap: EN BG BY UA RS HR RO PL SK HU

Aveo 2003-2008 · Aveo 2006-2011 · Aveo 2012-2018 · Captiva 2006-2018 · Cruze 2008-2016 · Lacetti 2002-2009 · Lanos 2002-2009 · Niva 2002-2016 · Tahoe 1992-2000 · Tahoe 2000-2014 · Lumina 1 1989-1994 · Trailblazer 1 2001-2008 · Orlando 1 2010-2018 ·
🛡️ For your security and to improve our service, this site uses cookies. You can disable them in your browser.