


Contents: Listening to the radio ↧ Search radio stations ↧ Setting the tone ↧ Adjusting the speakers ↧ Listening to a cassette recorder ↧
Listening to the radio
PWR-VOL: Press this button to turn the radio on or off. Rotate this button to increase or decrease the volume.
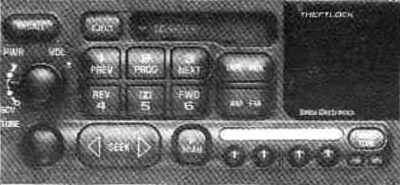
RECALL: If the radio is playing, press the button to select the desired frequency.
SCV (Speed-Compensater-Volum): SCV gives your audio system the ability to automatically adjust the volume depending on road and wind noise as you drive. Set the desired volume level. Turn the control knob behind the top button clockwise to adjust SCV. Now, as you drive, SCV automatically increases the volume to overcome all extraneous noise at any speed.
If you do not want to use the SCV, turn the control knob fully counterclockwise.
Search radio stations
AM-FM: Press this button to select between AM, FM1 or FM2. The display will show your selection.
TUNE: Press the button lightly until it comes out. Rotate it to select radio stations. When not in use, press it down.
SEEK: Press the right arrow to tune to a higher frequency radio station and the left arrow to tune to a lower frequency radio station.
SCAN: Press and hold SEEK for two seconds until SCAN appears on the display. SCAN allows you to listen to stations for a few seconds. The receiver will continue scanning and will stop immediately on each station when you press the button again.
PUSHBUTTONS: Six numbered buttons will allow you to return to your favorite radio stations. There will be 18 of them (6-AM, 6-FM1, 6-FM2). To do this:
- 1. Turn off the radio
- 2. Press AM - FM to select the frequency
- 3. Tune to the desired station
- 4. Press AUTO TONE
- 5. Press one of the six buttons. The sound will disappear. When it appears, release the button. If you ever press that button, you will get that station
- 6. Repeat the operation with each button.
P.SCAN: When you press the button, the radio stations you have previously selected on the numbered buttons are scanned. Press the button again or any of the six buttons to stop scanning and select a station.
Setting the tone
BASS: Press the button lightly to release it. Turn it clockwise to increase the bass and clockwise to decrease it.
TREB: Press the button lightly. Turn clockwise to boost the high frequencies and vice versa to reduce them.
When you use these buttons, AUTO TONE on the display does not light. If the buttons are not needed, press them back to their original positions.
AUTO TONE: Press this button to select from six tone settings CLASSIC, NEWS, ROCK, POP, COUNTRY/WESTERN or JAZZ. Each time you press the button, one of the six settings is selected in sequence. AUTO TONE appears on the display.
Adjusting the speakers
BAL: Press this button lightly. Turn it clockwise to boost the sound of the right speaker, and counterclockwise to boost the sound of the left speaker. The middle position equalizes the sound.
FADE: Press this button lightly. Turn it clockwise to increase the sound of the front speakers, and counterclockwise to increase the sound of the rear speakers.
If you are not using these buttons, return them to their original positions by pressing them lightly.
Listening to a cassette recorder
Your cassette recorder is designed for tapes with 30 or 45 minutes of play time per track. Tapes longer than this will not work.
To insert a cassette with the ignition key in the OFF (C) position, press EJECT or RECALL. Then insert the cassette. If the ignition is on and the radio is off, the tape player starts playing.
If it is playing, do not use VOL, AUTOTONE, BAL, FADE, BASS and TREB to tune as for a radio. The display will show tape recorder symbols and rewind direction arrows. Once a tape is inserted, the top track is selected for listening first.
PREV (1): Press this button or the left SEEK arrow to search for the previous track. After three seconds of silence, the tape recorder starts playing the previous melody from the beginning. The direction arrow flashes during the SEEK operation.
PROG (2): Press this button to switch the tape recorder from one track to another.
NEXT (3): Press this button or the right SEEK arrow to search for the next track. After three seconds of silence, the tape recorder will stop and play the next track. The direction arrow will flash during the search.
REV (4): Press this button to quickly rewind the tape to the beginning of the tape or until you press REV again. The radio will play the last selected tune and the direction arrow will flash while the tape is rewinding.
DD (5): Press this button to reduce the noise on the tape. The double D symbol will appear on the display when the tape recorder is in this mode.
FWD (6): Press this button to fast forward the tape to the end of the tape or until you press FWD again. The radio will play the last selected tune and the direction arrow will flash while the tape is being rewound.
AM-FM: Press this button to switch from tape to radio.
TAPE AUX: Press this button to return to listening to the tape recorder. The arrow will light when the tape recorder is in active mode.
EJECT: Press this button, remove the cassette, the radio will work again. To insert a new cassette, press EJECT again.
CLN: If this appears on the display, the tape recorder needs cleaning. You can listen to the recordings, but you should clean the tape recorder as soon as possible.