ChevyMan.ru
Mazda Mitsubishi Toyota Land Rover Honda Kia Nissan
English Русский
Български
Беларускі
Український
Српски
Hrvatski
Română
Polski
Slovenský
Magyar
|
Articles | Sitemap | Contacts |


Home   Aveo   Captiva   Cruze   Lacetti   Lanos   Niva   Tahoe   Others  
Orlando 1 (2010-2018) Trailblazer 1 (2001-2008, petrol) Lumina 1 (1989-1994)
  • Home
  • Chevrolet
  • Orlando 1
  • Chassis
  • Brake system
  • Checking the amplifier's functionality

Checking the amplifier's functionality (Chevrolet Orlando 1)

            0

A sign of a faulty brake booster is an increased force required to press the pedal for effective braking.

To complete the job you will need a rubber bulb. We carry out the work in the following order:

1. We prepare the car for maintenance and repair.

2. With the engine off, press the brake pedal 4-6 times. While holding the pedal, start the engine. If the amplifier is working properly, the pedal should move forward slightly.

3. After letting the engine run for 1.5-2 minutes, turn it off. Slowly press the brake pedal 2-3 times. If the pedal travel at the first press is greater than at the second and third press, the vacuum booster is sealed.

4. Start the engine again and press the brake pedal. Without releasing the pedal, turn off the engine. If the pedal remains motionless for 20 seconds, the amplifier is working properly.

5. Otherwise, visually check the reliability of the connections of the check valve 1 with the body of the vacuum booster 2 and the tightness of the vacuum supply tube 3.

5. Otherwise, visually check the reliability of the connections of the check valve 1 with the body…


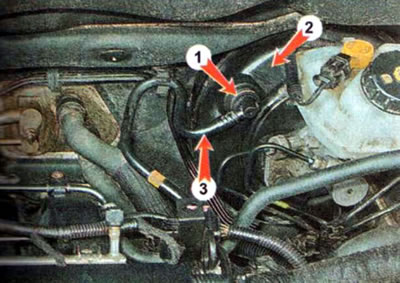
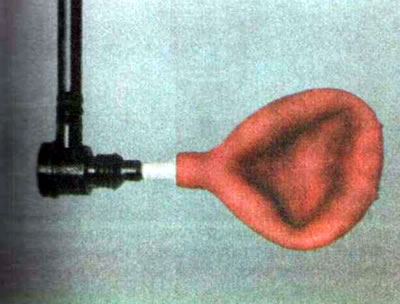
6. Check the operation of the check valve. To do this, with the engine turned off, remove the check valve from the rubber seal of the booster. We insert a rubber bulb into the valve branch pipe, which was used to insert it into the amplifier body, and squeeze it. If the bulb remains compressed, the valve is working properly. Otherwise, we replace the valve.


6. Check the operation of the check valve. To do this, with the engine turned off, remove the check…


7. Install the valve in the reverse order and re-check the tightness of the brake booster (items 2-3).

Recommendations. If the check valve is in good condition, its tube and rubber sealing sleeve on the brake booster body are not damaged, then the booster itself is faulty. A faulty vacuum booster must be replaced.


(The article was reprinted from the website ChevyMan)

The article was checked: Vladimir Romannikov
This article is available at russian, bulgarian, belarusian, ukrainian, serbian, croatian, romanian, polish, slovak, hungarian

Share information:

Previous articles
Orlando 1: Brake system
Next articles

Vacuum brake booster
Anti-lock braking system
Brake pedal position sensor
Bleeding the brake hydraulic system
Windscreen washer — check, replacement
Brake fluid
Replacing brake fluid


See similar articles on the topic of Chevrolet cars:
Checking the brake system Chevrolet Aveo T300 (2012-2018)
Checking oil pressure Chevrolet Captiva 1 (2006-2018)
Checking the wheels Chevrolet Cruze 1 (2008-2016)
Checking the condition of wheels and tires Chevrolet Lacetti 1 (2002-2009)
Checking the condition of wheels and tires Chevrolet Lanos T150 (2002-2009)
Checking the engine on a car after repair Chevrolet Niva 1 (2002-2016)
Checking the engine compartment Chevrolet Tahoe 1 (1992-2000)
Link in different formats to this page


Visitor comments

No comments yet


How much will 28 + 35 =


Orlando 1 (2010-2018) 
  • General information
  • Introduction to manual
  • User manual
  • Maintenance
  • Troubleshooting
  • Power unit
  • Engine repair
  • Fuel and control system
  • Cooling and lubrication system
  • Ignition system
  • Transmission
  • Clutch
  • Gearbox
  • Drive shafts
  • Chassis
  • Car suspension
  • Steering
  • Brake system
  • Body
  • Exterior (external elements)
  • Doors, locks and windows
  • Electrical equipment
  • Equipment and devices
  • Windscreen wipers
  • Power devices
  • Electrical diagrams


Trailblazer 1 (2001-2008) 
  • General information
  • User manual
  • Troubleshooting
  • Maintenance
  • Power unit
  • Engine in a car
  • Engine overhaul
  • Cooling and heating
  • Fuel and exhaust system
  • Engine electrical equipment
  • Engine control
  • Transmission
  • Automatic gearbox
  • Transfer case
  • Drive shafts and cardan
  • Chassis
  • Brake system
  • Car suspension
  • Steering
  • Body
  • Exterior (external elements)
  • Interior (internal elements)
  • Doors, locks and windows
  • Electrical equipment
  • Equipment and devices
  • Electrical circuits


Lumina 1 (1989-1994) 
  • General information
  • Maintenance
  • Power unit
  • Engine 3.1L V6
  • Engine 3.8L V6
  • Engine overhaul
  • Cooling system
  • Power and exhaust system
  • Fuel injection
  • Engine electrical equipment
  • Reduced exhaust gas toxicity
  • Transmission
  • Automatic gearbox
  • Drive shafts
  • Chassis
  • Brake system
  • Car suspension
  • Steering
  • Body
  • Heating and air conditioning
  • Repair of body elements
  • Doors, covers and windows
  • Interior (internal elements)
  • Electrical equipment
  • Equipment and devices
  • Electrical circuits


ChevyMan.ru © 2017-2026 · Mobile version · Feedback · Site search · Interesting to read · Sitemap: EN BG BY UA RS HR RO PL SK HU

Aveo 2003-2008 · Aveo 2006-2011 · Aveo 2012-2018 · Captiva 2006-2018 · Cruze 2008-2016 · Lacetti 2002-2009 · Lanos 2002-2009 · Niva 2002-2016 · Tahoe 1992-2000 · Tahoe 2000-2014 · Lumina 1 1989-1994 · Trailblazer 1 2001-2008 · Orlando 1 2010-2018 ·
🛡️ For your security and to improve our service, this site uses cookies. You can disable them in your browser.