
ChevyMan.ru
Mazda Mitsubishi Toyota Land Rover Honda Kia Nissan
English Русский
Български
Беларускі
Український
Српски
Hrvatski
Română
Polski
Slovenský
Magyar
|
Articles | Sitemap | Contacts |


Home   Aveo   Captiva   Cruze   Lacetti   Lanos   Niva   Tahoe   Others  
Captiva 1 (2006-2018)
  • Home
  • Captiva
  • 1 (2006-2018)
  • Engine HFV6 3.2L
  • Engine repair
  • Exhaust manifold assembly

Exhaust manifold assembly (Chevrolet Captiva 1)

            0

Contents: Removal procedure ↧ Clear ↧ Inspection ↧ Installation procedure ↧

Removal procedure


1. Disconnect the negative battery cable.

2. Remove the front exhaust pipe. See Part 1G3, Exhaust System - HFV6 3.2L.

3. Remove the auxiliary catalytic converter. See Part 1G3, Exhaust System - HFV6 3.2L.

4. Exhaust manifold bank 1: remove transfer case. See Part 5D. "Transfer case".

5. Exhaust manifold bank 1: Remove the rear suspension of the transmission with the final drive assembly. See "Rear suspension of the gearbox with the main gear assembly" in this section.
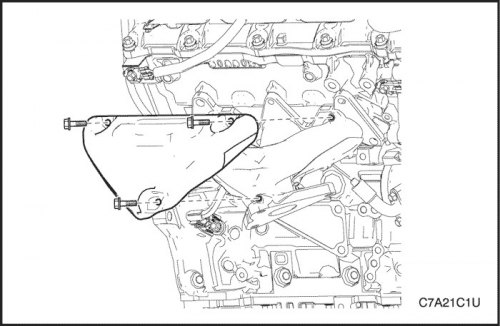
5. Exhaust manifold bank 1: Remove the rear suspension of the transmission with the final drive…


6. Disconnect the upper oxygen sensor connector.

7. Remove the three bolts (1) securing the outer heat-insulating shield (2) to the exhaust manifold.
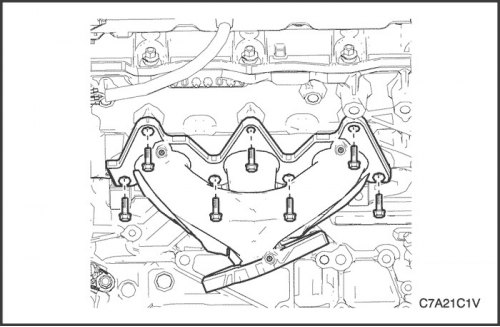
7. Remove the three bolts (1) securing the outer heat-insulating shield (2) to the exhaust manifold.


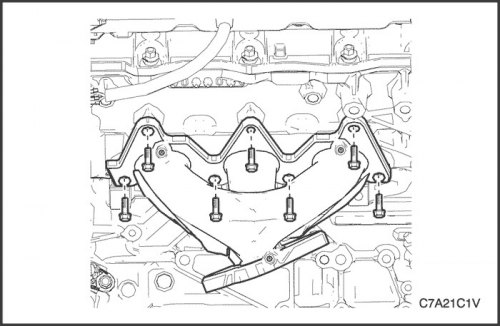
8. Gradually loosen the seven exhaust manifold mounting bolts, working from the center to the outer bolts, and then remove the bolts.


9. Remove and discard the gasket between the exhaust manifold and the cylinder head.

10. Remove the three bolts securing the inner heat shield to the exhaust manifold, if required.

Clear


1. Thoroughly clean the exhaust manifold using any of the common non-corrosive cleaning solvents and a soft bristle brush.

2. Dry the exhaust manifold with compressed air.
2. Dry the exhaust manifold with compressed air.


Inspection


1. Inspect the exhaust manifold (1), checking for the following faults:
  • Damage to threaded holes intended for fastening thermal insulation shields.
  • Damage to the holes intended for mounting the exhaust manifold.
  • Damage to the threads securing the exhaust manifold to the exhaust pipe flange studs.
  • Damage to surfaces sealed by gaskets.
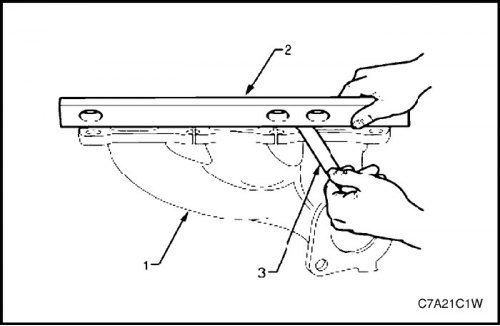
  • Using a ruler (2) and feeler gauges (3), check the joint surface of the exhaust manifold with the cylinder head for deformation, which should not exceed 0.25 mm.

Note: If the surface flatness differs from the required level, the exhaust manifold is deformed and must be replaced.

Note: If the surface flatness differs from the required level, the exhaust manifold is deformed and…


Installation procedure


1. Install the exhaust manifold inner heat shield if required.

Tighten

Tighten the exhaust manifold inner heat shield bolts to 10 N·m (89 lb-ft).

2. Place the new exhaust manifold gasket onto the manifold.

3. Lubricate the threads of the exhaust manifold mounting bolts with Loctite 272 thread sealant (or equivalent).

Note: When tightening the exhaust manifold to cylinder head bolts, start with the center bolts and then move to the bolts on opposite sides one by one.


4. Install the exhaust manifold and mounting bolts.

Tighten

Tighten the exhaust manifold to cylinder head bolts to 20 N·m (15 lb-ft).
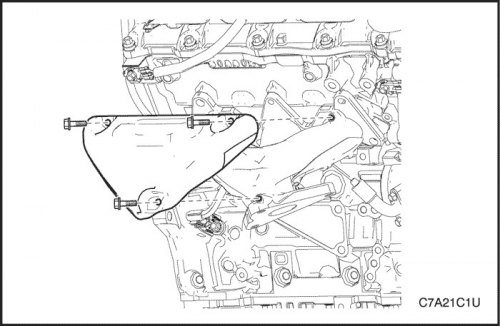
Tighten the exhaust manifold to cylinder head bolts to 20 N·m (15 lb-ft).


5. Install the exhaust manifold heat shield.

Tighten

Tighten the exhaust manifold outer heat shield bolts to 10 N·m (89 lb-ft).

6. Install previously removed external parts.
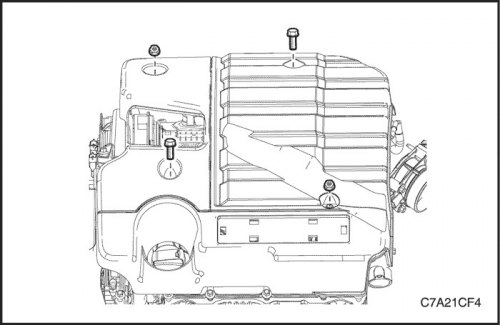
6. Install previously removed external parts.


[The material was created based on information from the website: «ChevyMan»]

The article was checked: Vladimir Romannikov
This article is available at russian, bulgarian, belarusian, ukrainian, serbian, croatian, romanian, polish, slovak, hungarian

Share information:

Previous articles
Captiva 1: Engine repair
Next articles

Intake manifold assembly
Upper intake manifold
Accessory Drive Belt Tensioner Assembly
Idle pulley of the auxiliary drive belt
Auxiliary drive belt
Cylinder head cover
Crankshaft pulley
Front cover assembly
Camshaft Drive Chain Components
Oil pump assembly


See similar articles on the topic of Chevrolet cars:
Replacing the intake manifold gasket Chevrolet Aveo T300 (2012-2018)
Replacing the exhaust manifold gasket Chevrolet Cruze 1 (2008-2016)
Removal the exhaust manifold Chevrolet Lacetti 1 (2002-2009)
Removal the exhaust manifold Chevrolet Lanos T150 (2002-2009)
Exhaust system Chevrolet Niva 1 (2002-2016)
Exhaust manifold — removal and installation Chevrolet Tahoe 1 (1992-2000)
Exhaust manifold — removal and installation Chevrolet Trailblazer 1 (2001-2008, petrol)
Link in different formats to this page


Visitor comments

No comments yet


How much will 35 + 27 =


Captiva 1 (2006-2018) 
  • Manual
  • Before leaving
  • Keys, doors and windows
  • Seats, protection systems
  • Instruments and controls
  • Lighting system
  • Information and entertainment
  • Navigation system
  • Climate control
  • Driving a car
  • Car care
  • Maintenance
  • Engine 2.0 l (diesel)
  • Engine device
  • Troubleshooting
  • Engine repair
  • Cooling system
  • Engine electrical equipment
  • Control and power systems
  • Exhaust system
  • Engine FAM II 2.4D
  • Engine device
  • Troubleshooting
  • Engine repair
  • Cooling system
  • Engine electrical equipment
  • Control and power systems
  • Exhaust system
  • Engine HFV6 3.2L
  • Engine device
  • Troubleshooting
  • Engine repair
  • Cooling system
  • Engine electrical equipment
  • Control and power systems
  • Exhaust system
  • Transmission
  • Front drive axle
  • Rear drive axle
  • Automatic gearbox - device
  • Automatic gearbox - service
  • Automatic gearbox - repair
  • Manual gearbox - device
  • Manual gearbox - service and repair
  • Clutch
  • Transfer case
  • Chassis
  • Car suspension
  • Brake system
  • Steering
  • Body
  • Heating and ventilation
  • Air conditioning (manual)
  • Air conditioning (automatic)
  • Seat belts
  • Airbags
  • Car seat
  • Interior (internal elements)
  • Exterior (external elements)
  • Doors and windows
  • Electrical equipment
  • Equipment and devices
  • Lighting and lamps
  • Windshield wipers and washers
  • Electrical circuits


ChevyMan.ru © 2017-2026 · Mobile version · Feedback · Site search · Interesting to read · Sitemap: EN BG BY UA RS HR RO PL SK HU

Aveo 2003-2008 · Aveo 2006-2011 · Aveo 2012-2018 · Captiva 2006-2018 · Cruze 2008-2016 · Lacetti 2002-2009 · Lanos 2002-2009 · Niva 2002-2016 · Tahoe 1992-2000 · Tahoe 2000-2014 · Lumina 1 1989-1994 · Trailblazer 1 2001-2008 · Orlando 1 2010-2018 ·
🛡️ For your security and to improve our service, this site uses cookies. You can disable them in your browser.