
Necessary equipment
- DT-48179 Universal Guide Handle
- DT-48182 Needle Bearing Puller/Installer
- DT-48225 Primary Shaft Mandrel
- DT-48226 Puller / tool for installing the main gear box crankcase ball bearing assembly
- DT-48227 Roller Bearing Puller/Installer
- DT-48228 Clutch Housing Ball Bearing Remover/Installer
- DT-48230 Device for installing differential bearing cage and drive axle shaft seal
- DT-48231 Primary and Secondary Shaft Puller/Pusher
- DT-48232 Primary shaft synchronizer housing protective device
Assembly order
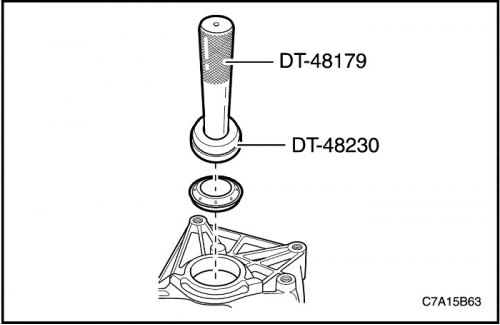
1. Install a new drive axle shaft seal into the clutch housing using DT-48179 and DT-48230.
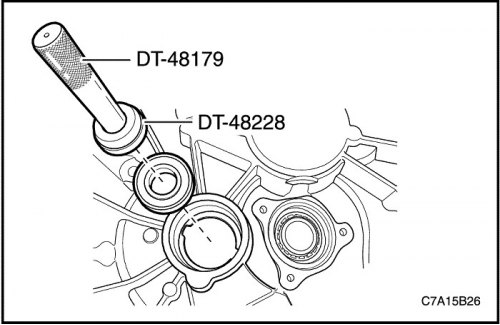
2. Install the intermediate shaft ball bearing into the clutch housing using DT-48179 and DT-48228.
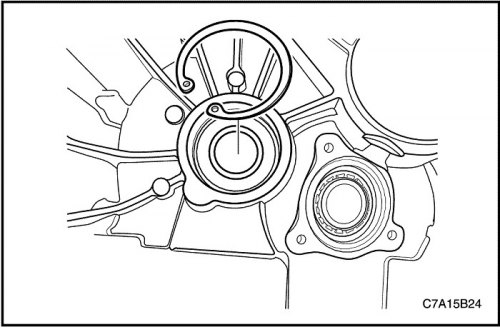
3. Install the snap ring onto the intermediate shaft ball bearing.
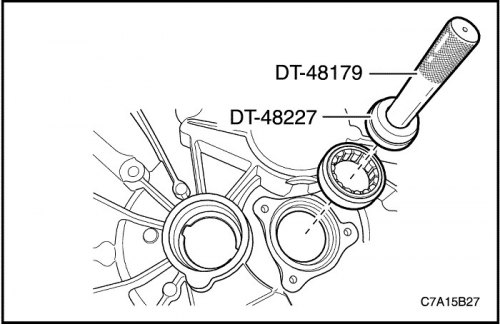
4. Install the input shaft roller bearing into the clutch housing using DT-48179 and DT-48227.
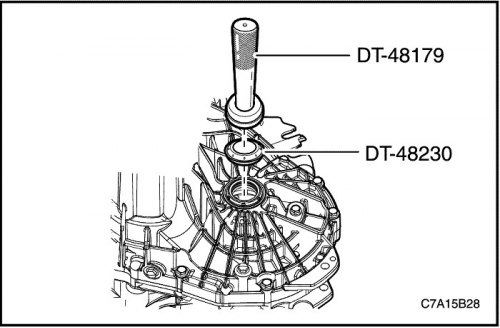
5. Install a new axle shaft seal into the transmission housing with the final drive assembly using DT-48179 and DT-48230.
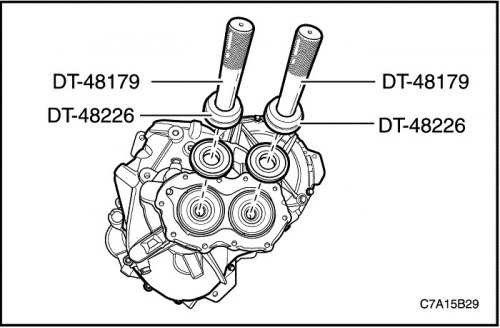
6. Install the input and output shaft ball bearings into the transaxle housing using DT-48179 and DT-48226.
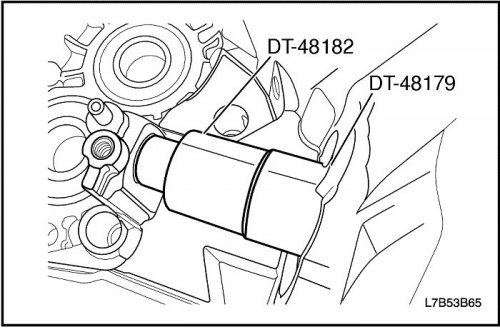
7. Install the needle bearing into the transaxle housing flush with the casting using DT-48179 and DT-48182.

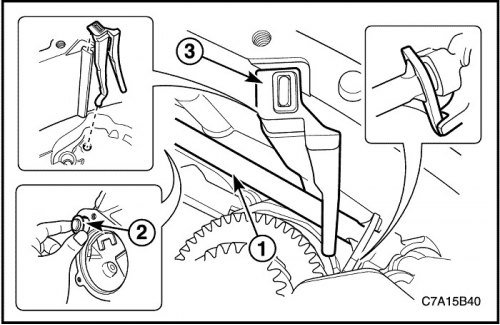
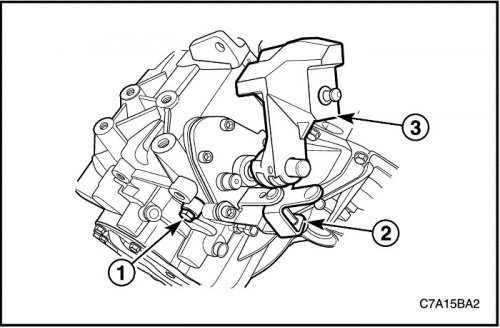
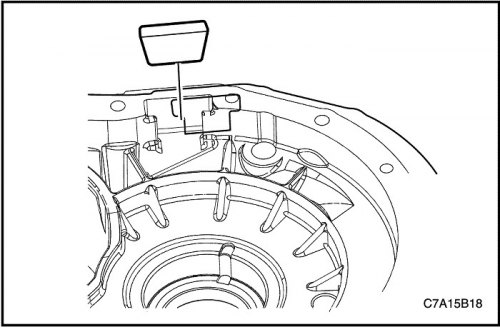
8. Install the reverse gear interlock device (1), torsion spring (2) and new grub screw (3) into the gearbox housing with the final drive assembly.
Tighten
Tighten the grub screw to 6~9 N·m (53~80 lb-in).
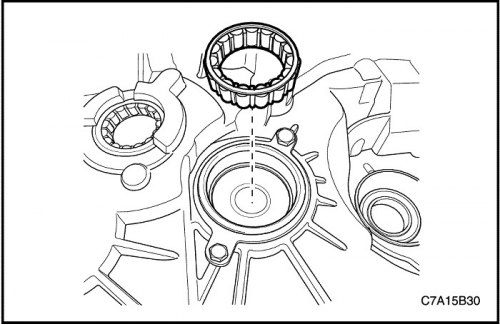
9. Install the secondary shaft roller bearing into the clutch housing.
Important: Make sure the roller bearing is oriented correctly.
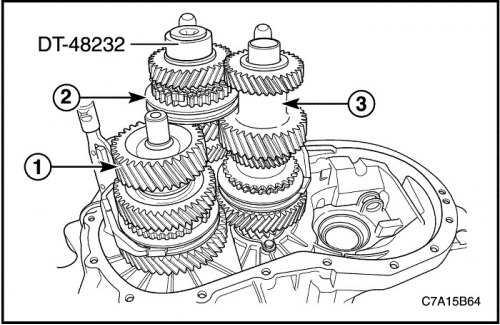
10. Install the intermediate (1), primary (2) and secondary (3) shaft as an assembly together with the corresponding gear shift forks into the clutch housing.
- Install DT-48232 and input shaft retaining plug.
- Install the intermediate (1) and primary (2) shaft as an assembly together with the corresponding gear shift forks.
Important: Place the intermediate shaft on the ball bearing side.
- Install the secondary shaft assembly and gear shift fork.
- After checking the gear engagement, fully install each shaft assembly.
- Remove DT-48232 and the input shaft retaining plug.
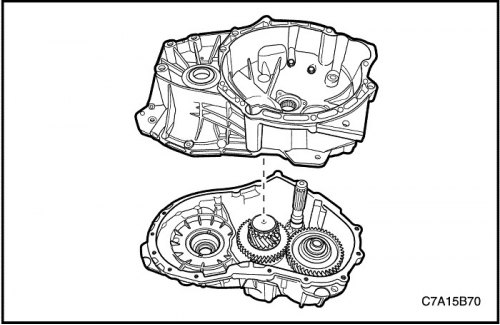
11. Install the gearbox housing with the final drive assembly into the clutch housing.
- The primary and secondary shafts must engage with the ball bearings in the gearbox housing with the final drive assembly.
- The intermediate shaft and shift forks must sit in opposing bearings in the gearbox housing with the final drive assembly.
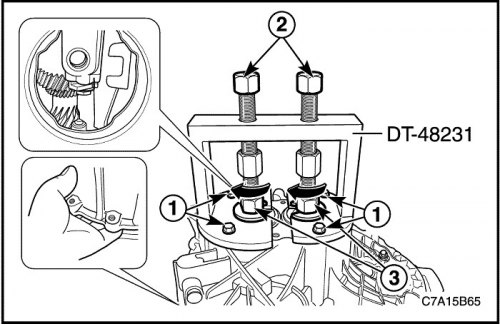
- Install DT-48231 into the gearbox housing with the final drive assembly.
- Tighten the four bolts (1).
- Screw the spindles into the primary and secondary shafts.
- Pull the primary and secondary shafts evenly into the ball bearings in the gearbox housing with the final drive assembly.
- Hold the spindles (2) using a suitable tool.
- Turn the passage nuts (3) in the direction of the arrow.
- Remove DT-48231 from the gearbox housing with the final drive assembly.
- Unscrew the spindles from the primary and secondary shafts.
- Remove four bolts (1).
Important: If the DT-48231 actuator requires a lot of force, separate the transmission case with the final drive assembly and the clutch housing again and check the position of the shaft and shift forks. Repeat the operation.
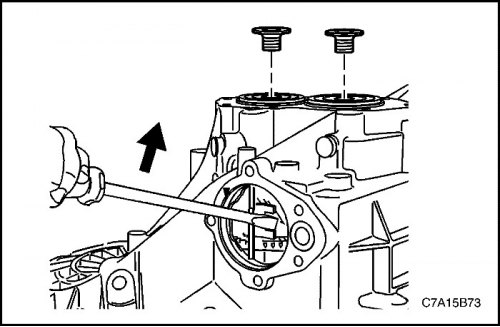
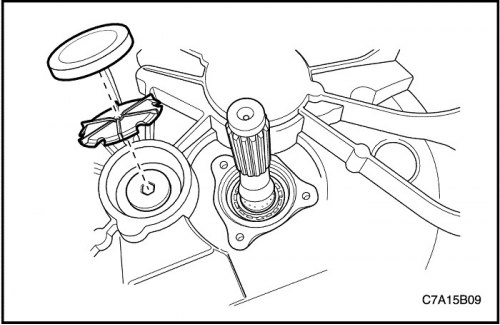
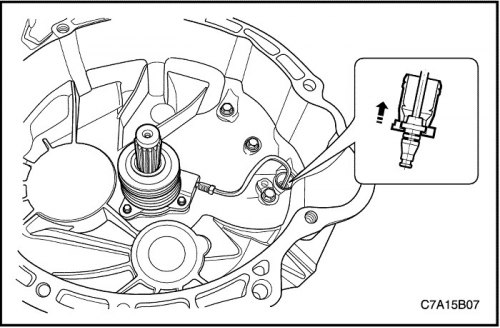
12. Shift the gearbox with the final drive assembly to 4th and 5th gear by moving the screwdriver upwards.
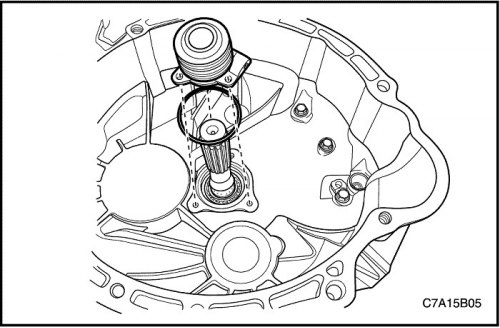
13. Install new primary and secondary shaft retaining plugs while holding the transmission in 4th and 5th gear positions, from bottom to top.
Tighten
Tighten the input shaft lock plug to 120~130 N·m (89~96 lb ft).
Tighten the secondary shaft lock plug to 120~130 N·m (89~96 lb ft).
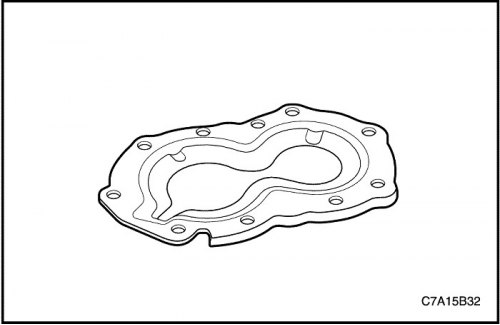
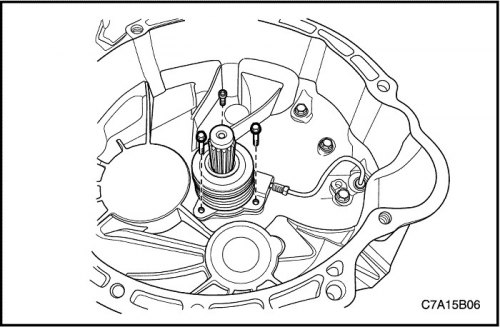
14. Apply sealant (Loctite 5900) on the rear cover of the gearbox housing with the main gear assembly.
Important: Leave enough space to prevent the oil line from becoming clogged.
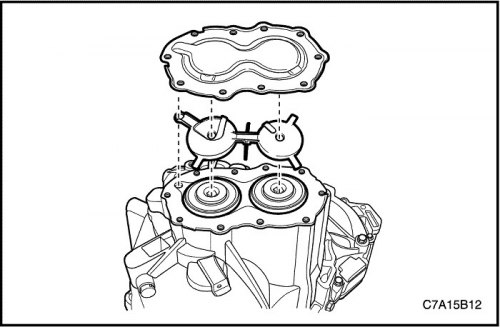
15. Install the oil line and the rear cover of the gearbox housing with the final drive assembly.
Important: The oil line is installed in one direction only. Make sure that the oil line is fully seated in the gear shafts.
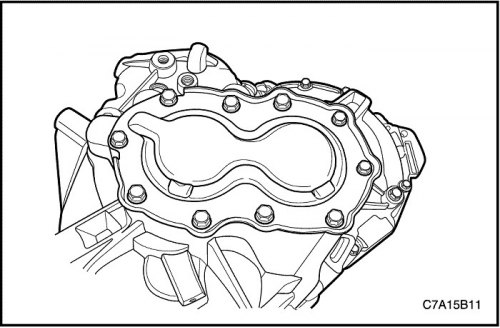
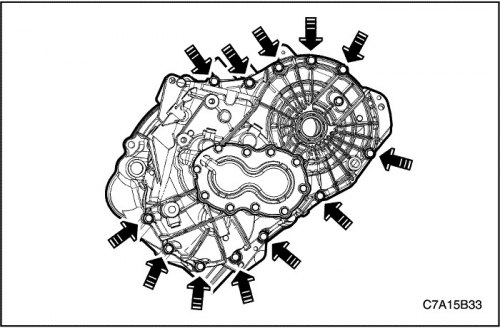
16. Install the bolts securing the rear cover of the gearbox housing with the final drive assembly.
Tighten
Tighten the rear cover mounting bolts to 20~25 N·m (15~18 ft·lbs).
17. Remove the clutch housing from the gearbox housing with the final drive assembly.
Important: To facilitate separation of the crankcase, use suitable tools in line with the intermediate shaft.
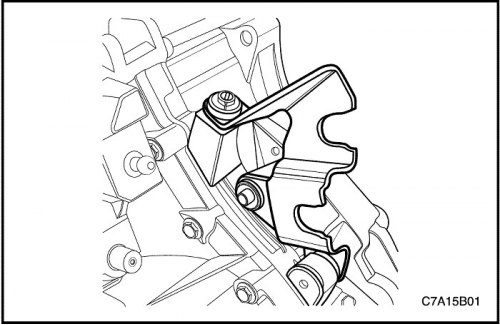
18. Install the idle gear shift mechanism rod (1) into the gearbox housing with the final drive assembly.
19. Install the idle gear shift mechanism rod bushing (2) into the gearbox housing with the final drive assembly.
20. Install the drain groove (3) into the gearbox housing with the final drive assembly.
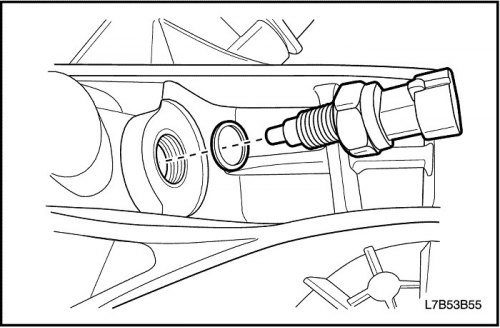
21. Install the reverse light switch and washer into the gearbox housing with the final drive assembly.
Tighten
Tighten the reversing light switch mounting bolt to 20 Nm (15 ft·lbs).
22. Install the gear shift shaft assembly.
- Apply sealant (Loctite 5203) on the mating surface of the gearbox housing with the main gear assembly and the gear shift housing.
- Shift into neutral.
- Install the gear shift shaft assembly (3).
- Install the gear selection lever (2).
- Install the gear shift mounting bolts.
Tighten
Tighten the gear shift mounting bolts to 20~25 N·m (15~18 lb ft).
- Install the gear shift guide bolt (1).
Tighten
Tighten the shift guide bolts to 20~25 N·m (15~18 lb ft).
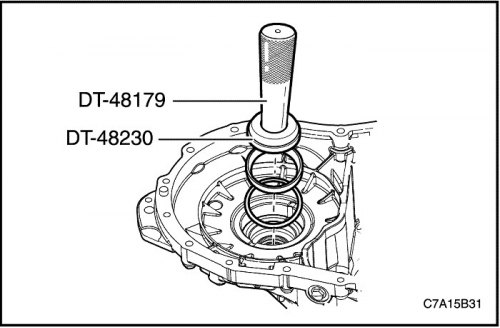
23. Install the differential bearing race and adjusting shim into the transaxle housing using DT-48179 and DT-48230. See "Gimbal Adjustment Procedures" in this section.
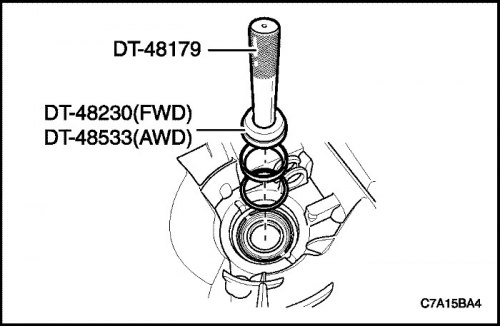
24. Install the differential bearing race and gasket into the clutch housing using DT-48230 (for four-wheel drive) or DT-48533 (for all-wheel drive) with DT-48179. See "Gimbal Adjustment Procedures" in this section.
25. Install the magnet into the gearbox housing with the final drive assembly.
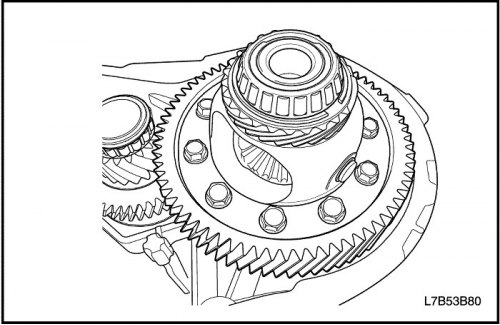
26. Install the differential into the gearbox housing.

27. Apply sealant (Loctite 5203) on the mating surface of the gearbox housing with the main gear assembly and the clutch housing.
28. Install the clutch housing into the gearbox housing with the final drive assembly.
Important:
- The primary and secondary shafts must engage with their bearings in the clutch housing.
- The shift forks must sit in the opposing bearings in the clutch housing.
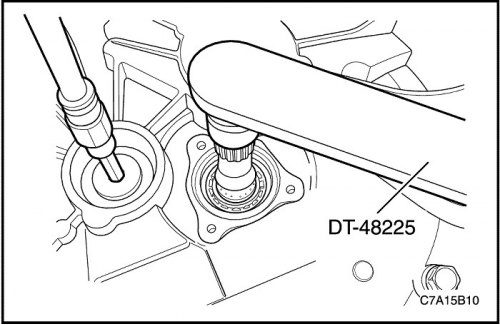
29. Hold the input shaft with DT-48225.
30. Pull the intermediate shaft into the intermediate shaft ball bearing using the old retaining plug.
- Shift to any gear.
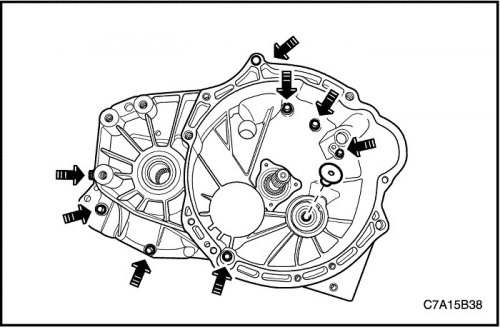
31. Install the bolts securing the clutch housing to the gearbox housing with the final drive assembly.
Tighten
Tighten the clutch housing to transaxle housing bolts to 20~25 N·m (15~18 lb ft).
32. Remove the old retaining plug from the intermediate shaft and install a new retaining plug.
Tighten
Tighten the intermediate shaft lock plug to 90~100 N·m (66~74 lb ft).
33. Remove DT-48225.
34. Install the gearbox housing and final drive assembly mounting bolts to the clutch housing.
Tighten
Tighten the transaxle housing to clutch housing bolts to 20~25 N·m (15~18 lb ft).
35. Install a new oil line into the intermediate shaft.
36. Install a new intermediate shaft sealing plug.
37. Install the sealing ring and concentric slave cylinder.
38. Fit the hydraulic tube fitting and tighten the cylinder mounting bolts.
Tighten
Tighten the clutch release cylinder mounting bolts to 8~12 N·m (71~106 lb-in).
39. Tighten the hydraulic tube fitting.
Tighten
Tighten the nipple to a torque of 16 Nm (12 ft·lbs).
40. Install the bushing onto the concentric working cylinder tube.
41. Install the shift control cable bracket, washer and bolts.
Tighten
Tighten the shift control cable bracket bolts to 15~20 N·m (11~15 lb ft).
42. Install the gearbox into the vehicle. See "Gearbox with final drive assembly" in this section.