
ChevyMan.ru
Mazda Mitsubishi Toyota Land Rover Honda Kia Nissan
English Русский
Български
Беларускі
Український
Српски
Hrvatski
Română
Polski
Slovenský
Magyar
|
Articles | Sitemap | Contacts |


Home   Aveo   Captiva   Cruze   Lacetti   Lanos   Niva   Tahoe   Others  
Cruze 1 (2008-2016)
  • Home
  • Cruze
  • J300 (2008-2016)
  • Power unit
  • Engine repair
  • Replacing and adjusting the timing belt of the F18D engine

Replacing and adjusting the timing belt of the F18D engine (Chevrolet Cruze J300)

            0

According to the manufacturer's recommendation, the timing belt must be replaced after 100 thousand km or every 10 years of operation (whichever comes first).

Replace the belt if, upon inspection, you find:
  • traces of oil on any surface of the belt;
  • traces of wear on the toothed surface, cracks, cuts, folds and separation of the fabric from the rubber;
  • cracks, folds, depressions or bulges on the outer surface of the belt;
  • fraying or delamination on the end surfaces of the belt.

Warning: A belt with traces of motor oil on any of its surfaces must be replaced, as oil quickly destroys rubber. The reason for oil getting on the belt (usually this is a leak in the crankshaft and camshaft seals) must be eliminated immediately.


Note: Carry out work on an inspection pit, overpass or, if possible, on a lift.


1. Open the hood.

2. Remove the accessory drive belt (see "Checking the tension and replacing the auxiliary drive belt of the F18D engine").


3. Remove the right engine splash guard (see "Removal and installation engine mudguards").

4. Remove the right front wheel.

5. Unscrew the two bolts 2 (Fig. 5.31) and remove the upper front timing belt cover.
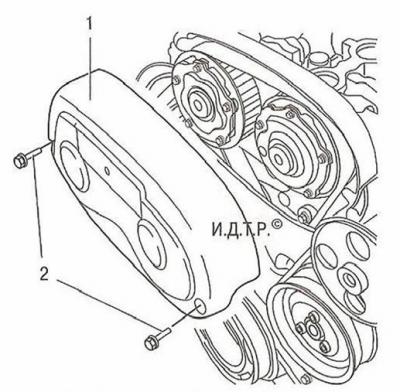
Fig. 5.31. Removing the upper front timing belt cover: 1 - Upper front cover of the timing drive; 2…
Fig. 5.31. Removing the upper front timing belt cover: 1 - Upper front cover of the timing drive; 2 - mounting bolts


6. Set the piston of the 1st cylinder to the TDC position of the compression stroke (see "Setting the piston of the first cylinder of the F18D engine to the TDC position of the compression stroke").

7. Fix the position of the camshaft pulleys with a special tool.
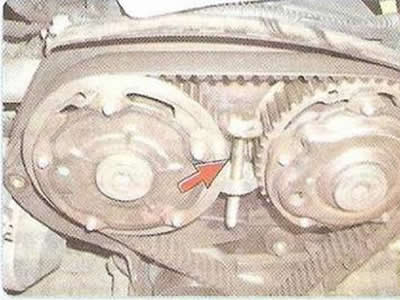
7. Fix the position of the camshaft pulleys with a special tool.


Helpful Hint: If you don't have a special tool to fix the position of the camshaft pulleys, you can use a W38 bolt with two washers and a nut.


8. Unscrew the mounting bolt and remove the crankshaft pulley.

9. Unscrew the three bolts 2 securing the lower front cover 1 (Fig. 5.32) of the timing belt and remove the cover.
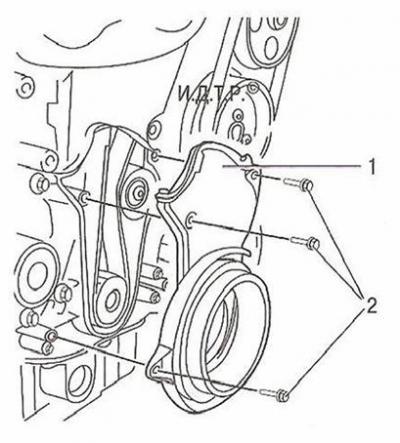
Fig. 5.32. Removing the lower front timing belt cover: 1 - lower front cover of the timing…
Fig. 5.32. Removing the lower front timing belt cover: 1 - lower front cover of the timing mechanism; 2 - mounting bolts


10. Install a reliable support under the engine. Unscrew the five bolts and unscrew one nut securing the right engine support and remove the support (see Fig. "Replacing the powertrain suspension mounts").


11. Remove the middle front timing belt cover, overcoming the resistance of its clips.

12. Loosen the tension roller mounting bolt 2 (Fig. 5.33). Insert the Allen key into the hexagonal hole of the tension roller and, turning key 1 clockwise, loosen the belt tension.
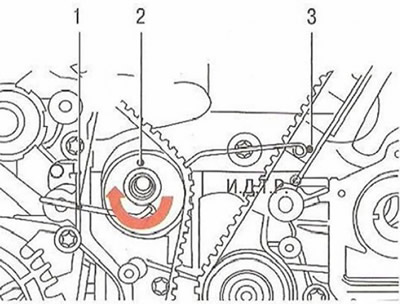
Fig. 5.33. Loosening the timing belt tension: 1 - Allen key; 2 - tension roller


13. Remove the belt from the crankshaft toothed pulley, from the tension and intermediate rollers and the camshaft pulleys.

Warning: After removing the timing belt, do not rotate the camshaft or crankshaft, as the pistons may damage the valves.


14. To replace the tension roller, unscrew the bolt securing it to the cylinder block and remove the roller.

Note: If you are disassembling the timing drive only to replace the tension roller, you do not need to remove the drive belt.


15. Install the tension roller in the reverse order of removal.

16. Check that the timing marks on the crankshaft and camshaft match (see "Setting the piston of the first cylinder of the F18D engine to the TDC position of the compression stroke").

17. Place the belt on the crankshaft toothed pulley.


18. Turn the tension roller clockwise until it stops and install a new drive belt, sequentially placing the belt on the camshaft pulleys, tension roller and intermediate roller.

19. Turn the crankshaft three full revolutions and make sure that the belt is correctly positioned in the pulley grooves.

20. Check the alignment of the timing marks on the camshafts and crankshaft.

21. Install the parts in the reverse order of removal.

The article was checked: Vladimir Romannikov
This article is available at russian, bulgarian, belarusian, ukrainian, serbian, croatian, romanian, polish, slovak, hungarian

Share information:

Previous articles
Cruze 1: Engine repair
Next articles

Checking and replacing the auxiliary drive belt of the F18D engine
Design Features of F18D Engines
Engine assembly
Engine parts defect detection
Disassembling the engine
Setting the piston of the first cylinder of the F18D engine to the TDC position of the compression stroke
Replacing oil and filter element of the F18D engine oil filter


See similar articles on the topic of Chevrolet cars:
Checking and adjusting the tension of the timing belt of the 1.5L SOHC engine Chevrolet Aveo T250 (2006-2011)
Checking and adjusting the tension of the timing belt Chevrolet Captiva 1 (2006-2018)
Checking the condition and replacing the timing belt Chevrolet Lacetti 1 (2002-2009)
Checking the condition and replacing the timing belt Chevrolet Lanos T150 (2002-2009)
Adjusting the tension of the water pump drive belt and the power steering pump drive belt Chevrolet Niva 1 (2002-2016)
Checking, adjusting and replacing drive belts of attachments Chevrolet Tahoe 1 (1992-2000)
Checking and adjusting the ignition timing (3.1L engine) Chevrolet Lumina 1 (1989-1994)
Link in different formats to this page


Visitor comments

No comments yet


How much will 22 + 39 =


Cruze 1 (2008-2016) 
  • General information
  • User manual
  • Troubleshooting
  • Maintenance
  • Power unit
  • Engine repair
  • Lubrication system
  • Cooling system
  • Exhaust system
  • Supply system
  • Control system
  • Transmission
  • Clutch
  • Car gearbox
  • Front wheel drives
  • Chassis
  • Front suspension
  • Rear suspension
  • Steering
  • Brake system
  • Body
  • Exterior (external elements)
  • Interior (internal elements)
  • Doors, covers and windows
  • Heating and air conditioning
  • Security systems
  • Electrical equipment
  • Equipment and devices
  • Power devices
  • Lighting and signaling
  • Electrical circuits


ChevyMan.ru © 2017-2026 · Mobile version · Feedback · Site search · Interesting to read · Sitemap: EN BG BY UA RS HR RO PL SK HU

Aveo 2003-2008 · Aveo 2006-2011 · Aveo 2012-2018 · Captiva 2006-2018 · Cruze 2008-2016 · Lacetti 2002-2009 · Lanos 2002-2009 · Niva 2002-2016 · Tahoe 1992-2000 · Tahoe 2000-2014 · Lumina 1 1989-1994 · Trailblazer 1 2001-2008 · Orlando 1 2010-2018 ·
🛡️ For your security and to improve our service, this site uses cookies. You can disable them in your browser.