
ChevyMan.ru
Mazda Mitsubishi Toyota Land Rover Honda Kia Nissan
English Русский
Български
Беларускі
Український
Српски
Hrvatski
Română
Polski
Slovenský
Magyar
|
Articles | Sitemap | Contacts |


Home   Aveo   Captiva   Cruze   Lacetti   Lanos   Niva   Tahoe   Others  
Tahoe 2 and 3 (2000-2014) Tahoe 1 (1992-2000)
  • Home
  • Tahoe
  • 1 (1992-2000)
  • General information
  • Maintenance
  • Checking the condition of the brakes

Checking the condition of the brakes (Chevrolet Tahoe 1)

            0

Contents: Disc brakes ↧ Drum brakes ↧ Checking and adjusting the parking… ↧
1. Checking the brakes should be combined with other work that requires raising the vehicle.

2. Raise the vehicle and remove the wheels.

Disc brakes


3. On the vehicles in question, disc brakes are provided only on the front wheels.

4. Most models are equipped with a brake pad wear sensor (see photo).
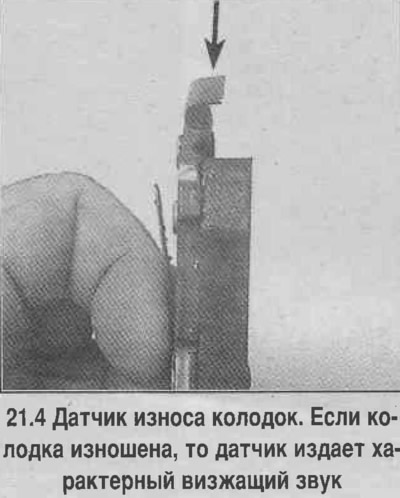
4. Most models are equipped with a brake pad wear sensor (see photo).


5. To inspect the pads, remove the wheel.

6. The pads can be checked through the window in the caliper (see photo). Check the pad thickness. If the wear indicator is very close to the disc surface, or the remaining pad material thickness is about 3 mm or less, the pads should be replaced.
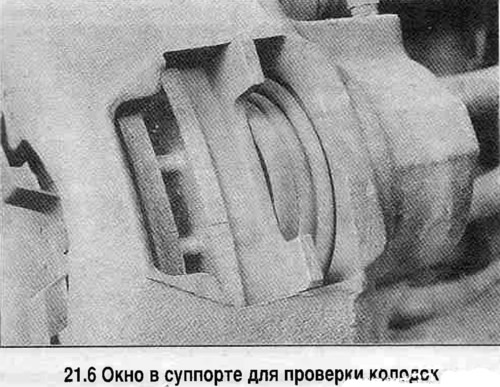
6. The pads can be checked through the window in the caliper (see photo). Check the pad thickness.…


7. If there is any doubt about the normal condition of the pads, the pads should be removed.


8. Before installing the wheels, make sure there is no leak near the hose fitting, check the condition of the hose. Replace the hose with signs of damage (see chapter 9).

9. Check the disk status (the disk is made integral with the wheel hub). Disc with signs of severe wear (deep grooves, traces of overheating, etc.) replace.

Drum brakes


10. Remove the drum. If the drum cannot be removed, pour penetrating liquid between the axle flange studs and the drum holes and tap the drum from the inside along the contour.

11. If the brake pads interfere with removal, remove the plug from the brake shield and use a Phillips-head screwdriver to move the brake pad drive lever away from the limiter (see photo). The shoes will move away from the drum, which will make it easier to remove. The procedure for removing the drums on rear brakes with two wheel cylinders is discussed in Chapter 9.
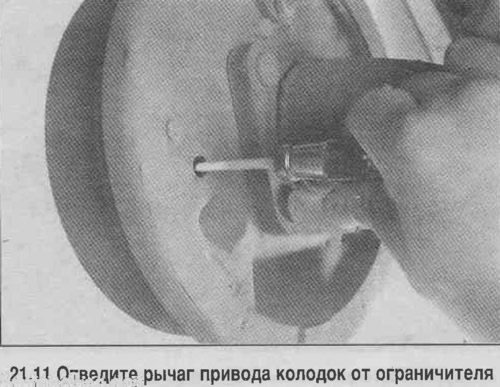
11. If the brake pads interfere with removal, remove the plug from the brake shield and use a…


12. Check the thickness of the friction linings (see photo). If the thickness of the pads (or distance to rivet heads) less than 1.6 mm, or there are traces of oiling or serious damage, then replace the pads.
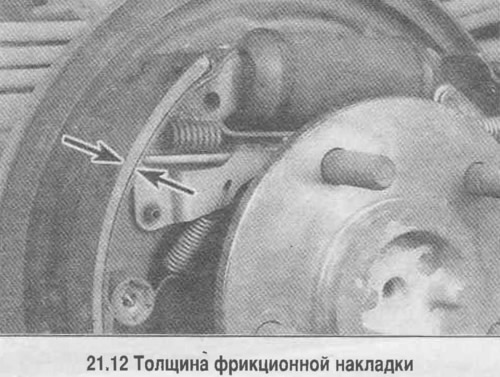
12. Check the thickness of the friction linings (see photo). If the thickness of the pads (or…


13. Check the condition of the brake shoe springs.


14. Check for fluid leaks from the wheel cylinder by peeling back the dust cover (see photo). If a leak is detected, replace the cylinder.
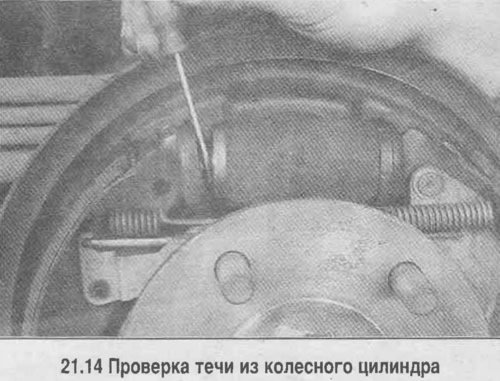
14. Check for fluid leaks from the wheel cylinder by peeling back the dust cover (see photo). If a…


15. Check the condition of the drums. Sand down minor defects with sandpaper, and sharpen the drums if necessary.

16. Install all removed parts and lower the vehicle. Tighten the wheel nuts to the specified torque.

Checking and adjusting the parking brake


17. The parking brake acts on the rear wheels, is foot-operated and is activated by a pedal.

18. The parking brake must hold the car on a steep slope (the transmission must be in Neutral position). Otherwise, the parking brake needs to be repaired (see Chapter 9).

The article was checked: Vladimir Romannikov
This article is available at russian, bulgarian, belarusian, ukrainian, serbian, croatian, romanian, polish, slovak, hungarian

Share information:

Previous articles
Tahoe 1: Maintenance
Next articles

Wheel rotation
Checking the oil level in the rear axle gearbox
Checking the Transfer Case Oil Level (4WD Models Only)
Checking the oil level in a manual transmission
Checking the clutch hydraulic drive
Checking the fuel system
Replacing the air filter
Replacing the fuel filter
Checking the tightening torque of the throttle body mounting bolts
Checking the throttle linkage


See similar articles on the topic of Chevrolet cars:
Checking the technical condition of the front wheel drives Chevrolet Aveo T300 (2012-2018)
Checking oil pressure Chevrolet Captiva 1 (2006-2018)
Checking the technical condition of the front suspension parts on the car Chevrolet Cruze 1 (2008-2016)
Checking the condition of wheels and tires Chevrolet Lacetti 1 (2002-2009)
Checking the condition of wheels and tires Chevrolet Lanos T150 (2002-2009)
Checking the technical condition and checking the clutch Chevrolet Niva 1 (2002-2016)
Checking the condition of the axle shaft boots (every 3000 miles or 3 months) Chevrolet Lumina 1 (1989-1994)
Link in different formats to this page


Visitor comments

No comments yet


How much will 40 + 28 =


Tahoe 2 and 3 (2000-2014) 
  • General information
  • Vehicle characteristics
  • Vehicle device
  • Manual
  • Maintenance
  • Power unit
  • Engine repair
  • Engine overhaul
  • Cooling system
  • Injection and control system
  • Exhaust system
  • Engine electrical equipment
  • Transmission
  • Automatic gearbox 4L60, 4L65, 4L70
  • Automatic gearbox 6L50, 6L80, 6L90
  • Transfer case
  • Drive shafts and cardan
  • Front drive axle
  • Rear drive axle
  • Chassis
  • Car suspension
  • Steering
  • Brake system
  • Body (until 2007)
  • Exterior (external elements)
  • Interior (internal elements)
  • Doors, locks and windows
  • Heating and air conditioning
  • Security System (SRS)
  • Body (since 2007)
  • Exterior (external elements)
  • Doors, locks and windows
  • Interior (internal elements)
  • Electrical equipment
  • Electrical appliances (until 2007)
  • Lighting and lamps (until 2007)
  • Audio system (until 2007)
  • Electrical appliances (since 2007)
  • Lighting and lamps (since 2007)
  • Audio system (since 2007)
  • Wiring diagrams (2000-2005)
  • Wiring diagrams (2005-2007)
  • Wiring diagrams (since 2007)


Tahoe 1 (1992-2000) 
  • General information
  • User manual
  • Maintenance
  • Power unit
  • Engine in a car
  • Engine removed
  • Cooling system
  • Heating and air conditioning
  • Fuel and exhaust systems
  • Decreased toxicity
  • Transmission
  • Manual gearbox
  • Automatic gearbox
  • Transfer case
  • Clutch and drive shafts
  • Chassis
  • Brake system
  • Car suspension
  • Steering
  • Body
  • Repair of body elements
  • Electrical equipment
  • Engine electrics
  • Equipment and devices
  • Electrical circuits


ChevyMan.ru © 2017-2026 · Mobile version · Feedback · Site search · Interesting to read · Sitemap: EN BG BY UA RS HR RO PL SK HU

Aveo 2003-2008 · Aveo 2006-2011 · Aveo 2012-2018 · Captiva 2006-2018 · Cruze 2008-2016 · Lacetti 2002-2009 · Lanos 2002-2009 · Niva 2002-2016 · Tahoe 1992-2000 · Tahoe 2000-2014 · Lumina 1 1989-1994 · Trailblazer 1 2001-2008 · Orlando 1 2010-2018 ·
🛡️ For your security and to improve our service, this site uses cookies. You can disable them in your browser.