
ChevyMan.ru
Mazda Mitsubishi Toyota Land Rover Honda Kia Nissan
English Русский
Български
Беларускі
Український
Српски
Hrvatski
Română
Polski
Slovenský
Magyar
|
Articles | Sitemap | Contacts |


Home   Aveo   Captiva   Cruze   Lacetti   Lanos   Niva   Tahoe   Others  
Tahoe 2 and 3 (2000-2014) Tahoe 1 (1992-2000)
  • Home
  • Tahoe
  • 1 (1992-2000)
  • Transmission
  • Clutch and drive shafts
  • Cardan joints — removal, disassembly and installation

Cardan joints — removal, disassembly and installation (Chevrolet Tahoe 1)

            0

Contents: Cardan joints with external… ↧ Crosspiece with internal plastic… ↧
Attention! The cardan joint repair kit must match the joint that is installed on this car model.


1. Remove the driveshaft.

Cardan joints with external retaining rings


2. Clamp the shaft in a vice.

3. Mark the position of the hinge forks and remove the retaining rings (see photo).
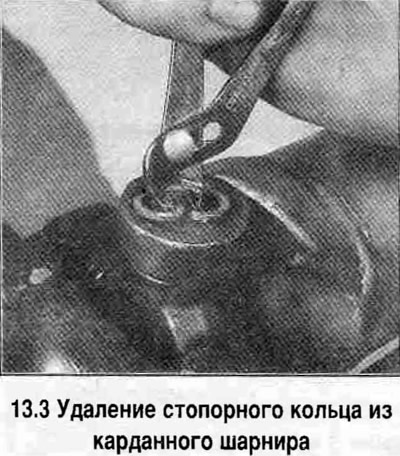
3. Mark the position of the hinge forks and remove the retaining rings (see photo).


4. Place a mandrel under the pin and press the joint crosspiece with a vice through a tubular mandrel placed under the fork opposite this pin until the bearing comes out (see photo).
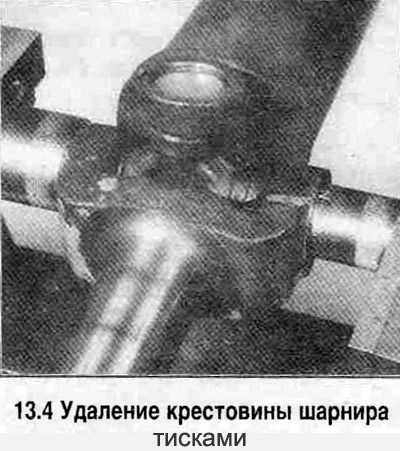
4. Place a mandrel under the pin and press the joint crosspiece with a vice through a tubular…


5. Remove the cross bearing (see photo).
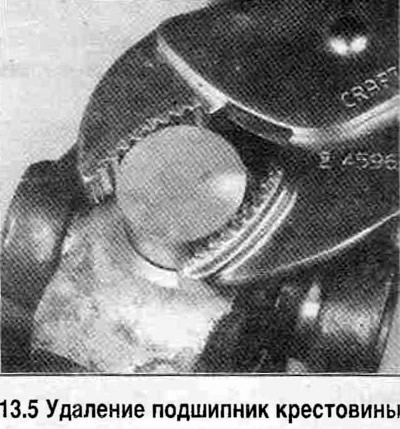
5. Remove the cross bearing (see photo).


6. Check the condition of the parts. Replace damaged bearing housings and seals with parts from the universal joint repair kit (see photo).
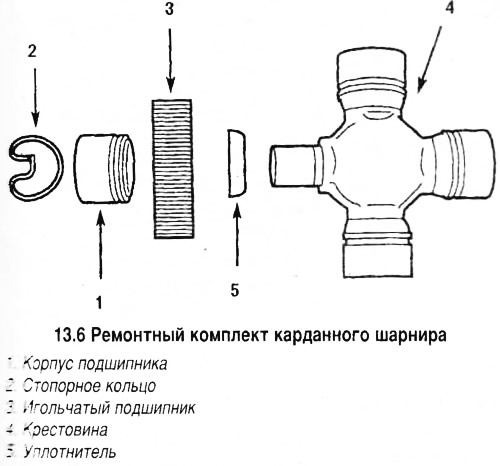


6. Check the condition of the parts. Replace damaged bearing housings and seals with parts from the…


7. Check the condition of the bearing housings for wear and damage.

If the bearing housings in the hinge fork are worn out so that they turn in the shaft fork hole, replace the shaft with a new one. Check the correct placement of the dust seals, the cavity of the cover should be towards the crosspiece body.

8. Press the bearing housing into the fork approximately 6mm.

9. Lubricate the bearing needles with general purpose grease to hold them in the housing.

10. Insert the crosspiece into the pressed bearing housing, taking care not to displace the needles.

11. Glue the bearings to the bearing housing of the opposite crosspiece pin with grease, resting the mandrel against the crosspiece, press both bearing housings in place by squeezing the jaws of the vice.

12. Using a vice, press the bearings into the fork through the mandrels. First press one of the bearings, then install the retaining ring, press the crosspiece with the second bearing until it stops against the retaining ring. Install the second retaining ring.

13. Replace the remaining bearings in the same order.

Crosspiece with internal plastic retaining rings


14. If the joint has been previously repaired, remove the retaining rings located on the inside of each bearing housing.


15. If the crosspiece has not been repaired, the rings should not be removed to avoid damaging them.

16. Press out the bearing housings (see above).

17. Remove the crosspiece and clean the fork from plastic.

18. Assemble the crosspiece in the same order as the crosspiece with outer rings (see above), with the only difference being that the retaining rings are installed inside the bearing housings (see photo).
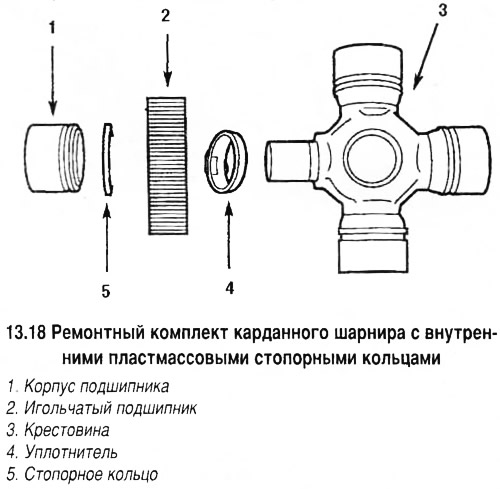
18. Assemble the crosspiece in the same order as the crosspiece with outer rings (see above), with…


19. When installing the bearing housing, press it into a position where the retaining ring can be inserted (see photo). If necessary, hit the fork with a hammer. This will cause the crosspiece eyes to spring into place (see photo).
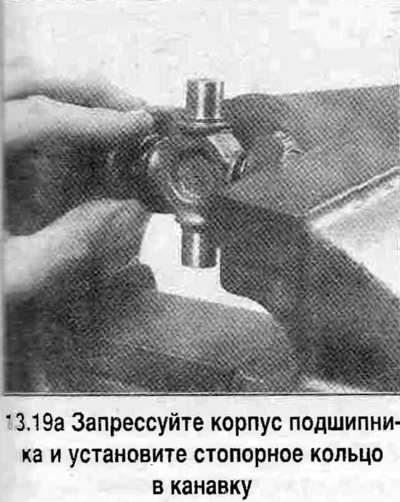
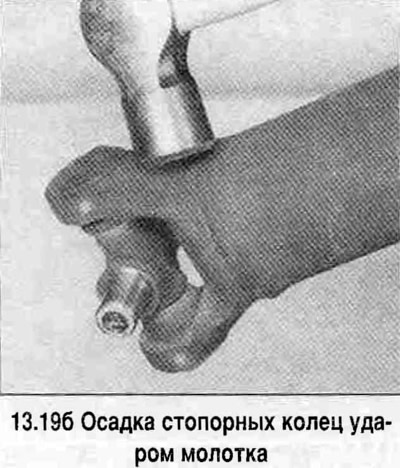
19. When installing the bearing housing, press it into a position where the retaining ring can be…


19. When installing the bearing housing, press it into a position where the retaining ring can be…


(The source of the article is available on the website «chevyman.ru»)

The article was checked: Vladimir Romannikov
This article is available at russian, bulgarian, belarusian, ukrainian, serbian, croatian, romanian, polish, slovak, hungarian

Share information:

Previous articles
Tahoe 1: Clutch and drive shafts
Next articles

Middle support of the propeller shaft — removal and installation
Cardan shaft — removal and installation
Checking the cardan shafts
Cardan shafts and cardan joints — general information
Clutch hydraulic drive — air removal
Half shafts — general information
Semi-unloaded rear axle half shaft — removal and installation
Axle shaft seal (semi-floating axle shaft) — replacement
Rear axle bearing (semi-floating axle shaft) — replacement
Fully unloaded axle shaft — removal and installation


See similar articles on the topic of Chevrolet cars:
Replacement of constant velocity joints Chevrolet Aveo T300 (2012-2018)
Cardan shaft — removal and installation Chevrolet Captiva 1 (2006-2018)
Replacement of constant velocity joints Chevrolet Cruze 1 (2008-2016)
Cardan transmission device Chevrolet Niva 1 (2002-2016)
Cardan shafts and joints — general information and inspection Chevrolet Trailblazer 1 (2001-2008, petrol)
Link in different formats to this page


Visitor comments

No comments yet


How much will 46 + 22 =


Tahoe 2 and 3 (2000-2014) 
  • General information
  • Vehicle characteristics
  • Vehicle device
  • Manual
  • Maintenance
  • Power unit
  • Engine repair
  • Engine overhaul
  • Cooling system
  • Injection and control system
  • Exhaust system
  • Engine electrical equipment
  • Transmission
  • Automatic gearbox 4L60, 4L65, 4L70
  • Automatic gearbox 6L50, 6L80, 6L90
  • Transfer case
  • Drive shafts and cardan
  • Front drive axle
  • Rear drive axle
  • Chassis
  • Car suspension
  • Steering
  • Brake system
  • Body (until 2007)
  • Exterior (external elements)
  • Interior (internal elements)
  • Doors, locks and windows
  • Heating and air conditioning
  • Security System (SRS)
  • Body (since 2007)
  • Exterior (external elements)
  • Doors, locks and windows
  • Interior (internal elements)
  • Electrical equipment
  • Electrical appliances (until 2007)
  • Lighting and lamps (until 2007)
  • Audio system (until 2007)
  • Electrical appliances (since 2007)
  • Lighting and lamps (since 2007)
  • Audio system (since 2007)
  • Wiring diagrams (2000-2005)
  • Wiring diagrams (2005-2007)
  • Wiring diagrams (since 2007)


Tahoe 1 (1992-2000) 
  • General information
  • User manual
  • Maintenance
  • Power unit
  • Engine in a car
  • Engine removed
  • Cooling system
  • Heating and air conditioning
  • Fuel and exhaust systems
  • Decreased toxicity
  • Transmission
  • Manual gearbox
  • Automatic gearbox
  • Transfer case
  • Clutch and drive shafts
  • Chassis
  • Brake system
  • Car suspension
  • Steering
  • Body
  • Repair of body elements
  • Electrical equipment
  • Engine electrics
  • Equipment and devices
  • Electrical circuits


ChevyMan.ru © 2017-2026 · Mobile version · Feedback · Site search · Interesting to read · Sitemap: EN BG BY UA RS HR RO PL SK HU

Aveo 2003-2008 · Aveo 2006-2011 · Aveo 2012-2018 · Captiva 2006-2018 · Cruze 2008-2016 · Lacetti 2002-2009 · Lanos 2002-2009 · Niva 2002-2016 · Tahoe 1992-2000 · Tahoe 2000-2014 · Lumina 1 1989-1994 · Trailblazer 1 2001-2008 · Orlando 1 2010-2018 ·
🛡️ For your security and to improve our service, this site uses cookies. You can disable them in your browser.