


2. Remove the oil pump cover (409).
Note: Mark the relative positions of the pump gears.
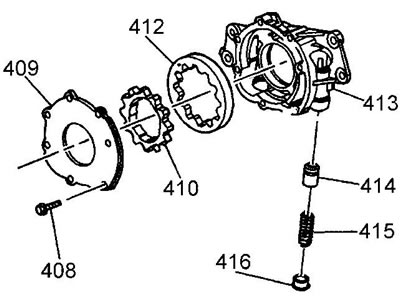
3. Remove the drive gear (410).
4. Remove the driven gear (412).
5. Unscrew the plug (416) of the pressure reducing valve. Tightening torque 12 Nm.
6. Remove the spring (415) of the pressure reducing valve
7. Remove the valve (414).
8. Assembly is carried out in reverse order.
Examination
Attention:
- The internal parts of the oil pump are not serviced separately, except for the relief valve spring. If the parts of the oil pump are worn or damaged, replace the oil pump assembly.
- The oil receiver and its mesh are serviced as an assembly; never repair the oil receiver mesh.
1. Wash the oil pump parts with solvent.
2. Dry the parts with compressed air.
3. Inspect the oil pump housing (413) and cover (409) for cracks, signs of excessive wear, scoring or casting defects.
4. Inspect the surface of the oil channel that supplies oil from the pump to the engine, looking for scratches or torn metal.
5. Check the condition of the threads of the bolt holes in the pump body.
6. Check the condition of the threads of the pressure reducing valve plug (416) and the hole for the plug in the housing.
7. Check the cleanliness of the oil channels in the pump body.
8. Check the condition of the drive (410) and driven (412) gears of the pump, look for signs of chipping, galling or wear. Minor defects can be removed with fine sandpaper.
9. Check the condition of the pinion splines, look for signs of excessive wear.
10. Inspect the pressure reducing valve (414) and the valve mounting hole for any signs of scoring or wear. The valve should move freely in the hole.
11. Check the condition and reliability of the fit of the oil pump oil receiver mesh.