
Contents: Motor oil ↧ Engine Coolant Fluid ↧ Windscreen washer fluid ↧ Battery electrolyte ↧ Brake fluid ↧
Note: As a rule, checking the operating fluid levels is performed every 400 km or weekly. Sometimes, during specific maintenance procedures, it is necessary to determine the level of a particular fluid. If traces of a leak are found under the vehicle, it is necessary to determine the cause and fix the problem immediately, regardless of the mileage or operating time interval.
1. Operating fluids are used in engine lubrication and cooling systems, brake hydraulic systems, and also in glass washers. Due to the fact that liquids tend to lose their level and become contaminated over time, there is a periodic need to top them up and replace them. Before adding fluid to the system, refer to the "Recommended Lubricants and Fluids" and "Capacity" sections of the specifications provided at the end of this chapter.
Note: Before checking the fluid level, make sure the vehicle is on a level surface.
Motor oil
2. The engine oil level is checked using the dipstick located in the engine cylinder block. The dipstick is inserted into a tube that reaches the bottom of the pan (see illustration).
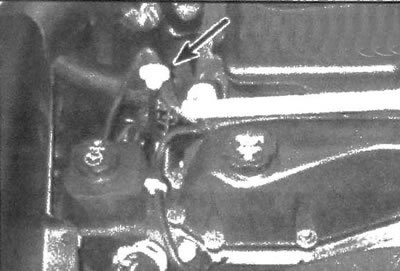
4.2. The dipstick for determining the engine oil level is located in the right front corner of the engine
3. Check the oil level before starting the engine or at least five minutes after turning it off. If the level is measured immediately after the engine has stopped, some of the oil will not have time to drain from the upper part of the crankcase, and the dipstick will show a low level.
4. Remove the dipstick and wipe off any oil using a clean cloth or paper towel. Insert a clean dipstick into the tube until it stops, then remove it again. Using the marks on the dipstick, determine the oil level, which should be between the upper (F) and lower (L) marks or in the "SAFE" zone (see illustration).
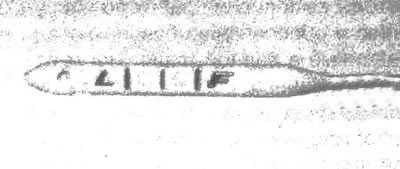
4.4 The oil level should be maintained within the safe range, between the designated marks. To raise the level from the "L" mark to the "F" mark, it is necessary to add about 1 liter of oil
5. Do not allow the permissible level to be exceeded, as this may result in oil being thrown onto the spark plugs, oil leakage or failure of the engine seals.
6. Before filling the system with oil, unscrew the oil filler cap located on the valve cover (see illustration). To prevent spillage, it is recommended to use a funnel.
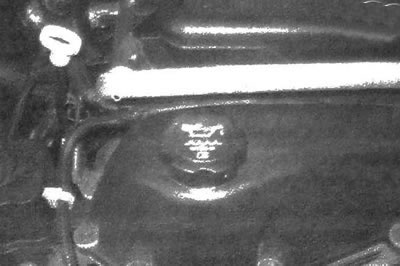
4.6. Oil is added to the engine lubrication system after unscrewing the filler cap. Before unscrewing the cap, it is necessary to wipe clean the area adjacent to the neck - this will prevent clogging of the lubrication system
7. Checking the engine oil level is an extremely important preventative maintenance procedure. If you have to add oil to your engine frequently, check for leaks. If there is an emulsion or drops of liquid in the oil, it is possible to assume that the cylinder head gasket is damaged. The engine should be diagnosed immediately and the condition of the engine oil should be checked. When checking the oil level, always run the dipstick between your thumb and forefinger before wiping it off. If there are foreign or metallic particles on the dipstick, replace the oil and filter (see subsection 8).
Engine Coolant Fluid
Warning 1: Do not allow antifreeze to come into contact with human or animal skin, or with car or other painted surfaces. The area where antifreeze has come into contact should be immediately washed with running water. Keep stored antifreeze out of reach of children or pets, who may be attracted by its sweet odor. Swallowing even a small amount of antifreeze can be fatal. Wipe up any spilled antifreeze from the garage floor immediately. Keep antifreeze containers tightly sealed and repair any leaks in the cooling system immediately. Used coolant must be sent for disposal to special organizations.
Warning 2: Do not attempt to remove the radiator cap or expansion tank when the engine is warm.
Note: Non-toxic antifreeze is now available in many stores, but coolant based on this type of antifreeze must also be disposed of safely and in accordance with environmental requirements.
Warning: It is prohibited to mix green ethylene glycol antifreeze with orange antifreeze "DEX-COOL", which does not contain silicate components, since this reduces the efficiency of the latter, which is intended for use for a mileage of 160,000 km (or 5 years).
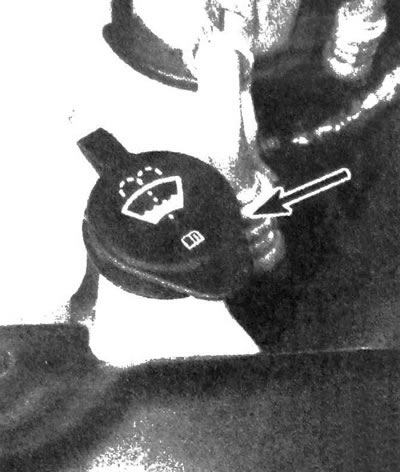
8. All models described in this manual have an expansion tank for the cooling system, located on the right side of the engine compartment. The tank is connected by hoses to the cooling system and the radiator.
9. It is necessary to regularly check the fluid level in the tank. If the engine is not warmed up, the level should be slightly above the minimum COLD mark (see illustration). As it warms up, the level rises to the HOT mark. If this condition is not met, it is necessary to add liquid to the cooling system. Turn and remove the cap and add 50% aqueous solution of antifreeze "DEX-COOL" (see the warning at the beginning of this subsection).
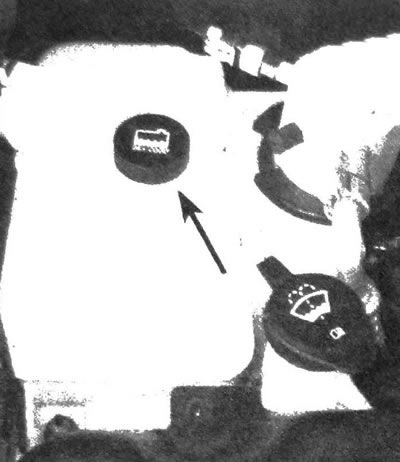
4.9. The coolant reservoir is located on the right side of the engine compartment
10. Drive the vehicle and recheck the coolant level. If only a small amount of topping up is required to reach the desired level, add clean water to the system. It should be noted that refilling with clean water may result in a decrease in the concentration of the antifreeze solution in the system. To maintain the required concentration, only antifreeze solution should be added to the system in the future. To prepare the antifreeze solution, it is recommended to use a transparent plastic bottle. Do not add anti-corrosion or other additives to the solution.
11. The closed cooling system does not require regular topping up of fluid. If you have to do this frequently, there is probably a leak in the system. Inspect the radiator, all hoses and connectors, filler cap, fluid drain and air bleed nipples from the system, as well as the system pump (see subsection 14). If a leak is detected, repair it as soon as possible. If there is no coolant leak, check the pressure that the radiator cap can hold by contacting an authorized service station.
12. If necessary, remove the radiator cap, wait until the engine has cooled down, then wrap it in a thick cloth and turn it slightly. If steam or liquid starts to leak from the radiator cap, wait until the engine has cooled completely, then remove the cap.
13. When determining the level, check the condition of the coolant. If there is a brown or rusty tint, drain the fluid, flush and fill the system. Even if the condition is apparently satisfactory, the anti-corrosion properties of the fluid decrease over time, so the replacement intervals should be strictly adhered to. A system filled with a regular green antifreeze solution requires more frequent maintenance.
Windscreen washer fluid
14. The washer fluid is contained in a plastic tank located on the left side of the engine compartment (see illustration).
4.14. To check the fluid level in the washer reservoir, you must first open its lid
15. In moderate climates, the washer fluid can be filled with ordinary water, but, remembering the property of water to increase in volume when freezing, do not fill the reservoir more than two-thirds full. When operating in cold conditions, fill the washer only with a specially designed antifreeze fluid, which can be purchased at most auto stores. Dilute the liquid with water in the proportions indicated on the canister label.
Warning: Do not fill the washer with cooling system antifreeze, which is aggressive towards the vehicle's paintwork.
16. To prevent icing, before using the washer, warm up the windshield by directing the heater blower onto it.
Battery electrolyte
17. The batteries installed on the described vehicles are completely sealed (except for the ventilation tube), and their design does not provide for the presence of filler plugs. This type of battery never requires electrolyte to be added. If the car has a serviceable battery, it is necessary to periodically unscrew the plugs located on top of the cans to check the electrolyte level. Carrying out this check is especially important in hot summer weather. Only clean distilled water can be added to the battery.
Brake fluid
18. The brake master cylinder reservoir is located in the upper left corner of the rear bulkhead of the engine compartment.
19. Since the tank is transparent, the fluid level can be determined without removing the cap (see illustration). Before removing the reservoir cap, it is necessary to wipe the area adjacent to it to prevent clogging of the brake hydraulic system when adding fluid later.
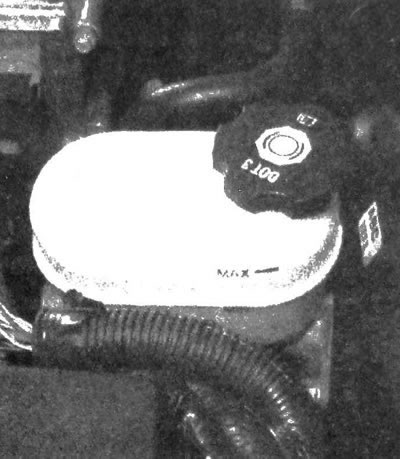
4.19. Do not allow the brake fluid level to fall below the MIN mark
20. When adding liquid, do not allow it to spill past the tank onto adjacent painted surfaces. Mixing different types of brake fluid can damage hydraulic system components (see "Recommended lubricants and operating fluids" or "Owner's Manual").
Warning: Brake fluid is harmful to eyes and paintwork. Be careful when moving and pouring it. Do not use fluid that has been stored in an open container for a long time, as it may absorb moisture from the air and lose its braking effectiveness.
21. After removing the cover, make sure there is no dirt inside the master cylinder reservoir or in the brake fluid. If there are foreign particles in the tank, the system should be refilled with new fluid.
22. After adding liquid to the required level in the tank, it is necessary to tighten its cap tightly to prevent leakage.
23. There will be a slight drop in fluid level in the brake cylinder reservoir as the front brake pads wear. If you constantly need to maintain a set level of fluid in the reservoir, then there is a leak in the brake system. Identify and correct the problem immediately. Inspect the system's tubes and hoses, as well as their connections (see subsection 19).
24. If after checking the fluid level one or both reservoirs are completely or almost completely empty, the brake hydraulic system should be bled and thoroughly examined (see chapter 9).
The article was reprinted from the website chevyman.ru