
ChevyMan.ru
Mazda Mitsubishi Toyota Land Rover Honda Kia Nissan
English Русский
Български
Беларускі
Український
Српски
Hrvatski
Română
Polski
Slovenský
Magyar
|
Articles | Sitemap | Contacts |


Home   Aveo   Captiva   Cruze   Lacetti   Lanos   Niva   Tahoe   Others  
Tahoe 2 and 3 (2000-2014) Tahoe 1 (1992-2000)
  • Home
  • Tahoe
  • 2 (2000-2014)
  • Power unit
  • Engine repair
  • Crankcase Collapse Cover — Removal and Installation

Crankcase Collapse Cover — Removal and Installation (Chevrolet Tahoe 2)

            0

Contents: Removal ↧ Installation ↧

Removal


1. Remove the intake manifold.

Early models


2. Carefully remove the rubber plugs.

3. Disconnect the knock sensor wiring connectors.

4. Remove the knock sensors.
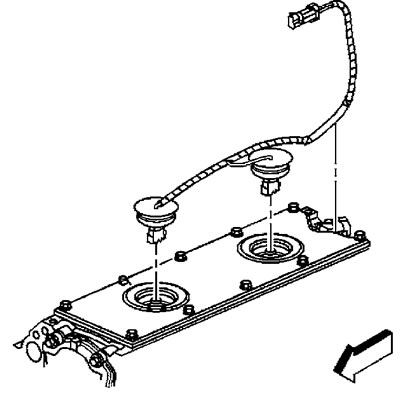
4. Remove the knock sensors.


5. Unscrew the block camber cover mounting bolts.
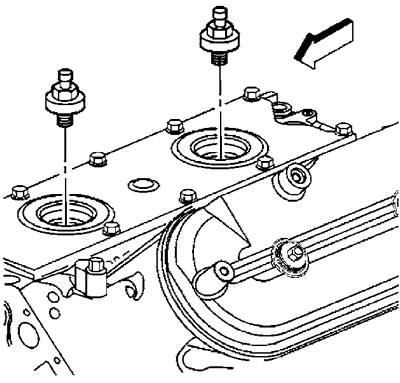
5. Unscrew the block camber cover mounting bolts.


6. Remove the camber cover and discard the cover gasket.
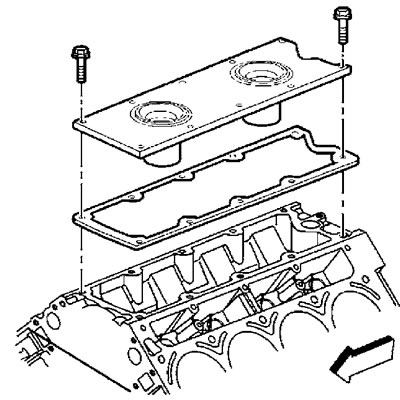
6. Remove the camber cover and discard the cover gasket.


7. Remove the knock sensor seals (1) from the cover (2).
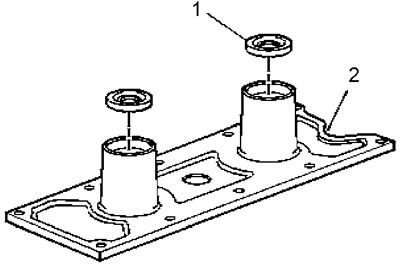


7. Remove the knock sensor seals (1) from the cover (2).


Late models


2. Unscrew the bolts (506) securing the block camber cover.
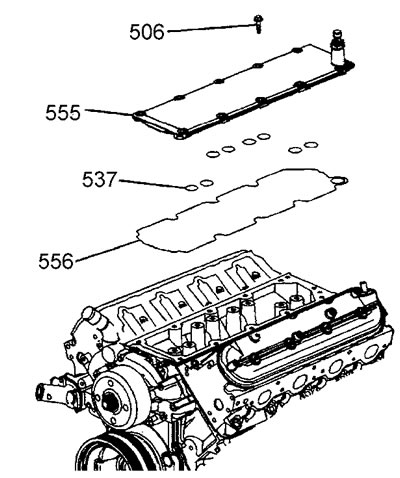
2. Unscrew the bolts (506) securing the block camber cover.


3. Remove the camber cover (555) and gasket (556).

4. Remove the sealing rings (537) from the cover.

5. Remove the oil pressure sensor (706) and sealing washer (707).
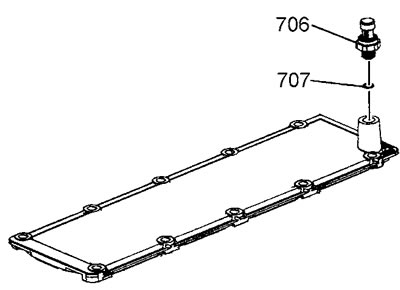
5. Remove the oil pressure sensor (706) and sealing washer (707).


Installation


Caution: Before installation, wash the cover and remove any remaining old gasket.


Early models


1. Lubricate NEW knock sensor seals with clean engine oil.

2. Install the knock sensor seals into the block cam cover.

3. Install the NEW camber cover gasket and cover onto the cylinder block.

4. Install and tighten the cover mounting bolts. Tightening torque 25 Nm.

5. Install and tighten the knock sensors. Tightening torque 20 Nm.

6. Connect the sensor connectors.

7. Install the rubber plugs.

8. Install the intake manifold.

Late models


1. Apply sealant to the oil pressure sensor threads.

2. Install a new sealing washer (707) and screw in the oil pressure sensor (706). Tightening torque 35 Nm.

3. Lubricate the cover sealing rings with engine oil.

4. Install the sealing rings into the camber cover.

5. Install the cover on the engine and tighten the mounting bolts. Tightening torque 25 Nm.

6. Install the intake manifold.

The article was checked: Vladimir Romannikov
This article is available at russian, bulgarian, belarusian, ukrainian, serbian, croatian, romanian, polish, slovak, hungarian

Share information:

Previous articles
Tahoe 2 and 3: Engine repair
Next articles

Exhaust manifold — removal and installation
Intake manifold — removal and installation
Hoses and tubes of the crankcase ventilation system
Upper engine cover
Support brackets (LY6 engine) — removal and installation
Oil manifold (cylinder deactivation system)
Left half-block valve cover
Valve cover of the right half-block
Rocker arms and push rods
Valve stem seals and springs


See similar articles on the topic of Chevrolet cars:
Removal and installation mudguards and engine crankcase protection Chevrolet Aveo T300 (2012-2018)
Decorative cover Chevrolet Captiva 1 (2006-2018)
Removal and installation the decorative engine cover Chevrolet Cruze 1 (2008-2016)
Replacing the cylinder head cover gasket Chevrolet Lacetti 1 (2002-2009)
Replacing the cylinder head cover gasket Chevrolet Lanos T150 (2002-2009)
Engine crankcase ventilation system Chevrolet Niva 1 (2002-2016)
Removal and installation the timing chain cover Chevrolet Lumina 1 (1989-1994)
Link in different formats to this page


Visitor comments

No comments yet


How much will 21 + 27 =


Tahoe 2 and 3 (2000-2014) 
  • General information
  • Vehicle characteristics
  • Vehicle device
  • Manual
  • Maintenance
  • Power unit
  • Engine repair
  • Engine overhaul
  • Cooling system
  • Injection and control system
  • Exhaust system
  • Engine electrical equipment
  • Transmission
  • Automatic gearbox 4L60, 4L65, 4L70
  • Automatic gearbox 6L50, 6L80, 6L90
  • Transfer case
  • Drive shafts and cardan
  • Front drive axle
  • Rear drive axle
  • Chassis
  • Car suspension
  • Steering
  • Brake system
  • Body (until 2007)
  • Exterior (external elements)
  • Interior (internal elements)
  • Doors, locks and windows
  • Heating and air conditioning
  • Security System (SRS)
  • Body (since 2007)
  • Exterior (external elements)
  • Doors, locks and windows
  • Interior (internal elements)
  • Electrical equipment
  • Electrical appliances (until 2007)
  • Lighting and lamps (until 2007)
  • Audio system (until 2007)
  • Electrical appliances (since 2007)
  • Lighting and lamps (since 2007)
  • Audio system (since 2007)
  • Wiring diagrams (2000-2005)
  • Wiring diagrams (2005-2007)
  • Wiring diagrams (since 2007)


Tahoe 1 (1992-2000) 
  • General information
  • User manual
  • Maintenance
  • Power unit
  • Engine in a car
  • Engine removed
  • Cooling system
  • Heating and air conditioning
  • Fuel and exhaust systems
  • Decreased toxicity
  • Transmission
  • Manual gearbox
  • Automatic gearbox
  • Transfer case
  • Clutch and drive shafts
  • Chassis
  • Brake system
  • Car suspension
  • Steering
  • Body
  • Repair of body elements
  • Electrical equipment
  • Engine electrics
  • Equipment and devices
  • Electrical circuits


ChevyMan.ru © 2017-2026 · Mobile version · Feedback · Site search · Interesting to read · Sitemap: EN BG BY UA RS HR RO PL SK HU

Aveo 2003-2008 · Aveo 2006-2011 · Aveo 2012-2018 · Captiva 2006-2018 · Cruze 2008-2016 · Lacetti 2002-2009 · Lanos 2002-2009 · Niva 2002-2016 · Tahoe 1992-2000 · Tahoe 2000-2014 · Lumina 1 1989-1994 · Trailblazer 1 2001-2008 · Orlando 1 2010-2018 ·
🛡️ For your security and to improve our service, this site uses cookies. You can disable them in your browser.