
ChevyMan.ru
Mazda Mitsubishi Toyota Land Rover Honda Kia Nissan
English Русский
Български
Беларускі
Український
Српски
Hrvatski
Română
Polski
Slovenský
Magyar
|
Articles | Sitemap | Contacts |


Home   Aveo   Captiva   Cruze   Lacetti   Lanos   Niva   Tahoe   Others  
Tahoe 2 and 3 (2000-2014) Tahoe 1 (1992-2000)
  • Home
  • Tahoe
  • 2 (2000-2014)
  • Power unit
  • Engine overhaul
  • Boring and honing of cylinders

Boring and honing of cylinders (Chevrolet Tahoe 2)

            0

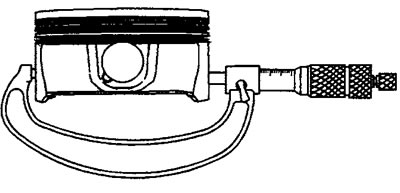
1. Before boring, measure the diameters of NEW pistons to determine the cylinder bore diameter. The piston diameter is measured at a distance of 43 mm from the top of the piston in a plane perpendicular to the axis of the piston pin.

1. Before boring, measure the diameters of NEW pistons to determine the cylinder bore diameter. The…


2. When boring the cylinders, all crankshaft main bearing caps must be in place, and the cap mounting bolts must be tightened to the specified torque.

3. The cylinder diameter after boring should be 0.03 mm less than the final diameter - this is an allowance for honing the cylinder walls.

4. Honing is recommended to be carried out in two stages, first with relatively coarse stones with a grain size of 100 mesh (0.12 mm), then finally with stones with a grain size of 220-240 mesh (0.05 mm). The hone grid should be located at an angle of 45 degrees to the axis of the cylinder. The tops of the hone marks should be clearly visible, but not have sharp tops (plateau honing).
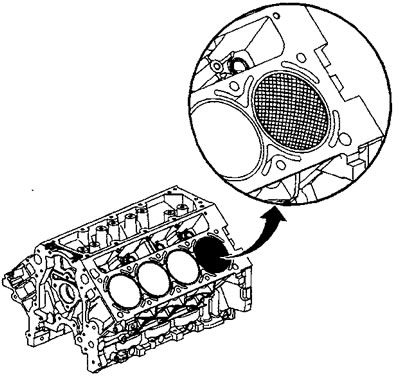
4. Honing is recommended to be carried out in two stages, first with relatively coarse stones with…


5. After honing, mark the piston with the cylinder number where it will be installed.


6. Thoroughly rinse the cylinder walls until all abrasive is removed.

7. Lubricate the cylinder walls with clean engine oil to prevent rust.

8. If boring the cylinders to the repair size is not required, remove polished areas from the cylinder walls using a hand hone.
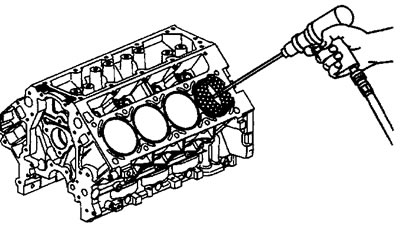
8. If boring the cylinders to the repair size is not required, remove polished areas from the…

The article was checked: Vladimir Romannikov
This article is available at russian, bulgarian, belarusian, ukrainian, serbian, croatian, romanian, polish, slovak, hungarian

Share information:

Previous articles
Tahoe 2 and 3: Engine overhaul
Next articles

Cylinder Block — Check
Disassembling the engine
Engine Removal and Installation — Late Models
Engine Removal and Installation — Early Models
Crankshaft — Check
Measuring clearance in main and connecting rod bearings
Crankshaft pulley — cleaning and checking
Automatic transmission drive clutch — cleaning and checking
Piston, connecting rod and connecting rod bearing


See similar articles on the topic of Chevrolet cars:
Checking the compression in the cylinders Chevrolet Aveo T300 (2012-2018)
Checking the compression in the cylinders Chevrolet Cruze 1 (2008-2016)
Replacement of protective covers and sealing rings of pistons of brake cylinders of front and rear wheels Chevrolet Lacetti 1 (2002-2009)
Removal and installation the master and slave cylinders of the clutch release drive Chevrolet Niva 1 (2002-2016)
Checking the compression in the cylinders Chevrolet Lumina 1 (1989-1994)
Link in different formats to this page


Visitor comments

No comments yet


How much will 28 + 27 =


Tahoe 2 and 3 (2000-2014) 
  • General information
  • Vehicle characteristics
  • Vehicle device
  • Manual
  • Maintenance
  • Power unit
  • Engine repair
  • Engine overhaul
  • Cooling system
  • Injection and control system
  • Exhaust system
  • Engine electrical equipment
  • Transmission
  • Automatic gearbox 4L60, 4L65, 4L70
  • Automatic gearbox 6L50, 6L80, 6L90
  • Transfer case
  • Drive shafts and cardan
  • Front drive axle
  • Rear drive axle
  • Chassis
  • Car suspension
  • Steering
  • Brake system
  • Body (until 2007)
  • Exterior (external elements)
  • Interior (internal elements)
  • Doors, locks and windows
  • Heating and air conditioning
  • Security System (SRS)
  • Body (since 2007)
  • Exterior (external elements)
  • Doors, locks and windows
  • Interior (internal elements)
  • Electrical equipment
  • Electrical appliances (until 2007)
  • Lighting and lamps (until 2007)
  • Audio system (until 2007)
  • Electrical appliances (since 2007)
  • Lighting and lamps (since 2007)
  • Audio system (since 2007)
  • Wiring diagrams (2000-2005)
  • Wiring diagrams (2005-2007)
  • Wiring diagrams (since 2007)


Tahoe 1 (1992-2000) 
  • General information
  • User manual
  • Maintenance
  • Power unit
  • Engine in a car
  • Engine removed
  • Cooling system
  • Heating and air conditioning
  • Fuel and exhaust systems
  • Decreased toxicity
  • Transmission
  • Manual gearbox
  • Automatic gearbox
  • Transfer case
  • Clutch and drive shafts
  • Chassis
  • Brake system
  • Car suspension
  • Steering
  • Body
  • Repair of body elements
  • Electrical equipment
  • Engine electrics
  • Equipment and devices
  • Electrical circuits


ChevyMan.ru © 2017-2026 · Mobile version · Feedback · Site search · Interesting to read · Sitemap: EN BG BY UA RS HR RO PL SK HU

Aveo 2003-2008 · Aveo 2006-2011 · Aveo 2012-2018 · Captiva 2006-2018 · Cruze 2008-2016 · Lacetti 2002-2009 · Lanos 2002-2009 · Niva 2002-2016 · Tahoe 1992-2000 · Tahoe 2000-2014 · Lumina 1 1989-1994 · Trailblazer 1 2001-2008 · Orlando 1 2010-2018 ·
🛡️ For your security and to improve our service, this site uses cookies. You can disable them in your browser.