
ChevyMan.ru
Mazda Mitsubishi Toyota Land Rover Honda Kia Nissan
English Русский
Български
Беларускі
Український
Српски
Hrvatski
Română
Polski
Slovenský
Magyar
|
Articles | Sitemap | Contacts |


Home   Aveo   Captiva   Cruze   Lacetti   Lanos   Niva   Tahoe   Others  
Tahoe 2 and 3 (2000-2014) Tahoe 1 (1992-2000)
  • Home
  • Tahoe
  • 2 (2000-2014)
  • Transmission
  • Front drive axle
  • Fork, seal and deflector of the drive gear of the gearbox

Fork, seal and deflector of the drive gear of the gearbox (Chevrolet Tahoe 2)

            0

Contents: Removal ↧ Installation ↧

Removal


1. Raise the vehicle.

2. Remove the front wheels.

3. Remove the brake calipers.

4. If installed, remove the gearbox guard.

5. Mark the relative positions of the drive shaft and the pinion fork.

6. Loosen the bolts (6) and remove the covers (7) from the fork (1) of the front axle drive gear.
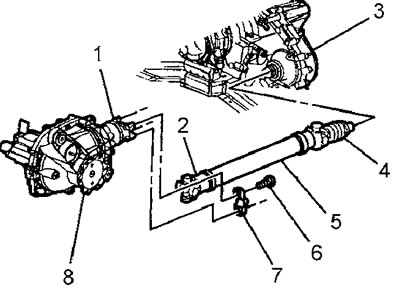
6. Loosen the bolts (6) and remove the covers (7) from the fork (1) of the front axle drive gear.


Warning: When removing the drive shaft, do not strike the joint or place a lever between the fork and the joint, otherwise the joint may be damaged.


7. Disconnect the propeller shaft (2) from the yoke (1). Wrap the bearing caps with insulating tape to prevent loss of the bearing rollers.

8. Hang the cardan shaft to the side with a wire.

9. Measure the turning torque of the drive gear of the gearbox.
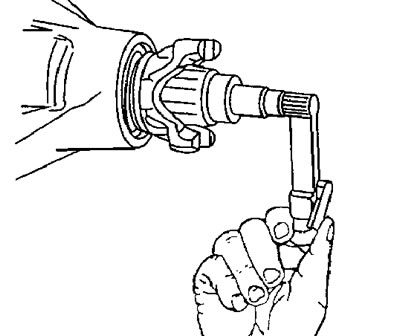
9. Measure the turning torque of the drive gear of the gearbox.


Record the torque value to check the correct assembly. The turning torque gives the combined value of the preload in the following units:


  • bearings of the drive gear.
  • seal of the drive gear.
  • gearbox housing bearings.
  • axle shaft bearings.
  • axle shaft seals.

10. Mark the relative positions of the cardan joint fork and the pinion shaft.
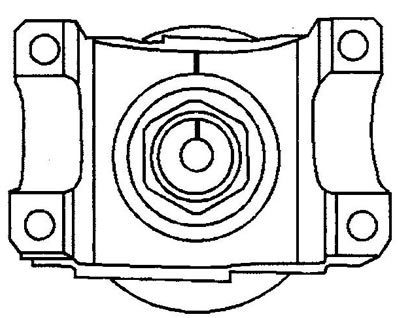
10. Mark the relative positions of the cardan joint fork and the pinion shaft.


11. Attach the fork lock key to the fork to prevent it from turning.
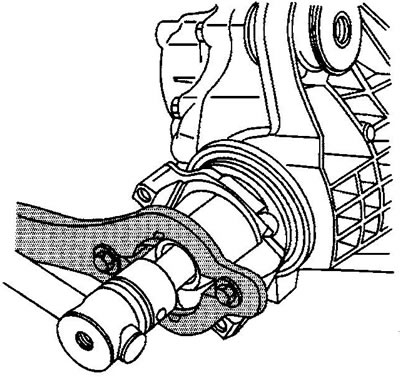
11. Attach the fork lock key to the fork to prevent it from turning.


12. Holding the fork with a wrench, unscrew the fork mounting nut.

13. Install the nut (2) and screw (3) of the fork puller into the key (1).
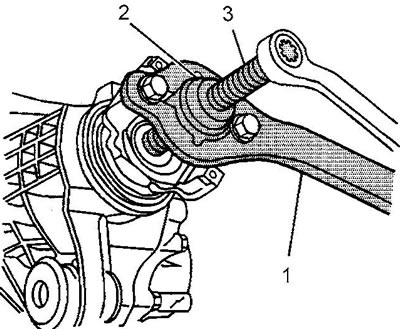
13. Install the nut (2) and screw (3) of the fork puller into the key (1).


14. Holding the fork with a key, turn the puller screw to pull the fork off the drive gear shaft. Remove the deflector.


Warning: Remove the fork seal carefully, do not scratch the seal seat.


15. Using a suitable tool, remove the fork seal.

Warning: Remove the fork seal carefully, do not scratch the seal seat.


Installation


1. Using a mandrel, press the oil seal into the axle gearbox housing.
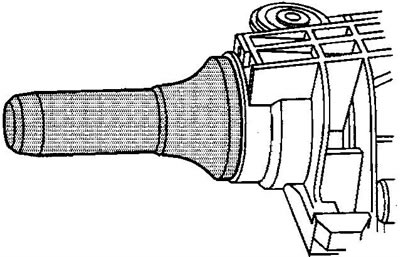
1. Using a mandrel, press the oil seal into the axle gearbox housing.


2. Apply sealant to the splines of the universal joint fork.

3. Install the deflector. Install the fork according to the relative position marks made before removal.

4. Using a soft-faced hammer, seat the fork on the gear shaft until several turns of the gear shaft thread emerge.

5. Install the washer and screw on the new fork mounting nut.

6. Attach the fork lock key to the fork to prevent it from turning.

7. Tighten the fork mounting nut until the pinion shaft axial clearance is almost eliminated. At the same time, rotate the pinion shaft to ensure proper bearing seating.

8. Measure the turning torque of the drive gear shaft. Tighten the nut in small portions until the initial torque is exceeded by 0.4-0.6 Nm.

Caution: If the pinion turning torque is exceeded, the pinion will have to be removed and the deformable spacer will have to be replaced.


9. Once the specified turning torque is reached, turn the pinion shaft a few revolutions. Check the turning torque value, adjust the torque value if necessary.

10. Connect the front propeller shaft to the fork.

11. Check and adjust the oil level in the gearbox crankcase.

12. Install the gearbox protection.

13. Install the brake calipers.

14. Install the wheels.

15. Lower the vehicle.

The article was checked: Vladimir Romannikov
This article is available at russian, bulgarian, belarusian, ukrainian, serbian, croatian, romanian, polish, slovak, hungarian

Share information:

Previous articles
Tahoe 2 and 3: Front drive axle
Next articles

Bridge engagement drive
Breather hose nipple — removal and installation
Breather hose — removal and installation
Transmission oil change
Checking the oil level
Front Axle Gearbox — 2500 Series
Front Axle Gearbox — 1500 Series
Axle shaft and beam of a non-disconnectable bridge — 8.25 inch gearbox
Half shaft and beam of the disconnectable bridge — gearboxes 8.25 and 9.25


See similar articles on the topic of Chevrolet cars:
Replacing the wheel drive shaft seal Chevrolet Aveo T250 (2006-2011)
Gearbox with final drive assembly Chevrolet Captiva 1 (2006-2018)
Replacing gearbox drive seals Chevrolet Cruze 1 (2008-2016)
Adjusting the gearbox control drive Chevrolet Lacetti 1 (2002-2009)
Adjusting the gearbox control drive Chevrolet Lanos T150 (2002-2009)
Installation and adjustment of the drive gear of the gearbox Chevrolet Niva 1 (2002-2016)
Extended Gearbox Housing Seal (2WD) — Replacement Chevrolet Trailblazer 1 (2001-2008, petrol)
Link in different formats to this page


Visitor comments

No comments yet


How much will 35 + 12 =


Tahoe 2 and 3 (2000-2014) 
  • General information
  • Vehicle characteristics
  • Vehicle device
  • Manual
  • Maintenance
  • Power unit
  • Engine repair
  • Engine overhaul
  • Cooling system
  • Injection and control system
  • Exhaust system
  • Engine electrical equipment
  • Transmission
  • Automatic gearbox 4L60, 4L65, 4L70
  • Automatic gearbox 6L50, 6L80, 6L90
  • Transfer case
  • Drive shafts and cardan
  • Front drive axle
  • Rear drive axle
  • Chassis
  • Car suspension
  • Steering
  • Brake system
  • Body (until 2007)
  • Exterior (external elements)
  • Interior (internal elements)
  • Doors, locks and windows
  • Heating and air conditioning
  • Security System (SRS)
  • Body (since 2007)
  • Exterior (external elements)
  • Doors, locks and windows
  • Interior (internal elements)
  • Electrical equipment
  • Electrical appliances (until 2007)
  • Lighting and lamps (until 2007)
  • Audio system (until 2007)
  • Electrical appliances (since 2007)
  • Lighting and lamps (since 2007)
  • Audio system (since 2007)
  • Wiring diagrams (2000-2005)
  • Wiring diagrams (2005-2007)
  • Wiring diagrams (since 2007)


Tahoe 1 (1992-2000) 
  • General information
  • User manual
  • Maintenance
  • Power unit
  • Engine in a car
  • Engine removed
  • Cooling system
  • Heating and air conditioning
  • Fuel and exhaust systems
  • Decreased toxicity
  • Transmission
  • Manual gearbox
  • Automatic gearbox
  • Transfer case
  • Clutch and drive shafts
  • Chassis
  • Brake system
  • Car suspension
  • Steering
  • Body
  • Repair of body elements
  • Electrical equipment
  • Engine electrics
  • Equipment and devices
  • Electrical circuits


ChevyMan.ru © 2017-2026 · Mobile version · Feedback · Site search · Interesting to read · Sitemap: EN BG BY UA RS HR RO PL SK HU

Aveo 2003-2008 · Aveo 2006-2011 · Aveo 2012-2018 · Captiva 2006-2018 · Cruze 2008-2016 · Lacetti 2002-2009 · Lanos 2002-2009 · Niva 2002-2016 · Tahoe 1992-2000 · Tahoe 2000-2014 · Lumina 1 1989-1994 · Trailblazer 1 2001-2008 · Orlando 1 2010-2018 ·
🛡️ For your security and to improve our service, this site uses cookies. You can disable them in your browser.