
Warning. When servicing the battery, avoid getting electrolyte on clothing and skin. If electrolyte gets in contact with the surface, rinse the area of contact with water or ammonia. Use glasses and rubber gloves when working.
To complete the work, you will need a device for cleaning battery terminals and wire terminals or fine-grained sandpaper, a glass of baking soda solution or 10% ammonia solution, 1 liter of distilled water, a multimeter, and a hydrometer.
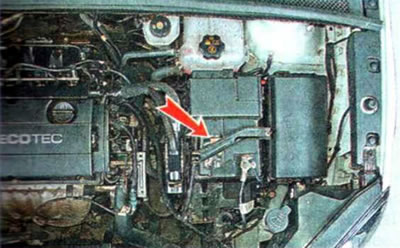
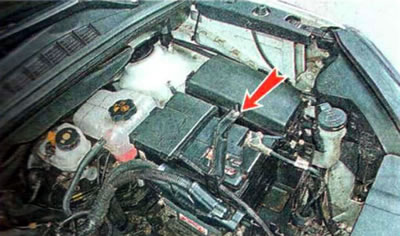
Note: The battery is mounted on a platform on the left side of the engine compartment.
1. We prepare the car for maintenance and repair.
2. Using a rag soaked in a solution of baking soda or a 10% solution of ammonia, clean the outer surface of the battery. We inspect the battery for damage and cracks; a battery with a sealed case must be replaced.
3. Using a 10 mm wrench, check the tightening of the battery clamp mounting bolt...
...and the terminals of the wires on the terminals of the battery. If necessary, tighten them with a 10 mm wrench.

To access the positive terminal, open the cover.

Note: If the wire terminals are very loose, disconnect them from the battery terminals (see "Removal" below). Inspect the terminals for oxidation and damage. Cracked terminals (or terminals assembled with wires) needs to be replaced. Clean the inner surfaces of the terminals until they shine using a special tool or fine-grained sandpaper.

The constant formation of oxides on the contact surfaces of the wire terminals and battery terminals indicates increased voltage in the vehicle's on-board network due to improper operation of the generator voltage regulator.
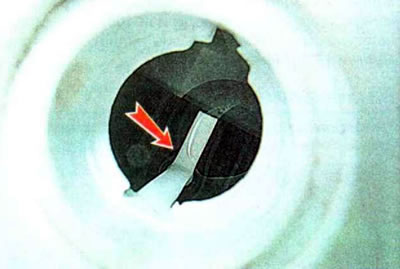
4. By the color of the built-in charge level indicator (if available) we check the condition of the battery.

Note: Depending on the manufacturer, two types of indicators may be installed on batteries (tricolor and bicolor), which differ in their indication of charge level and electrolyte level.
Three-color indicator shows the charge level and electrolyte level:
- If the indicator is blue, the battery is good and charged to at least 65%.
- If the indicator is white, the battery is discharged by more than 35%. In this case, the battery should be charged (see below "Charging") using a charger.
- The red color of the indicator already indicates a low electrolyte level. In this case, it is necessary to add distilled water (see below).
Note: With another version of the three-color indicator, a combination of colors green-black-white is possible.
The two-color indicator shows the electrolyte level in the battery. If the indicator is black, the level is sufficient; if the indicator is colorless or light yellow, the level is low.
Warning. Operating a battery with a low electrolyte level will lead to its rapid failure.
The built-in indicator gives an approximate assessment of the battery condition, so it is necessary to periodically check the battery using special devices.
For a battery whose casing is made of transparent plastic, we check the electrolyte level relative to the marks on its casing. In all battery cells, the level should be between the LOWER (low) and UPPER (high) or MIN and MAX marks.

5. If the battery case is opaque or there are no electrolyte level marks on it, open the battery filler caps. We control the electrolyte level in each battery through the filler hole.
Depending on the design of the battery, the electrolyte should be at the level of the lower edge of the wells or at the level of the indicator located inside the filler holes.
A drop in the electrolyte level may be caused by improper charging of the battery (in the previous tense) or a malfunction of the generator voltage regulator. In this case, it is necessary to identify and eliminate the cause of the decrease in the level and add distilled water to the electrolyte.

Warning. To replenish the electrolyte level, use only distilled water. Adding electrolyte is not allowed, this will cause the active mass of the electrodes to melt and the battery to fail. Adding electrolyte is only possible if it spills out of the battery.
6. After restoring the electrolyte level, check its density with a hydrometer and charge the battery if necessary (see "Charging" below).
Note: Immediately after adding distilled water, until the solution in the battery is completely mixed, the hydrometer readings will be incorrect. Therefore, the density of the electrolyte should be checked no earlier than half an hour after adding water.
7. Preparing the hydrometer for work (according to the instructions included with it) and we measure the density of the electrolyte in each battery cell.

We compare the obtained values with those shown on the graph.

The obtained values should be within zone A. If the obtained values are lower, the battery should be removed from the vehicle and charged using a charger. If it is higher, the battery is overcharging, which is most likely caused by a faulty voltage regulator.
Note. In a working battery, the difference in the density of the electrolyte in the can should be no more than 0.01 g/cm³. If the density of the electrolyte in neighboring batteries differs significantly (more than 0.04 g/cm³), most likely there was a short circuit and the battery is faulty.
The state of charge of the battery depending on the voltage at its terminals
| Voltage at battery terminals, V | Degree of charge, % |
| 12,6 | 100 |
| 12,4 | 75 |
| 12,2 | 50 |
| 12,0 | 25 |
To roughly estimate the state of charge of the battery in the absence of a hydrometer, you can use a voltmeter. To do this, measure the voltage at the battery terminals and compare it with the data in the table (voltage values are given at a battery temperature of 20-24°C). If the battery charge level is less than 50%, it must be charged (see "Charging" below).
8. Install the parts in reverse order. In this case, first connect the wire terminal to the positive terminal of the battery, and then to the negative one. To protect against environmental influences, apply technical petroleum jelly or protective varnish to the battery terminals with the clamps installed on them.
The original text can be found on the website: «chevyman.ru»