


Contents: General recommendations ↧ Examination ↧
General recommendations
The car can be equipped with either a serviced or a maintenance-free type of battery. As a rule, the service life of a maintenance-free battery is set by the battery manufacturer, and there is no need to frequently check the electrolyte level during its operation. The design of a maintenance-free battery does not allow adding electrolyte, so when the level drops below the permissible level, the battery must be replaced with a new one.
When choosing a new battery, you must be guided by the parameters for the battery that the manufacturer provides specifically for your car.
Battery parameters:
- Capacity, measured in ampere-hours (Ah), is the amount of electricity that can be obtained from the battery when it is discharged to the set final voltage.
- Cold start current is the amount of current applied by the battery to the vehicle starter during cold engine start. Measured in Amperes (A).
- The size of the battery case must match the size of the mounting area and the mounting brackets. The battery must be securely fastened in the vehicle's regular location.
The parameters of the battery are usually indicated on its case. However, different manufacturers use different standards for measurement and therefore it is necessary to take this into account.
Examination
The standard battery for the vehicles is from ACDelco®.
- Capacity 115 Ah
- Cold cranking current:
- models before 2007 - 600 A
- models from 2007 - 770 A
Recommended battery:
- Models up to 2007: ACDelco® 78-6YR, 78-7YR
- Models from 2007 onwards: ACDelco® 48-6YR
Note: See safety precautions when working with electrical equipment:
- Do not disconnect the battery while the engine and/or accessories are running. Turn the ignition switch to the "OFF" (LOCK) position and turn off all auxiliary electrical equipment.
- When checking, disconnect the negative battery cable first and reconnect it last.
- Be careful not to short-circuit the terminals with tools.
1. Visual inspection of the battery condition.
Note: If there is corrosion from the electrolyte, wash the damaged areas with a solution of clean warm water and soda, then wipe dry with a cloth. Do not allow the cleaning solution to get into the battery.
a) (Non-standard battery with charge status indicators) Check the status of the indicators according to the battery manufacturer's instructions. The colors indicating the state of charge of the battery may differ from those shown in the illustration for each manufacturer.
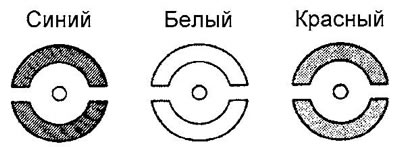
- Blue: Battery is OK.
- White: Needs to be recharged.
- Red: low electrolyte level.
b) Check the battery posts and tray for corrosion damage caused by electrolyte leakage.
c) Check the battery case and cover for cracks and damage that could cause electrolyte leakage. Replace the battery if necessary.
Caution: If there are electrolyte leaks from the battery, use suitable rubber gloves when removing the battery (do not use household gloves).
d) Check the strength of the battery terminals. If the terminal connections are loose, tighten the clamp nuts.
d) Check the terminals for damage and corrosion, if necessary, clean the terminals and apply a special consistent lubricant to them.
Caution: Do not overtighten the terminal retainer nuts.
e) Tighten the retaining clip only enough to hold the battery securely in place. Overtightening may damage the battery case.
2. If necessary, check the level and density of electrolyte in the battery (serviced).
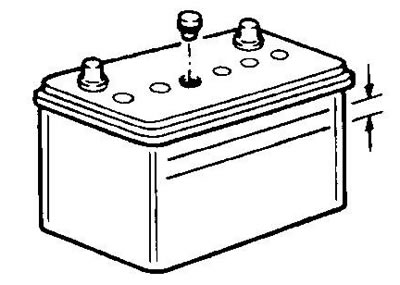
a) Make sure that the electrolyte level in the battery is between the maximum level marks (UPPER LEVEL) and minimum level (LOWER LEVEL).
Note: It is recommended to check the electrolyte level regularly depending on operating conditions, but not less than once every four weeks.
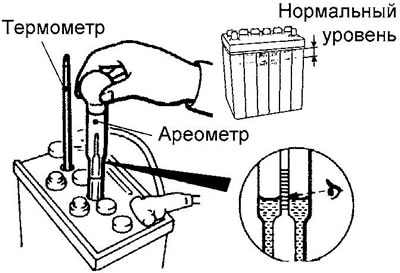
b) Using a hydrometer and a thermometer, measure the density of the electrolyte in the battery.
- Nominal value - 1.22 -1.29 g/cm³ (at 20°C)
c) The density of the electrolyte depends on the temperature, therefore, to convert the measured value to the density at a temperature of 20°C, use the following formula:
D20 = Dt + 0,0007 (t - 20),
where D20 is the reduced density of the electrolyte at 20°C;
Dt - actually measured density;
t - actual temperature in°C.
3. (Some types of standard batteries) Checking the electrolyte level in the standard battery.
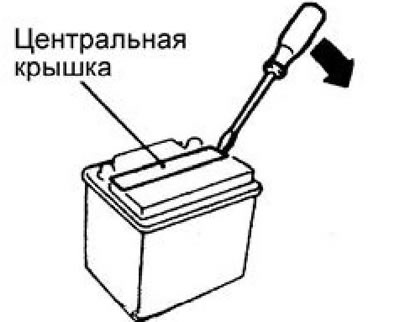
a) Using a flat-head screwdriver, remove the center battery cover.
Note: The battery cell plugs are rigidly connected to the center cap and will be removed along with it when it is removed.
b) Make sure that the electrolyte level in each battery cell reaches the bottom edge of the indicator. If necessary, add distilled water to the cell, but do not exceed the specified level.
Attention: if the electrolyte level exceeds the level specified above, electrolyte may leak from the battery while the vehicle is moving.
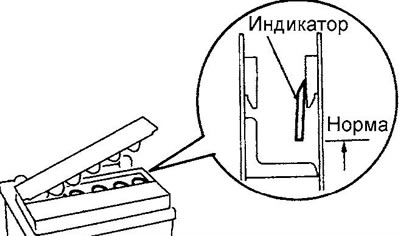
c) Install the center battery cover securely.
4. Checking the output voltage of the battery.
a) Turn on the headlights for 15 seconds.
b) Turn off the headlights and wait 2 minutes for the battery voltage to stabilize.
c) Turn off the ignition and disconnect the wires from the battery terminals.
d) Measure the voltage at the battery terminals (open circuit voltage).
- Voltage: 12.4V or higher (at 20°C)
d) If the voltage does not correspond to the nominal value, charge the battery, e) If necessary, load the battery with the recommended load for 15 seconds. Read the battery voltage at the terminals after 15 seconds, then remove the electrical load.
5. Charging the battery. Note: Before charging the battery, read the instructions for this charger. Charge strictly according to the recommendations specified therein.
a) When charging a battery installed in a vehicle, first disconnect the cable from the negative terminal of the battery, and then disconnect the cable from the positive terminal to prevent damage to the vehicle's electrical components.
b) The charging current is usually 1/10 of the battery capacity.
c) In case of fast charging (due to lack of time, etc.) a deeply discharged battery, the charging current should never exceed 70% of the battery capacity indicated in amperes, and the charging time should not exceed 30 minutes.
- Charging current: 11.5 A
d) Determining the moment of completion of charging:
- If the density of the electrolyte has reached 1.25 - 1.29 g/cm³ and remains constant for an hour.
- If the voltage of each battery cell has reached 2.5 - 2.8 V and remains constant for one hour.
Attention:
- Be careful and monitor the electrolyte level, which may increase during charging.
- Charging near fire sources is not permitted due to the risk of explosion.
- While charging, do not perform nearby work that may cause sparks.
- Charge the battery in a well-ventilated area.
- After charging is complete, close the lids of the jars, wash the battery from the outside with clean water to remove any remaining acid and wipe dry.
- Do not allow the electrolyte temperature to rise above approximately 45°C (approximately 55°C when performing fast charging) during charging.