
ChevyMan.ru
Mazda Mitsubishi Toyota Land Rover Honda Kia Nissan
English Русский
Български
Беларускі
Український
Српски
Hrvatski
Română
Polski
Slovenský
Magyar
|
Articles | Sitemap | Contacts |


Home   Aveo   Captiva   Cruze   Lacetti   Lanos   Niva   Tahoe   Others  
Lanos T150 (2002-2009)
  • Home
  • Lanos
  • T150 (2002-2009)
  • Power unit
  • Engine repair
  • Removal and installation the engine

Removal and installation the engine (Chevrolet Lanos T150)

            0

We perform the work when it is necessary to repair or replace the engine. We show the engine dismantling operations on a car with power steering and air conditioning.

We release the pressure in the engine fuel system (see Replacing the fuel filter).

We remove the battery.

Drain the oil from the engine (see Changing engine oil and oil filter) and coolant (see Replacing the coolant).

Disconnect the intermediate pipe from the catalytic converter of the exhaust system (see Removal the intermediate pipe).

Disconnect the fuel pipe tips from the fuel rail fittings and the fuel pressure regulator (see Removal the fuel rail and injectors).

Disconnect the throttle cable end from the throttle assembly sector (see Replacing the throttle cable).

Remove the air supply hose to the throttle assembly (see Removal the intake manifold air temperature sensor). Remove the air filter (see Removal the air filter).

Remove the brake booster hose and the manifold absolute air pressure sensor hose from the intake manifold fittings (see Removal the intake manifold).

We remove the radiator of the cooling system together with the fans (see Removal the radiator).

We disconnect the filler hose of the expansion tank and the outlet hose of the heater radiator from the supply pipe of the coolant pump, and the supply hose of the heater from the tee.

We dismantle the engine together with the engine wiring harness, without disconnecting the wiring harness blocks from the generator, ignition coil, control system sensors located on the engine, purge valves of the adsorber and exhaust gas recirculation, idle speed controller and injectors.


Disconnect the two engine wiring harness connectors from the engine control unit (see Removal the electronic control unit) and one block - from the absolute air pressure sensor (see Removal the Manifold Absolute Pressure Sensor).
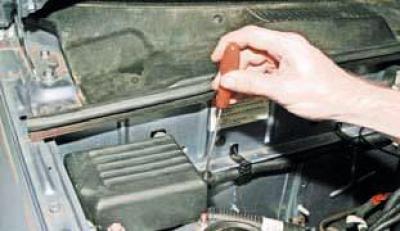
Using a Phillips screwdriver, unscrew and remove the piston securing the casing of the wiring…


Using a Phillips screwdriver, unscrew and remove the piston securing the casing of the wiring harness pad block..
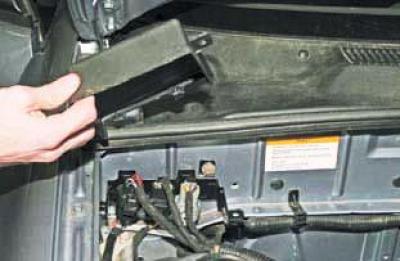
…and remove the casing.
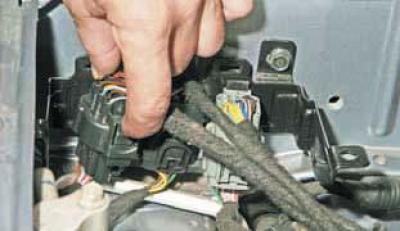

…and remove the casing.

Disconnect the three engine wiring harness connectors from the wiring harness connectors attached…


Disconnect the three engine wiring harness connectors from the wiring harness connectors attached to the front panel and place the engine wiring harness on the engine.
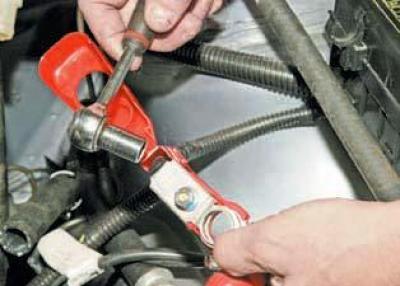


Using a 10 mm socket, unscrew the nut securing the ends of the two wires to the positive terminal…


Using a 10 mm socket, unscrew the nut securing the ends of the two wires to the positive terminal of the battery.
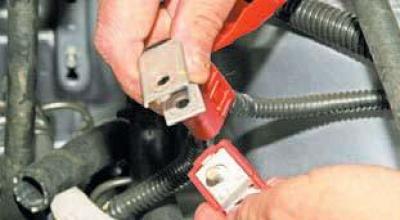
We remove the wire tips from the terminal stud..
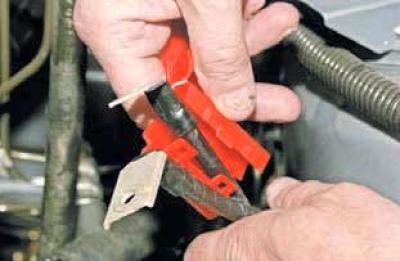

We remove the wire tips from the terminal stud..

…and we disconnect the positive wires of the engine harness and the engine compartment mounting…


…and we disconnect the positive wires of the engine harness and the engine compartment mounting block.
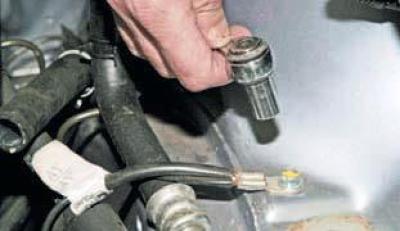
Using a 10 mm socket head, unscrew the bolt securing the end of the ground wire of the engine…


Using a 10 mm socket head, unscrew the bolt securing the end of the ground wire of the engine wiring harness.
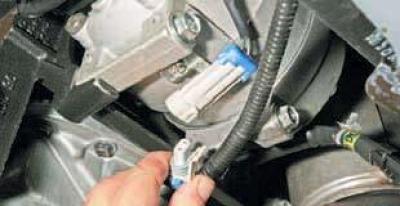


Disconnect the air conditioning compressor wiring harness connector.


Disconnect the air conditioning compressor wiring harness connector.

We remove the air conditioning compressor from the engine without disconnecting the refrigerant supply and discharge lines.
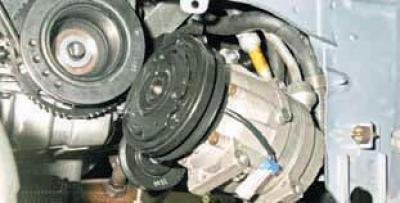
Having removed the compressor, we lower it on the tubes and move it away from the engine.


Having removed the compressor, we lower it on the tubes and move it away from the engine.

Remove the gearbox (see Removal the gearbox). After dismantling the gearbox, the engine is supported by a support from below.

Having disconnected the fluid supply pipes to the windshield washer nozzles and having unscrewed the four bolts securing the hood to the hinges…
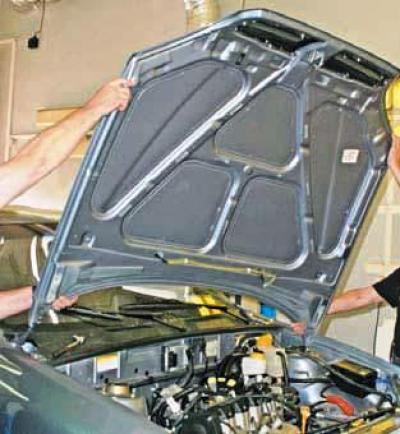
…we remove the hood.

…we remove the hood.


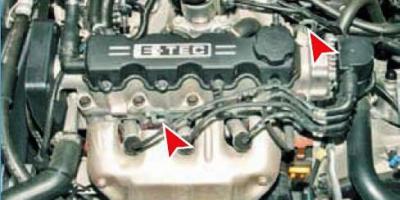
The engine is equipped with two eyes for attaching the lifting device chain.


The engine is equipped with two eyes for attaching the lifting device chain.

We fix the chain of the lifting device to the eyes. Having tightened the chain of the lifting device, we remove the stop from under the engine. We remove the right support of the power unit. Before removing the engine from the engine compartment, it is necessary to check again whether all hoses, tubes, wires are disconnected from the engine and moved to the side.
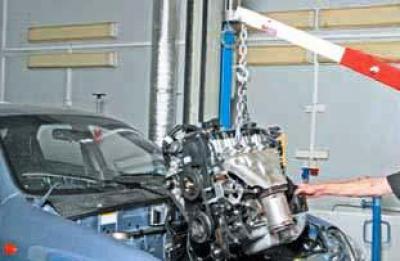
We remove the engine from the engine compartment.


We remove the engine from the engine compartment.

We install the engine on the car in the reverse order.

(The original source of the article is the website «ChevyMan.ru»)

The article was checked: Vladimir Romannikov
This article is available at russian, bulgarian, belarusian, ukrainian, serbian, croatian, romanian, polish, slovak, hungarian

Share information:

Previous articles
Lanos T150: Engine repair
Next articles

Removal the powertrain supports
Replacing the low oil pressure sensor
Replacing the rear crankshaft oil seal
Replacing the front crankshaft oil seal
Replacing the camshaft seal


See similar articles on the topic of Chevrolet cars:
The engine will not start Chevrolet Aveo T300 (2012-2018)
Engine coolant temperature gauge Chevrolet Captiva 1 (2006-2018)
The engine will not start Chevrolet Cruze 1 (2008-2016)
Starting the engine from another car's battery («jump-starting») Chevrolet Lacetti 1 (2002-2009)
Starting the engine Chevrolet Niva 1 (2002-2016)
Starting a gasoline engine Chevrolet Tahoe 1 (1992-2000)
Engine bay and underbody of the car Chevrolet Lumina 1 (1989-1994)
Link in different formats to this page


Visitor comments

No comments yet


How much will 46 + 41 =


Lanos T150 (2002-2009) 
  • General information
  • User manual
  • Maintenance
  • Troubleshooting
  • Power unit
  • Engine repair
  • Control system
  • Supply system
  • Cooling system
  • Exhaust system
  • Transmission
  • Clutch
  • Car gearbox
  • Front wheel drives
  • Chassis
  • Front suspension
  • Rear suspension
  • Steering
  • Brake system
  • Body
  • Repair of body elements
  • Heating and air conditioning
  • Electrical equipment
  • Engine electrics
  • Lighting and lamps
  • Equipment and devices
  • Electrical circuits


ChevyMan.ru © 2017-2026 · Mobile version · Feedback · Site search · Interesting to read · Sitemap: EN BG BY UA RS HR RO PL SK HU

Aveo 2003-2008 · Aveo 2006-2011 · Aveo 2012-2018 · Captiva 2006-2018 · Cruze 2008-2016 · Lacetti 2002-2009 · Lanos 2002-2009 · Niva 2002-2016 · Tahoe 1992-2000 · Tahoe 2000-2014 · Lumina 1 1989-1994 · Trailblazer 1 2001-2008 · Orlando 1 2010-2018 ·
🛡️ For your security and to improve our service, this site uses cookies. You can disable them in your browser.