


Contents: 8.6 inch gearbox ↧ 9.5 inch gearbox ↧
8.6 inch gearbox
1. Install the dial indicator as shown in the figure.
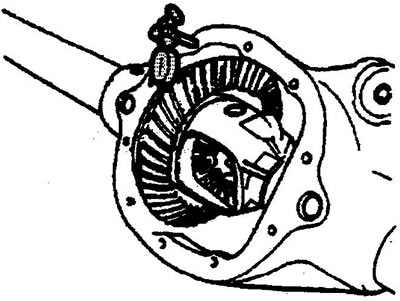
2. Place the indicator leg on the root of the driven gear tooth of the gearbox.
3. Adjust the position of the indicator so that the leg is directed in the direction of rotation of the gear and is perpendicular to the end of the tooth.
4. Create a preload on the indicator leg and set the pointer to zero.
5. While holding the drive gear, rock the driven gear from stop to stop, record the clearance value.
6. Repeat the measurement process for eight teeth around the circumference. The difference between the minimum and maximum clearance values should not exceed 0.05 mm
7. If the difference in gaps is more than 0.05 mm, check:
- presence of scoring on the driven gear seat;
- presence of deformation of the differential cup flange;
- uniform tightening of the driven gear mounting bolts.
8. If the difference in the gap values is normal, then the absolute value of the gap should be within 0.08-0.25 mm, preferably in the range of 0.13-0.18 mm.
Attention:
- Do not reinstall factory cast iron shims, use service shims and spacers instead.
- Install shims of equal thickness on both sides to maintain correct side bearing preload.
- Moving 0.05mm of shim thickness from one side to the other will change the engagement clearance by approximately 0.03mm.
9. If the engagement gap is too small:
- a) Unscrew the bolts securing the side bearing caps, mark the locations of the caps.
- b) Remove the gearbox with the outer bearing rings and adjusting washers. Mark the left and right outer bearing rings and adjusting washers.
- c) Measure the thickness of the shim pack on the left and right sides. Determine the thickness of each shim individually. Take measurements at least in three points around the circumference. Determine the arithmetic mean and add the thicknesses of all the shims to determine the total thickness of the pack.
- d) Assemble a new left-hand shim pack, reducing the overall pack thickness by the desired amount. For example, to increase the gap by 0.05 mm, reduce the pack thickness by 0.10 mm.
- d) Assemble a new right-hand shim pack, increasing the overall pack thickness by the desired amount. For example, to increase the clearance by 0.05 mm, increase the pack thickness by 0.10 mm.
10. If the gap is too large, carry out all operations according to point 9, but changing the direction of transfer of the thickness of the adjusting washers.
11. Install the gearbox with the outer rings of the differential side bearings.
12. Install the spacer on the left side between the crankcase and the differential.
13. Install the spacer on the right side between the crankcase and the differential.
14. Install the selected set of adjusting washers between the spacer and the outer ring of the left bearing. If necessary, use a special puller.
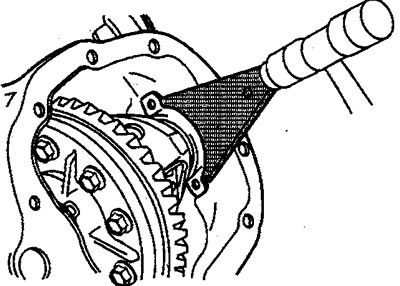
15. Install the selected set of adjusting washers between the spacer and the outer ring of the right bearing. If necessary, use a special puller.
16. Install the bearing caps and tighten the mounting bolts. Tightening torque 75 N·m.
17. Recheck the clearance in the engagement and adjust if necessary.
18. After making adjustments, check the position of the tooth contact patch.
9.5 inch gearbox
Caution: Before adjusting the engagement clearance, adjust the differential side bearing preload.
1. Measure the total torque of the gearbox. Torque:
- new bearings 3.9 - 6.2 Nm.
- old bearings 2.8-5.1 Nm.
2. If the turning torque is too low, turn the bearing adjusting nut one notch toward the tightening side until the required torque is reached.
3. If the turning torque is too high, turn the bearing adjustment nut one notch in the direction of loosening until the required torque is achieved.
4. If the overall turning torque cannot be adjusted in this way, check and adjust the turning torque of the pinion gear.
5. Install the dial indicator as shown in the figure.
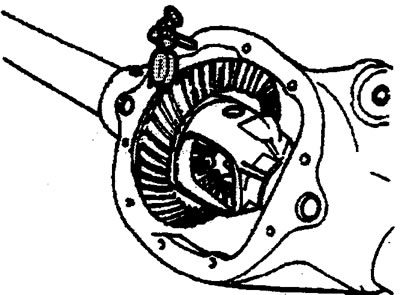
6. Install the indicator leg on the root of the tooth of the driven gear of the gearbox.
7. Adjust the position of the indicator so that the leg is directed in the direction of rotation of the gear and is perpendicular to the end of the tooth.
8. Create a preload on the indicator leg and set the arrow to zero.
9. Holding the drive gear, rock the driven gear from stop to stop, record the clearance value.
10. Repeat the measurement process for eight teeth around the circumference. The difference between the minimum and maximum clearance values should not exceed 0.05 mm
11. If the difference in gaps is more than 0.05 mm, check:
- presence of scoring on the driven gear seat;
- presence of deformation of the differential cup flange;
- uniform tightening of the driven gear mounting bolts.
12. If the difference in the gap values is normal, then the absolute value of the gap should be within 0.08-0.25 mm, preferably in the range of 0.13-0.18 mm.
Note: Moving 0.05mm of shim thickness from one side to the other will change the engagement clearance by approximately 0.03mm.
13. If the gap is outside the permissible limits:
- a) Loosen the bearing adjustment nut retainer bolt.
- b) Remove the retainer.
- c) Loosen the bearing cover mounting bolts; there is no need to remove the bolts.
- d) Loosen the bearing adjustment nut.
- d) Remove the side bearing adjusting washers.
- e) Measure the thickness of the adjusting washer. Take measurements at least in three points around the circumference. Determine the arithmetic mean, which will give the thickness of the washer.
- g) If the gap is too small, select a washer of a smaller thickness. For example, to increase the gap by 0.05 mm, the thickness of the washer must be reduced by 0.10 mm.
- h) If the gap is too large, select a washer of greater thickness. For example, to reduce the gap by 0.05 mm, the washer thickness should be increased by 0.10 mm.
- i) Install the adjusting washer.
14. Tighten the bearing adjustment nut until it contacts the outer ring of the bearing.
15. From the achieved position, tighten the nut by two notches for old bearings or by three notches for new bearings.
16. Tighten the bearing cap bolts. Tightening torque 85 N·m.
17. Recheck the clearance size in the engagement.
18. Install the bearing adjustment nut retainer.
19. Install the retainer bolt. Tightening torque 26 N·m.
20. Check the overall torque of the gearbox, adjust the torque if necessary, see above.
21. After making all adjustments, check the position of the contact patch in the gearbox gear engagement.