
ChevyMan.ru
Mazda Mitsubishi Toyota Land Rover Honda Kia Nissan
English Русский
Български
Беларускі
Український
Српски
Hrvatski
Română
Polski
Slovenský
Magyar
|
Articles | Sitemap | Contacts |


Home   Aveo   Captiva   Cruze   Lacetti   Lanos   Niva   Tahoe   Others  
Tahoe 2 and 3 (2000-2014) Tahoe 1 (1992-2000)
  • Home
  • Tahoe
  • 2 (2000-2014)
  • Transmission
  • Rear drive axle
  • Adjusting the position of the drive gear of the gearbox

Adjusting the position of the drive gear of the gearbox (Chevrolet Tahoe 2)

            0

Contents: 10.5 inch gearbox ↧ 8.6" and 9.5" gearboxes ↧

10.5 inch gearbox


1. Install the gearbox.

Caution: Before servicing the bearing cap, measure and record the thickness of the pinion bearing cap adjusting washer.


2. Install the original pinion bearing cover adjusting washer. If the original washer is not available, install a 0.41mm thick washer.

Caution: Do not apply grease to the washer at this time.


3. Install the bearing cap.

4. Install the bearing cover mounting bolts. Tighten the bolts. Tightening torque 88 N·m.

5. Adjust the engagement clearance.

6. Check the shape and position of the contact patch of the teeth of the drive and driven gears of the gearbox.

7. If the shape and position of the contact patch are not normal, adjust the position of the drive gear:
  • a) Loosen the gear bearing cover bolts.
  • b) Remove the cover.
  • c) Remove the adjusting washer.
    • If the contact patch is higher than normal, install a washer one size larger (approximately 0.25 mm).
    • If the contact patch is below normal, install a washer one size smaller (approximately 0.25 mm).
  • d) Install the selected adjusting washer.
  • d) Install the bearing cover.
  • e) Install and tighten the bearing cover mounting bolts. Tightening torque 88 N·m.
  • g) Check the shape and position of the contact patch of the teeth of the drive and driven gears of the gearbox.

Note: Adjusting washers are available in thicknesses from 0.15 to 0.61 mm with a step of 0.2-0.3 mm.


8. Check the clearance size in the engagement.

8.6" and 9.5" gearboxes


Note: This will require special measuring equipment.


Attention: when taking measurements, all tools, differential side bearing seats and gearbox pinion bearing rings must be absolutely clean.


1. Lubricate the bearings of the drive gear of the reduction gear with transmission oil.

2. Install the pinion bearings into the gearbox housing.

3. Assemble and install the measuring device as shown in the figure.
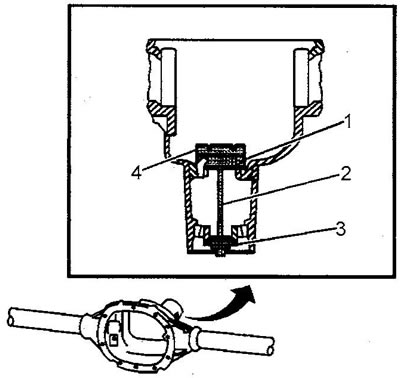
3. Assemble and install the measuring device as shown in the figure.


4. Hold the plug (4) of the device with a torque wrench and turn the nut (3) until a turning torque of 1.7 Nm is obtained. Turn the assembly several times in both directions to seat the bearings.

5. Check the value of the turning torque. If the torque is less than 1.7 Nm, tighten the nut until the torque is in the range of 1.7-2.3 Nm.

6. Install the second device into the gearbox housing as shown in the figure.
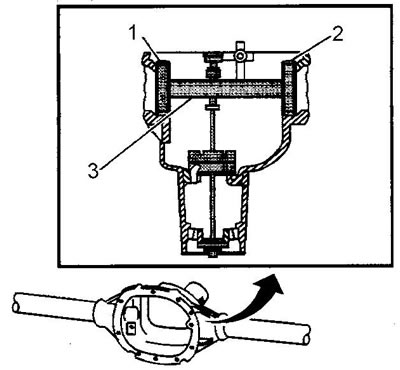
6. Install the second device into the gearbox housing as shown in the figure.


7. Install the differential side bearing caps.


8. Install the bearing cap mounting bolts. Tighten the bolts. Tightening torque 75 N·m.

9. Rotate the axle (3) in the disks (1) and (2). The axle should rotate freely in both directions. If there is no free rotation, dismantle the device and inspect all mounting places, eliminate any defects noticed (for example, skew). Reinstall the fixture.
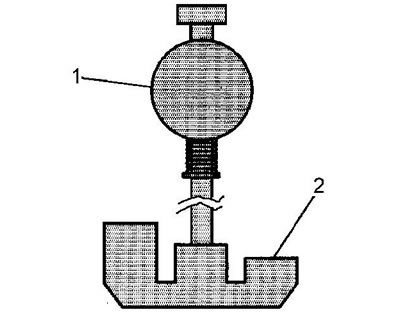
9. Rotate the axle (3) in the disks (1) and (2). The axle should rotate freely in both directions.…


10. Align the plunger of the axle (1) of the device with the measuring platform (2).

11. Install the dial indicator on the device axis as follows:
  • a) Loosely slide the indicator mounting clamp onto the axle.
  • b) Install the indicator contact pad onto the axle support post.
  • c) Create a preliminary indicator stroke of approximately three quarters of a turn of the arrow.
  • d) Tighten the indicator clamp.

12. Move the plunger of the axis back and forth and determine the place of greatest deviation of the indicator arrow.

13. At the point of maximum deviation, move the indicator so that the indicator arrow points to zero.

14. Move the plunger of the device axis to confirm that the indicator zero is set correctly.

15. Move the axle plunger away from the measuring platform.
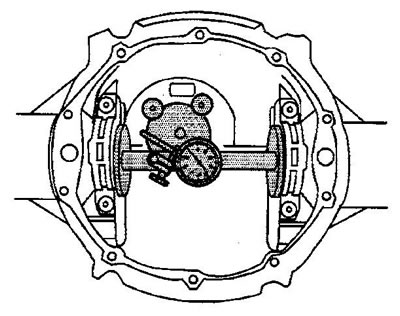


15. Move the axle plunger away from the measuring platform.


16. The value on the indicator now corresponds to the thickness of the drive gear adjusting washer.

17. Select the appropriate adjusting washer.

18. Remove the measuring devices.

19. Remove the pinion bearings.

20. Install the selected adjusting washer between the gear and the inner bearing.

The article was checked: Vladimir Romannikov
This article is available at russian, bulgarian, belarusian, ukrainian, serbian, croatian, romanian, polish, slovak, hungarian

Share information:

Previous articles
Tahoe 2 and 3: Rear drive axle
Next articles

Gearbox pinion bearings
Gearbox gears — removal and installation
Fork and seal of the drive gear of the reducer
Breather hose — removal and installation
Oil seals and axle bearing
Adjusting the side bearing preload
Adjusting the clearance in the engagement
Checking the configuration of the contact patch in the engagement of gear teeth
Locking differential — disassembly and assembly


See similar articles on the topic of Chevrolet cars:
Adjusting the position of the front seats Chevrolet Aveo T300 (2012-2018)
Adjusting the position of the steering wheel Chevrolet Captiva 1 (2006-2018)
Adjusting the position of the front seats Chevrolet Cruze 1 (2008-2016)
Adjusting the gearbox control drive Chevrolet Lacetti 1 (2002-2009)
Adjusting the gearbox control drive Chevrolet Lanos T150 (2002-2009)
Adjusting the bearings of the drive gear of the gearbox Chevrolet Niva 1 (2002-2016)
Gear Shift Lever Neutral Position Sensor Chevrolet Lumina 1 (1989-1994)
Link in different formats to this page


Visitor comments

No comments yet


How much will 47 + 30 =


Tahoe 2 and 3 (2000-2014) 
  • General information
  • Vehicle characteristics
  • Vehicle device
  • Manual
  • Maintenance
  • Power unit
  • Engine repair
  • Engine overhaul
  • Cooling system
  • Injection and control system
  • Exhaust system
  • Engine electrical equipment
  • Transmission
  • Automatic gearbox 4L60, 4L65, 4L70
  • Automatic gearbox 6L50, 6L80, 6L90
  • Transfer case
  • Drive shafts and cardan
  • Front drive axle
  • Rear drive axle
  • Chassis
  • Car suspension
  • Steering
  • Brake system
  • Body (until 2007)
  • Exterior (external elements)
  • Interior (internal elements)
  • Doors, locks and windows
  • Heating and air conditioning
  • Security System (SRS)
  • Body (since 2007)
  • Exterior (external elements)
  • Doors, locks and windows
  • Interior (internal elements)
  • Electrical equipment
  • Electrical appliances (until 2007)
  • Lighting and lamps (until 2007)
  • Audio system (until 2007)
  • Electrical appliances (since 2007)
  • Lighting and lamps (since 2007)
  • Audio system (since 2007)
  • Wiring diagrams (2000-2005)
  • Wiring diagrams (2005-2007)
  • Wiring diagrams (since 2007)


Tahoe 1 (1992-2000) 
  • General information
  • User manual
  • Maintenance
  • Power unit
  • Engine in a car
  • Engine removed
  • Cooling system
  • Heating and air conditioning
  • Fuel and exhaust systems
  • Decreased toxicity
  • Transmission
  • Manual gearbox
  • Automatic gearbox
  • Transfer case
  • Clutch and drive shafts
  • Chassis
  • Brake system
  • Car suspension
  • Steering
  • Body
  • Repair of body elements
  • Electrical equipment
  • Engine electrics
  • Equipment and devices
  • Electrical circuits


ChevyMan.ru © 2017-2026 · Mobile version · Feedback · Site search · Interesting to read · Sitemap: EN BG BY UA RS HR RO PL SK HU

Aveo 2003-2008 · Aveo 2006-2011 · Aveo 2012-2018 · Captiva 2006-2018 · Cruze 2008-2016 · Lacetti 2002-2009 · Lanos 2002-2009 · Niva 2002-2016 · Tahoe 1992-2000 · Tahoe 2000-2014 · Lumina 1 1989-1994 · Trailblazer 1 2001-2008 · Orlando 1 2010-2018 ·
🛡️ For your security and to improve our service, this site uses cookies. You can disable them in your browser.