
ChevyMan.ru
Mazda Mitsubishi Toyota Land Rover Honda Kia Nissan
English Русский
Български
Беларускі
Український
Српски
Hrvatski
Română
Polski
Slovenský
Magyar
|
Articles | Sitemap | Contacts |


Home   Aveo   Captiva   Cruze   Lacetti   Lanos   Niva   Tahoe   Others  
Aveo T300 (2012-2018) Aveo T250 (2006-2011) Aveo T200 (2003-2008)
  • Home
  • Aveo
  • T200 (2003-2008)
  • Chassis
  • Steering
  • Removal and installation the steering column

Removal and installation the steering column (Chevrolet Aveo T200)

            0

Contents: General description and operation of… ↧ Removal the steering wheel ↧ Removal the turn signal switch and… ↧ Removal the Windscreen Wiper/Washer… ↧ Removal the ignition switch and… ↧ Installation ↧
Remove the steering column only in the following cases:
  • the steering column needs replacing;
  • the steering and ignition lock housing needs to be replaced.

If you need to remove the steering wheel, be sure to use a puller.

Caution! The tilt steering column is not serviceable. If the tilt steering column is defective, the entire steering column must be replaced.


Before you begin removing the steering column, carefully read the information about airbags in the "Vehicle Passive Restraint System" section.

General description and operation of the system


The steering column consists of a steering shaft with cardan joints and a steering wheel. The tilt steering column is equipped with a spherical joint, allowing tilt adjustment. The steering column also contains controls:
  • central light and turn signal switch;
  • windshield wiper/washer switch;
  • ignition switch with control blocking, ignition key blocking and engine immobilizer receiver unit. Ignition and control blocking prevents the possibility of vehicle theft.

In addition to the control function, the steering column also provides, along with the airbag, a safety function, since in the event of a frontal collision it is crumpled and absorbs the impact energy, thereby ensuring the safety of the driver.

Removal the steering wheel


Caution: Always use a puller to remove the steering wheel. Do not attempt to remove it by force or impact.


1. Remove the airbag module from the steering wheel. See the "Vehicle Passive Restraint System" section.
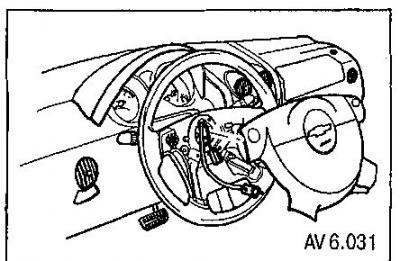
1. Remove the airbag module from the steering wheel. See the «Vehicle Passive Restraint System»…


2. Disconnect the airbag module connector.

3. Unscrew the steering wheel mounting nut.
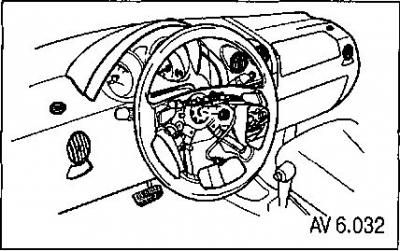
3. Unscrew the steering wheel mounting nut.


4. Remove the retaining clip.

Note: Before removing the steering wheel, mark the steering column shaft and the steering wheel where they connect to ensure proper alignment of the steering wheel when assembling and installing the steering column.


5. Using a puller, remove the steering wheel from the shaft.
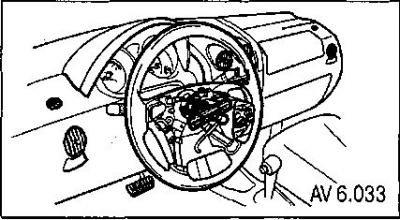
5. Using a puller, remove the steering wheel from the shaft.


6. If necessary, loosen the contact ring on the steering wheel.


Removal the turn signal switch and lever


7. Loosen the screws securing the lower cover of the steering column panel and remove the panel.

8. Remove the screws securing the steering column panel top cover and remove the panel.
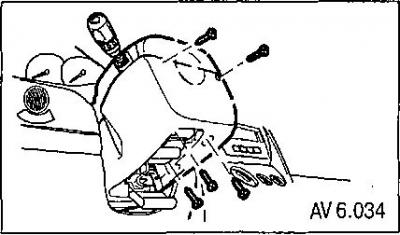
8. Remove the screws securing the steering column panel top cover and remove the panel.


9. Disconnect the horn and clock spring connectors.

10. Loosen the mounting screws and remove the clock spring from the steering column.
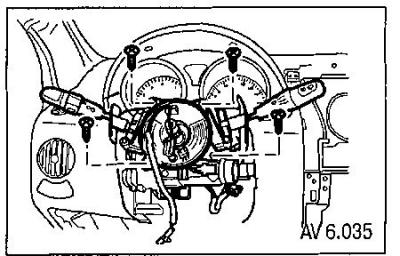
10. Loosen the mounting screws and remove the clock spring from the steering column.


11. Disconnect the switch electrical connectors.

12. Remove the central light and turn signal switch by pressing inward on the tabs on both sides of the housing.
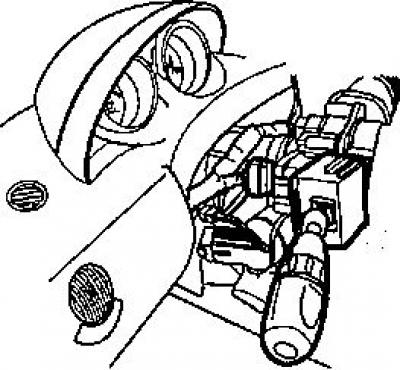
12. Remove the central light and turn signal switch by pressing inward on the tabs on both sides of…


Removal the Windscreen Wiper/Washer Switch
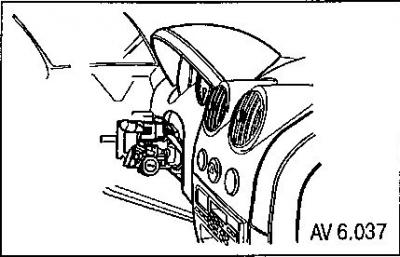


Removal the Windscreen Wiper/Washer Switch


13. Disconnect the switch electrical connectors.

14. Remove the windshield wiper switch by pressing inward on the tabs on both sides of the switch housing.

Removal the ignition switch and immobilizer control unit


15. Disconnect the electrical connector from the immobilizer control unit.
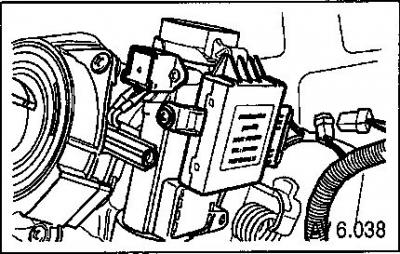
15. Disconnect the electrical connector from the immobilizer control unit.


16. Unscrew the mounting screws and remove the unit.
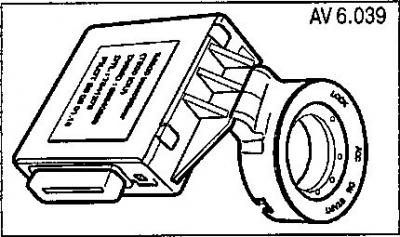
16. Unscrew the mounting screws and remove the unit.


17. After inserting the key into the ignition switch, turn it to the ACC position and remove the lock cylinder by pressing on the locking spring, for example using a screwdriver, and removing the cylinder.
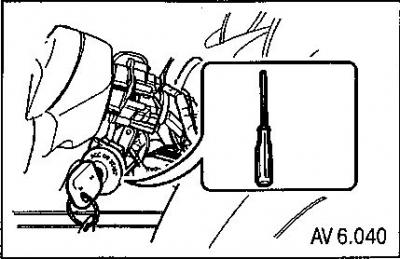


17. After inserting the key into the ignition switch, turn it to the ACC position and remove the…


18. Loosen the ignition switch locking screw.

19. Disconnect the wires and remove the ignition switch.

20. Remove the key lock solenoid mounting screws and pull out the solenoid. Be careful not to lose the key lock solenoid spring.
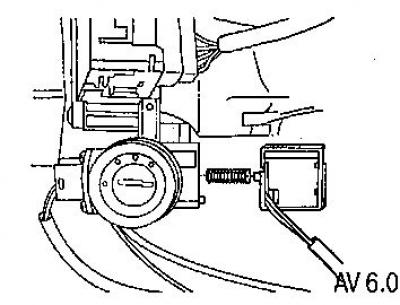
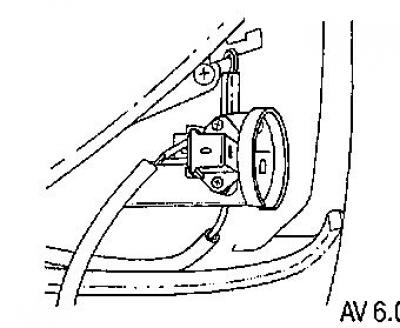
20. Remove the key lock solenoid mounting screws and pull out the solenoid. Be careful not to lose…


20. Remove the key lock solenoid mounting screws and pull out the solenoid. Be careful not to lose…


21. Loosen and remove the steering shaft clamp clamp screw.
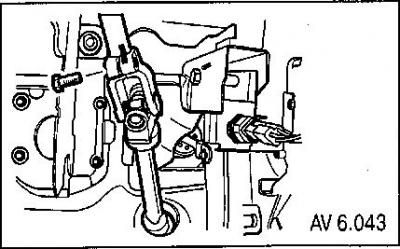
21. Loosen and remove the steering shaft clamp clamp screw.


22. Unscrew the steering column bracket mounting nuts.
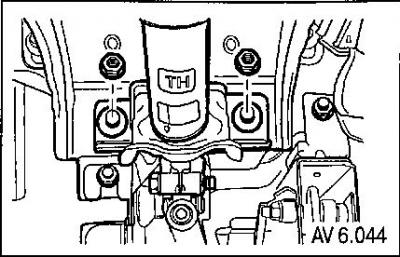


22. Unscrew the steering column bracket mounting nuts.


23. Carefully remove the steering column.

Installation


Installation is carried out in the reverse order of removal.

When assembling the steering shaft, lubricate its elements with lithium grease. Before installing the steering column, install a new steering shaft centering sleeve.
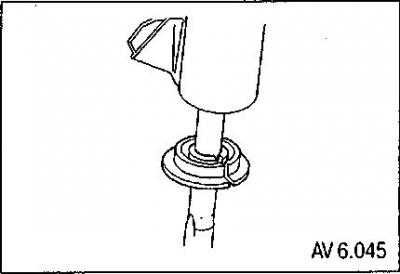
When assembling the steering shaft, lubricate its elements with lithium grease. Before installing…


Tighten the fasteners to the following torques:
  • steering shaft clamp clamping screw - 22 Nm;
  • steering column bracket mounting nuts - 22 Nm;
  • tilt adjustment lever screw - 4 Nm;
  • key lock solenoid mounting screws - 2 Nm;
  • ignition switch locking screw - 2 Nm;
  • ignition switch housing mounting screws - 4 Nm;
  • immobilizer control unit mounting screws - 2 Nm;
  • clock spring mounting screws - 3 Nm;
  • screws for fastening the upper and lower steering column covers - 3 Nm;
  • steering wheel mounting nut - 38 Nm;
  • airbag module mounting screws - 11 Nm.


(Original version of the article on the website «ChevyMan»)

The article was checked: Vladimir Romannikov
This article is available at russian, bulgarian, belarusian, ukrainian, serbian, croatian, romanian, polish, slovak, hungarian

Share information:

Previous articles
Aveo T200: Steering
Next articles

Removal and installation the hydraulic fluid reservoir
Removal and installation the power steering pump
Removal and installation the rack and pinion mechanism
Removal and installation the drive shaft-gear with the control valve
Replacing steering rods with internal ball joint


See similar articles on the topic of Chevrolet cars:
Diagnosing steering column faults Chevrolet Captiva 1 (2006-2018)
Removal and installation the steering column cover Chevrolet Cruze 1 (2008-2016)
Steering column switches, switches, headlight corrector, instrument lighting brightness adjustment Chevrolet Lacetti 1 (2002-2009)
Steering column switches Chevrolet Lanos T150 (2002-2009)
Steering column switches Chevrolet Niva 1 (2002-2016)
Steering column boot Chevrolet Tahoe 2 and 3 (2000-2014)
Removal and installation the steering column cover Chevrolet Lumina 1 (1989-1994)
Link in different formats to this page


Visitor comments

No comments yet


How much will 39 + 49 =


Aveo T300 (2012-2018) 
  • General information
  • Vehicle device
  • User manual
  • Main malfunctions
  • Maintenance
  • Power unit
  • Engine
  • Lubrication system
  • Cooling system
  • Supply system
  • Exhaust system
  • Transmission
  • Clutch
  • Manual gearbox
  • Automatic gearbox
  • Front wheel drives
  • Chassis
  • Front suspension
  • Rear suspension
  • Steering
  • Brake system
  • Body
  • Exterior
  • Interior
  • Doors and trunk
  • Security systems
  • Electrical equipment
  • Engine electrics
  • Equipment and devices
  • Heating and air conditioning
  • Electrical circuits


Aveo T250 (2006-2011) 
  • Manual
  • Driver's workplace
  • Salon equipment
  • Vehicle characteristics
  • Maintenance
  • Engine 1.5 SOHC
  • Engine repair
  • Fuel supply system
  • Control system
  • Cooling system
  • Engine 1.6 DOHC
  • Engine repair
  • Control system
  • Transmission
  • Clutch
  • Manual gearbox
  • Automatic gearbox
  • Wheel drive
  • Chassis
  • Wheel suspension
  • Steering
  • Brake system
  • Body
  • Exterior
  • Interior


Aveo T200 (2003-2008) 
  • General information
  • User manual
  • Power unit
  • Engine repair 1.5L SOHC
  • Fuel system
  • Control system
  • Cooling system
  • Transmission
  • Clutch
  • Manual gearbox
  • Automatic gearbox
  • Drive shafts
  • Chassis
  • Front suspension
  • Rear suspension
  • Steering
  • Brake system
  • Body
  • Exterior (external elements)
  • Interior (internal elements)
  • Electrical equipment
  • Equipment and devices
  • Electrical circuits


ChevyMan.ru © 2017-2026 · Mobile version · Feedback · Site search · Interesting to read · Sitemap: EN BG BY UA RS HR RO PL SK HU

Aveo 2003-2008 · Aveo 2006-2011 · Aveo 2012-2018 · Captiva 2006-2018 · Cruze 2008-2016 · Lacetti 2002-2009 · Lanos 2002-2009 · Niva 2002-2016 · Tahoe 1992-2000 · Tahoe 2000-2014 · Lumina 1 1989-1994 · Trailblazer 1 2001-2008 · Orlando 1 2010-2018 ·
🛡️ For your security and to improve our service, this site uses cookies. You can disable them in your browser.