
ChevyMan.ru
Mazda Mitsubishi Toyota Land Rover Honda Kia Nissan
English Русский
Български
Беларускі
Український
Српски
Hrvatski
Română
Polski
Slovenský
Magyar
|
Articles | Sitemap | Contacts |


Home   Aveo   Captiva   Cruze   Lacetti   Lanos   Niva   Tahoe   Others  
Aveo T300 (2012-2018) Aveo T250 (2006-2011) Aveo T200 (2003-2008)
  • Home
  • Aveo
  • T250 (2006-2011)
  • Engine 1.5 SOHC
  • Engine repair
  • Installing the cylinder head

Installing the cylinder head (Chevrolet Aveo T250)

            0

1. Apply a continuous bead of sealant 3 mm wide to the sealing surface of the camshaft housing.

2. Install the cylinder head gasket.

3. Install the cylinder head together with the intake and exhaust manifolds.

4. Install the camshaft housing assembly.

5. Install the head cover screws in the sequence shown in the figure.

6. Tighten the cylinder head bolts in the sequence shown in the figure to a torque of 25 Nm.
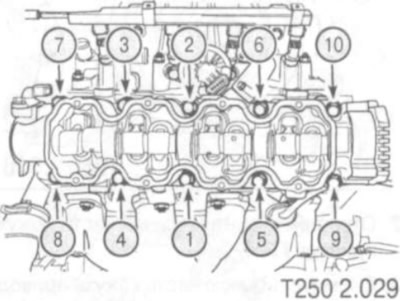
6. Tighten the cylinder head bolts in the sequence shown in the figure to a torque of 25 Nm.


7. Tighten the cylinder head bolts to an angle of 70°.

8. Tighten the cylinder head bolts to an angle of 30°
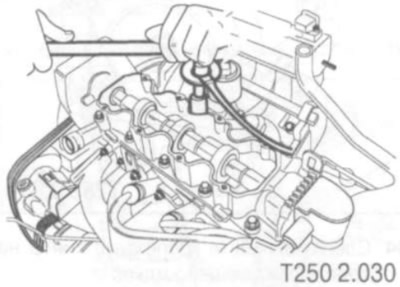
8. Tighten the cylinder head bolts to an angle of 30°


9. Connect the accelerator cable to the throttle body and intake manifold.
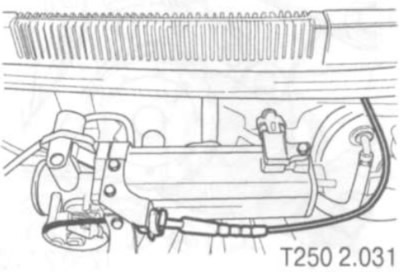
9. Connect the accelerator cable to the throttle body and intake manifold.


10. Install and tighten the intake manifold support bracket mounting screws to 25 Nm.


11. Connect the coolant hose from the expansion tank to the throttle body.

12. Connect the heater delivery hose to the coolant distributor

13. Install the catalytic converter retaining nuts on the exhaust manifold flange. Tighten the additional catalytic converter-to-exhaust manifold fastening nuts to 40 Nm.

14. Connect the front oxygen sensor electrical connector.

15. Install the timing belt cover rear part screws and tighten them to 10 Nm.

Caution: Use extreme caution to avoid scratching, gouging or otherwise damaging the camshaft. Such damage may impair the performance of the vehicle.


16. Install the camshaft timing pulley.

17. Tighten the camshaft timing pulley screw to 45 Nm.

18. Connect the crankcase ventilation tube to the camshaft housing.

19. Align the mark on the camshaft sprocket with the mark on the top of the rear of the timing case.

20. Align the mark on the crankshaft timing pulley with the mark on the bottom of the timing belt cover.

21. Install the timing belt.

22. Check the timing belt tension.

23. Tighten the timing belt cover lower part screws to 10 Nm.
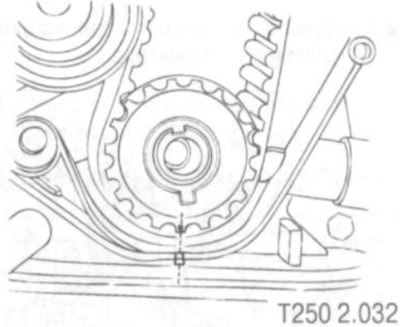
23. Tighten the timing belt cover lower part screws to 10 Nm.


24. Install the crankshaft pulley.


25. Tighten the crankshaft pulley bolts to 95 Nm.

26. Tighten the pulley mounting screws another 30° + 15°.

27. Connect the vacuum hoses and electrical connectors.

28. Connect the brake booster hose to the intake manifold.

29. Connect the upper radiator hose to the thermostat housing.

30. Install the generator bracket.

31. Tighten the generator bracket mounting nut to 25 Nm.

32. Install the generator nut without tightening.

33. Connect the fuel supply line to the fuel rail.

34. Install the additional accessory drive belt.

35. Tighten the timing belt cover upper part screws to 10 Nm.

36. If necessary, install the air conditioning compressor belt.

37. Install the right front wheel mudguard.

38. Install the right front wheel.

39. Install the air filter housing.

40. Install the air filter housing by tightening the air filter housing screws to a torque of 8 Nm.

41. Connect the air duct to the throttle body.

42. Connect the ventilation tube to the timing cover.

43. Connect the supply air temperature sensor connector.

44. Install the CMR sensor.

45. Connect the coolant temperature sensor.

46. Connect the supply air temperature sensor connector valve.

47. Connect the TP sensor connector.

48. Connect the ignition coil connector of the ignition system.

49. Connect the connectors of the wiring harness of the distributed fuel injection system (DFIS).

50. Connect the oxygen sensor connector.

51. Connect the ECM ground terminal to the intake manifold.

52. Connect the negative battery cable.

53. Install the fuel pump fuse.

54. Fill the engine cooling system.

The article was checked: Vladimir Romannikov
This article is available at russian, bulgarian, belarusian, ukrainian, serbian, croatian, romanian, polish, slovak, hungarian

Share information:

Previous articles
Aveo T250: Engine repair
Next articles

Cleaning the cylinder head
Removal the cylinder head
Removal and installation the valve cover
Maintenance and repair
Cylinder Block Parts
Removal the camshaft
Installing the camshaft
Checking and adjusting the tension of the timing belt
Removal the timing belt
Installing the timing belt


See similar articles on the topic of Chevrolet cars:
Cylinder head cover Chevrolet Captiva 1 (2006-2018)
Replacing the cylinder head gasket Chevrolet Cruze 1 (2008-2016)
Replacing the cylinder head cover gasket Chevrolet Lacetti 1 (2002-2009)
Replacing the cylinder head cover gasket Chevrolet Lanos T150 (2002-2009)
Cylinder head and valve mechanism Chevrolet Niva 1 (2002-2016)
Cylinder Head Cover — Removal and Installation Chevrolet Tahoe 1 (1992-2000)
Removal and installation the cylinder head Chevrolet Lumina 1 (1989-1994)
Link in different formats to this page


Visitor comments

No comments yet


How much will 47 + 44 =


Aveo T300 (2012-2018) 
  • General information
  • Vehicle device
  • User manual
  • Main malfunctions
  • Maintenance
  • Power unit
  • Engine
  • Lubrication system
  • Cooling system
  • Supply system
  • Exhaust system
  • Transmission
  • Clutch
  • Manual gearbox
  • Automatic gearbox
  • Front wheel drives
  • Chassis
  • Front suspension
  • Rear suspension
  • Steering
  • Brake system
  • Body
  • Exterior
  • Interior
  • Doors and trunk
  • Security systems
  • Electrical equipment
  • Engine electrics
  • Equipment and devices
  • Heating and air conditioning
  • Electrical circuits


Aveo T250 (2006-2011) 
  • Manual
  • Driver's workplace
  • Salon equipment
  • Vehicle characteristics
  • Maintenance
  • Engine 1.5 SOHC
  • Engine repair
  • Fuel supply system
  • Control system
  • Cooling system
  • Engine 1.6 DOHC
  • Engine repair
  • Control system
  • Transmission
  • Clutch
  • Manual gearbox
  • Automatic gearbox
  • Wheel drive
  • Chassis
  • Wheel suspension
  • Steering
  • Brake system
  • Body
  • Exterior
  • Interior


Aveo T200 (2003-2008) 
  • General information
  • User manual
  • Power unit
  • Engine repair 1.5L SOHC
  • Fuel system
  • Control system
  • Cooling system
  • Transmission
  • Clutch
  • Manual gearbox
  • Automatic gearbox
  • Drive shafts
  • Chassis
  • Front suspension
  • Rear suspension
  • Steering
  • Brake system
  • Body
  • Exterior (external elements)
  • Interior (internal elements)
  • Electrical equipment
  • Equipment and devices
  • Electrical circuits


ChevyMan.ru © 2017-2026 · Mobile version · Feedback · Site search · Interesting to read · Sitemap: EN BG BY UA RS HR RO PL SK HU

Aveo 2003-2008 · Aveo 2006-2011 · Aveo 2012-2018 · Captiva 2006-2018 · Cruze 2008-2016 · Lacetti 2002-2009 · Lanos 2002-2009 · Niva 2002-2016 · Tahoe 1992-2000 · Tahoe 2000-2014 · Lumina 1 1989-1994 · Trailblazer 1 2001-2008 · Orlando 1 2010-2018 ·
🛡️ For your security and to improve our service, this site uses cookies. You can disable them in your browser.