ChevyMan.ru
Mazda Mitsubishi Toyota Land Rover Honda Kia Nissan
English Русский
Български
Беларускі
Український
Српски
Hrvatski
Română
Polski
Slovenský
Magyar
|
Articles | Sitemap | Contacts |


Home   Aveo   Captiva   Cruze   Lacetti   Lanos   Niva   Tahoe   Others  
Tahoe 2 and 3 (2000-2014) Tahoe 1 (1992-2000)
  • Home
  • Tahoe
  • 2 (2000-2014)
  • General information
  • Manual
  • Tire pressure monitoring system

Tire pressure monitoring system (Chevrolet Tahoe 2)

            0

Each wheel valve has a built-in pressure sensor that continuously measures the tire pressure and sends a corresponding signal to the tire pressure monitoring system receiver. The pressure value of each tire can be viewed via the multi-function display (see section "Multifunctional display (dIC system)").

1. If a message appears on the multifunction display "CHECK TIRE PRESSURE" and the low tire pressure indicator, this indicates a drop in pressure or a puncture in one of the tires. In this case, it is necessary, avoiding sudden braking, to stop and bring the tire pressure to normal or replace the punctured wheel.

Note:
  • Driving with low tire pressure can result in tire failure, increased fuel consumption and poor handling.
  • If a tire is punctured, do not use sealant to repair the tire as it may damage the pressure sensor.
  • The tire pressure monitoring system does not replace the driver, so check the condition and pressure of your tires regularly.
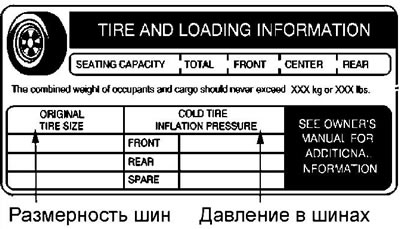
  • The recommended tire pressure values according to tire size are indicated on the plate located on the driver's door pillar.
  • The low tire pressure indicator may not come on when the tire is flat or may come on when the tire pressure is normal under the following conditions:
  • If the car is in a strong electromagnetic field.
  • If the radio receiver operates at a frequency close to the frequency of the pressure sensor signals.
  • If the car is heavily snowed in, either the wheels are in deep snow, or the tire valve is covered with ice or snow.
  • If the installed tires are not equipped with pressure sensors.
  • If the vehicle is equipped with studded tires, tires with anti-skid chains.
  • If the pressure sensor battery is discharged.
  • If you use a spare tire.


If you use a spare tire.


2. Each pressure sensor has its own unique identification code. Each time the wheels are rotated or the pressure sensors are replaced, the sensors must be programmed in accordance with the position of the wheels. The sensors are programmed in the following order: front left wheel, front right wheel, rear right wheel, rear left wheel.


Note: programming all sensors should take no more than five minutes (of which the first minute is for programming the first sensor). Otherwise, the sensor programming procedure will have to be started from the beginning.


3. The procedure for programming sensors is performed as follows:

a) Apply the parking brake.

b) Turn the ignition key to the "ON" position (engine off).

c) Turn the headlight switch from the "OFF" position to the "ON" position four times within three seconds. The horn should then sound twice and the low tire pressure indicator should start flashing, indicating that the tire pressure sensors have started to install.

Note: The low tire pressure indicator will continue to flash until the sensor programming process is complete.


d) Start the programming operation of the pressure sensor for the front left wheel.
  • Remove the cap from the tire valve.
  • Activate the pressure sensor by increasing or decreasing the tire pressure for ten seconds (after 10 seconds, a sound signal should be heard). An audible signal will sound for 15 seconds indicating that the pressure sensor programming procedure has been completed successfully and the sensor identification code has been assigned to the given tire and wheel position.

Note:
  • If the sound signal does not sound within 15 seconds, the pressure sensor programming procedure was performed incorrectly and must be started over (from step "a").
  • The outer part of the tire valve cap can be used to release pressure.


d) Perform the programming operation for the pressure sensor for the front right wheel as described in paragraph "d".


e) Perform the programming operation for the pressure sensor for the rear right wheel as described in paragraph "d".

g) Perform the programming operation for the pressure sensor for the rear left wheel as described in paragraph "d".

c) After completing the programming operation of the pressure sensor for the rear left wheel (after the buzzer stops sounding) check that the low tire pressure indicator continues to flash. If the indicator continues to flash, turn the ignition off (LOCK position).

i) Inflate the tires to the correct pressure.

c) Install the caps on the wheel nipples.

4. If the message appears on the multifunction display "SERVICE TIRE MONITOR", this indicates a fault in the system. In this case, contact your dealer.

[The article was reprinted from the website: chevyman]

The article was checked: Vladimir Romannikov
This article is available at russian, bulgarian, belarusian, ukrainian, serbian, croatian, romanian, polish, slovak, hungarian

Share information:

Previous articles
Tahoe 2 and 3: Manual
Next articles

StabiliTrak stability control system
Traction Control System (TAS) (Chevrolet Tahoe)
Anti-lock braking system (ABS)
Automatic Variable Shock Absorber System (RSS)
Driving a car with automatic transmission
Features of the transmission of 4WD models
Rear Wheel Steering (WS) System
Tips for driving in different conditions
Towing a car
Towing a trailer


See similar articles on the topic of Chevrolet cars:
Tire pressure and technical fluids Chevrolet Aveo T300 (2012-2018)
Relieving pressure in the fuel supply system Chevrolet Captiva 1 (2006-2018)
Checking the pressure in the fuel system Chevrolet Cruze 1 (2008-2016)
Bleeding the hydraulic brake system Chevrolet Lacetti 1 (2002-2009)
Checking the pressure in the engine fuel system Chevrolet Lanos T150 (2002-2009)
Electronic anti-theft system Chevrolet Niva 1 (2002-2016)
Check tire condition and pressure (every 250 miles or weekly) Chevrolet Lumina 1 (1989-1994)
Link in different formats to this page


Visitor comments

No comments yet


How much will 29 + 43 =


Tahoe 2 and 3 (2000-2014) 
  • General information
  • Vehicle characteristics
  • Vehicle device
  • Manual
  • Maintenance
  • Power unit
  • Engine repair
  • Engine overhaul
  • Cooling system
  • Injection and control system
  • Exhaust system
  • Engine electrical equipment
  • Transmission
  • Automatic gearbox 4L60, 4L65, 4L70
  • Automatic gearbox 6L50, 6L80, 6L90
  • Transfer case
  • Drive shafts and cardan
  • Front drive axle
  • Rear drive axle
  • Chassis
  • Car suspension
  • Steering
  • Brake system
  • Body (until 2007)
  • Exterior (external elements)
  • Interior (internal elements)
  • Doors, locks and windows
  • Heating and air conditioning
  • Security System (SRS)
  • Body (since 2007)
  • Exterior (external elements)
  • Doors, locks and windows
  • Interior (internal elements)
  • Electrical equipment
  • Electrical appliances (until 2007)
  • Lighting and lamps (until 2007)
  • Audio system (until 2007)
  • Electrical appliances (since 2007)
  • Lighting and lamps (since 2007)
  • Audio system (since 2007)
  • Wiring diagrams (2000-2005)
  • Wiring diagrams (2005-2007)
  • Wiring diagrams (since 2007)


Tahoe 1 (1992-2000) 
  • General information
  • User manual
  • Maintenance
  • Power unit
  • Engine in a car
  • Engine removed
  • Cooling system
  • Heating and air conditioning
  • Fuel and exhaust systems
  • Decreased toxicity
  • Transmission
  • Manual gearbox
  • Automatic gearbox
  • Transfer case
  • Clutch and drive shafts
  • Chassis
  • Brake system
  • Car suspension
  • Steering
  • Body
  • Repair of body elements
  • Electrical equipment
  • Engine electrics
  • Equipment and devices
  • Electrical circuits


ChevyMan.ru © 2017-2026 · Mobile version · Feedback · Site search · Interesting to read · Sitemap: EN BG BY UA RS HR RO PL SK HU

Aveo 2003-2008 · Aveo 2006-2011 · Aveo 2012-2018 · Captiva 2006-2018 · Cruze 2008-2016 · Lacetti 2002-2009 · Lanos 2002-2009 · Niva 2002-2016 · Tahoe 1992-2000 · Tahoe 2000-2014 · Lumina 1 1989-1994 · Trailblazer 1 2001-2008 · Orlando 1 2010-2018 ·
🛡️ For your security and to improve our service, this site uses cookies. You can disable them in your browser.