
ChevyMan.ru
Mazda Mitsubishi Toyota Land Rover Honda Kia Nissan
English Русский
Български
Беларускі
Український
Српски
Hrvatski
Română
Polski
Slovenský
Magyar
|
Articles | Sitemap | Contacts |


Home   Aveo   Captiva   Cruze   Lacetti   Lanos   Niva   Tahoe   Others  
Tahoe 2 and 3 (2000-2014) Tahoe 1 (1992-2000)
  • Home
  • Tahoe
  • 2 (2000-2014)
  • Chassis
  • Brake system
  • Hydraulic brake booster

Hydraulic brake booster (Chevrolet Tahoe 2)

            0

Contents: Examination ↧ Removal and installation ↧

Examination


Caution: The hydraulic booster may appear wet due to excess fluid when installed at the factory or due to brake fluid spillage when filling the system. Check for leaks before deciding to replace the booster.


Note: The hydraulic brake system uses two different and incompatible fluids. The hydraulic brake booster uses power steering fluid. The rest of the system uses brake fluid. Do not mix the fluids when servicing.


1. Check the condition of the working fluid in the power steering system, adjust the fluid level if necessary.

2. Clean the amplifier parts:
  • body near the fittings (3) and the fittings;
  • place (2) of installation on the brake master cylinder booster;
  • end cap;
  • place (1) for installing the amplifier on the end cap.
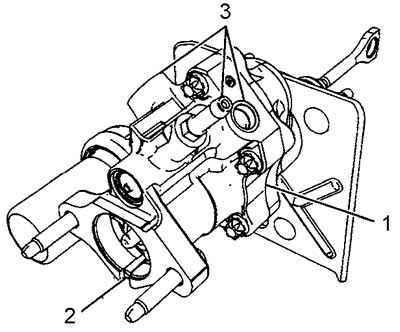
place (1) for installing the amplifier on the end cap.


Note: To properly diagnose leaks, you may need the assistance of an assistant.


3. Start the engine and warm up the power steering fluid to operating temperature.

4. With the engine idling, slowly press the pedal until the pressure relief valve of the power steering pump operates (a hissing sound occurs). Hold the pedal in this position for approximately two seconds and release the brake pedal.


5. Let the engine idle for 15 seconds without pressing the brake pedal.

6. Repeat steps 4 and 5 four more times.

7. With the engine idling, turn the steering wheel from lock to lock four times, holding the wheel at each lock for 2 seconds.

Caution: Do not hold the steering wheel on the stop for more than three seconds, otherwise the working fluid may overheat.


8. Bring the engine to about 1000 rpm and turn the steering wheel from lock to lock six times at a rate of one revolution per second. Do not hold the steering wheel at the lock.

9. Let the engine idle for 30 seconds without pressing the brake pedal.

10. With the engine idling, press the brake pedal until the power steering pump relief valve operates, hold the pedal for one second and release the pedal. _

11. Repeat steps 7-10 four times.

12. Let the engine idle and turn it off after 30 seconds.

13. Inspect the hydraulic booster, look for leaks.

Attention:
  • On low mileage vehicles, a light film of liquid may form between the booster and the end cap. If a drip leak occurs, replace the booster.
  • A leak between the brake booster and the brake master cylinder is not acceptable. If there is fluid at the connector, determine the type of fluid. If it is power steering fluid, replace the brake booster. If it is brake fluid, there is a problem with the brake master cylinder.


Removal and installation


1. Apply the parking brake and block the wheels.

2. Disconnect the inlet hose, steering gear hose and return hose from the brake booster.

3. Loosen the nuts securing the brake cylinder to the booster and move the master cylinder to the side.


Caution: Do not disconnect the brake pipes from the master cylinder.


4. Remove the brake light switch.

5. Unscrew the four nuts securing the amplifier to the engine compartment bulkhead. Tightening torque 33 N·m.
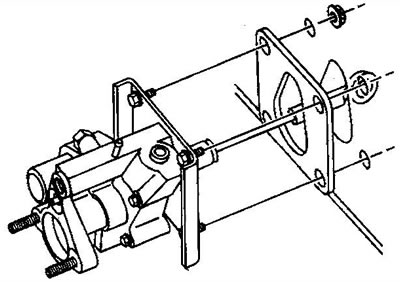
5. Unscrew the four nuts securing the amplifier to the engine compartment bulkhead. Tightening…


6. Remove the amplifier.

7. Remove the amplifier gasket.

8. Installation in reverse order.

9. After installation, bleed the power steering system.

The article was checked: Vladimir Romannikov
This article is available at russian, bulgarian, belarusian, ukrainian, serbian, croatian, romanian, polish, slovak, hungarian

Share information:

Previous articles
Tahoe 2 and 3: Brake system
Next articles

Brake booster check valve and hose
Vacuum brake booster
Brake pedal — removal and installation
Brake fluid level sensor
Master brake cylinder
Hydraulic brake booster accumulator
Brake pipes — replacement
Front Brake Brake Hose
Frame and rear axle brake hose
Rear Brake Brake Hose


See similar articles on the topic of Chevrolet cars:
Checking the operation of the brake booster Chevrolet Aveo T300 (2012-2018)
Diagnostics of the hydraulic brake system Chevrolet Captiva 1 (2006-2018)
Checking the tightness of the hydraulic brake drive Chevrolet Cruze 1 (2008-2016)
Checking the fluid level in the brake and clutch hydraulic reservoir Chevrolet Lacetti 1 (2002-2009)
Replacing fluid in hydraulic brake and clutch drives Chevrolet Lanos T150 (2002-2009)
Vacuum brake booster Chevrolet Niva 1 (2002-2016)
Checking, removing and installing the brake booster Chevrolet Lumina 1 (1989-1994)
Link in different formats to this page


Visitor comments

No comments yet


How much will 14 + 14 =


Tahoe 2 and 3 (2000-2014) 
  • General information
  • Vehicle characteristics
  • Vehicle device
  • Manual
  • Maintenance
  • Power unit
  • Engine repair
  • Engine overhaul
  • Cooling system
  • Injection and control system
  • Exhaust system
  • Engine electrical equipment
  • Transmission
  • Automatic gearbox 4L60, 4L65, 4L70
  • Automatic gearbox 6L50, 6L80, 6L90
  • Transfer case
  • Drive shafts and cardan
  • Front drive axle
  • Rear drive axle
  • Chassis
  • Car suspension
  • Steering
  • Brake system
  • Body (until 2007)
  • Exterior (external elements)
  • Interior (internal elements)
  • Doors, locks and windows
  • Heating and air conditioning
  • Security System (SRS)
  • Body (since 2007)
  • Exterior (external elements)
  • Doors, locks and windows
  • Interior (internal elements)
  • Electrical equipment
  • Electrical appliances (until 2007)
  • Lighting and lamps (until 2007)
  • Audio system (until 2007)
  • Electrical appliances (since 2007)
  • Lighting and lamps (since 2007)
  • Audio system (since 2007)
  • Wiring diagrams (2000-2005)
  • Wiring diagrams (2005-2007)
  • Wiring diagrams (since 2007)


Tahoe 1 (1992-2000) 
  • General information
  • User manual
  • Maintenance
  • Power unit
  • Engine in a car
  • Engine removed
  • Cooling system
  • Heating and air conditioning
  • Fuel and exhaust systems
  • Decreased toxicity
  • Transmission
  • Manual gearbox
  • Automatic gearbox
  • Transfer case
  • Clutch and drive shafts
  • Chassis
  • Brake system
  • Car suspension
  • Steering
  • Body
  • Repair of body elements
  • Electrical equipment
  • Engine electrics
  • Equipment and devices
  • Electrical circuits


ChevyMan.ru © 2017-2026 · Mobile version · Feedback · Site search · Interesting to read · Sitemap: EN BG BY UA RS HR RO PL SK HU

Aveo 2003-2008 · Aveo 2006-2011 · Aveo 2012-2018 · Captiva 2006-2018 · Cruze 2008-2016 · Lacetti 2002-2009 · Lanos 2002-2009 · Niva 2002-2016 · Tahoe 1992-2000 · Tahoe 2000-2014 · Lumina 1 1989-1994 · Trailblazer 1 2001-2008 · Orlando 1 2010-2018 ·
🛡️ For your security and to improve our service, this site uses cookies. You can disable them in your browser.